The MTA and its dependencies
The Hub installs the chosen package and everything it needs to run. For MailerQ, it takes into account what the cluster already has.

Installing PowerMTA and MailerQ on a VPS/VDS
PowerMTA or MailerQ on your own server: the Hub checks the server, installs everything it needs and takes the server under its management.
You see it all in the task console: the steps, the commands, their output — and the reason, if the installation stops.
01 / What the installation gives you
The result is an installed PowerMTA or MailerQ with base settings, checked services and a connection to the Hub. The summary and the installation log are kept on the server's card.
The Hub installs the chosen package and everything it needs to run. For MailerQ, it takes into account what the cluster already has.
The Hub sets up services, start at boot, permissions and logs itself — it is part of the installation.
The server appears in monitoring. The Hub gets management access and makes sure the MTA is running.
The commands, their output and the result of each step are still there after the installation ends.
Sending addresses, DNS, DKIM and SMTP settings are the next step after installing the MTA. Then you can start warm-up.
What comes next02 / PowerMTA and MailerQ
PowerMTA and MailerQ are built differently: PowerMTA installs as a single package, while MailerQ comes with a PostgreSQL database and a RabbitMQ broker. The Hub shows the steps for the chosen MTA and carries them out itself.
Installed on the server you choose: the package, everything it needs to run, the services and base settings, so you can manage it from the Hub.
MailerQ works together with a PostgreSQL database and a RabbitMQ message broker. You can install them all on the first server, or connect a new server to a cluster that is already running.
Three components on one server
The database and broker stay on the existing node
03 / Server requirements
Prepare the server and access details. Before installing, the Hub checks the server, shows warnings, and stops if it finds a problem that makes installation impossible.
The Hub checks whether your server fits.
04 / Installation console
The console shows the commands and the server's responses as they happen. If the installation stops, the log shows at which step and why.
You can close the tab. The installation will carry on, and the log will be saved on the server's card.
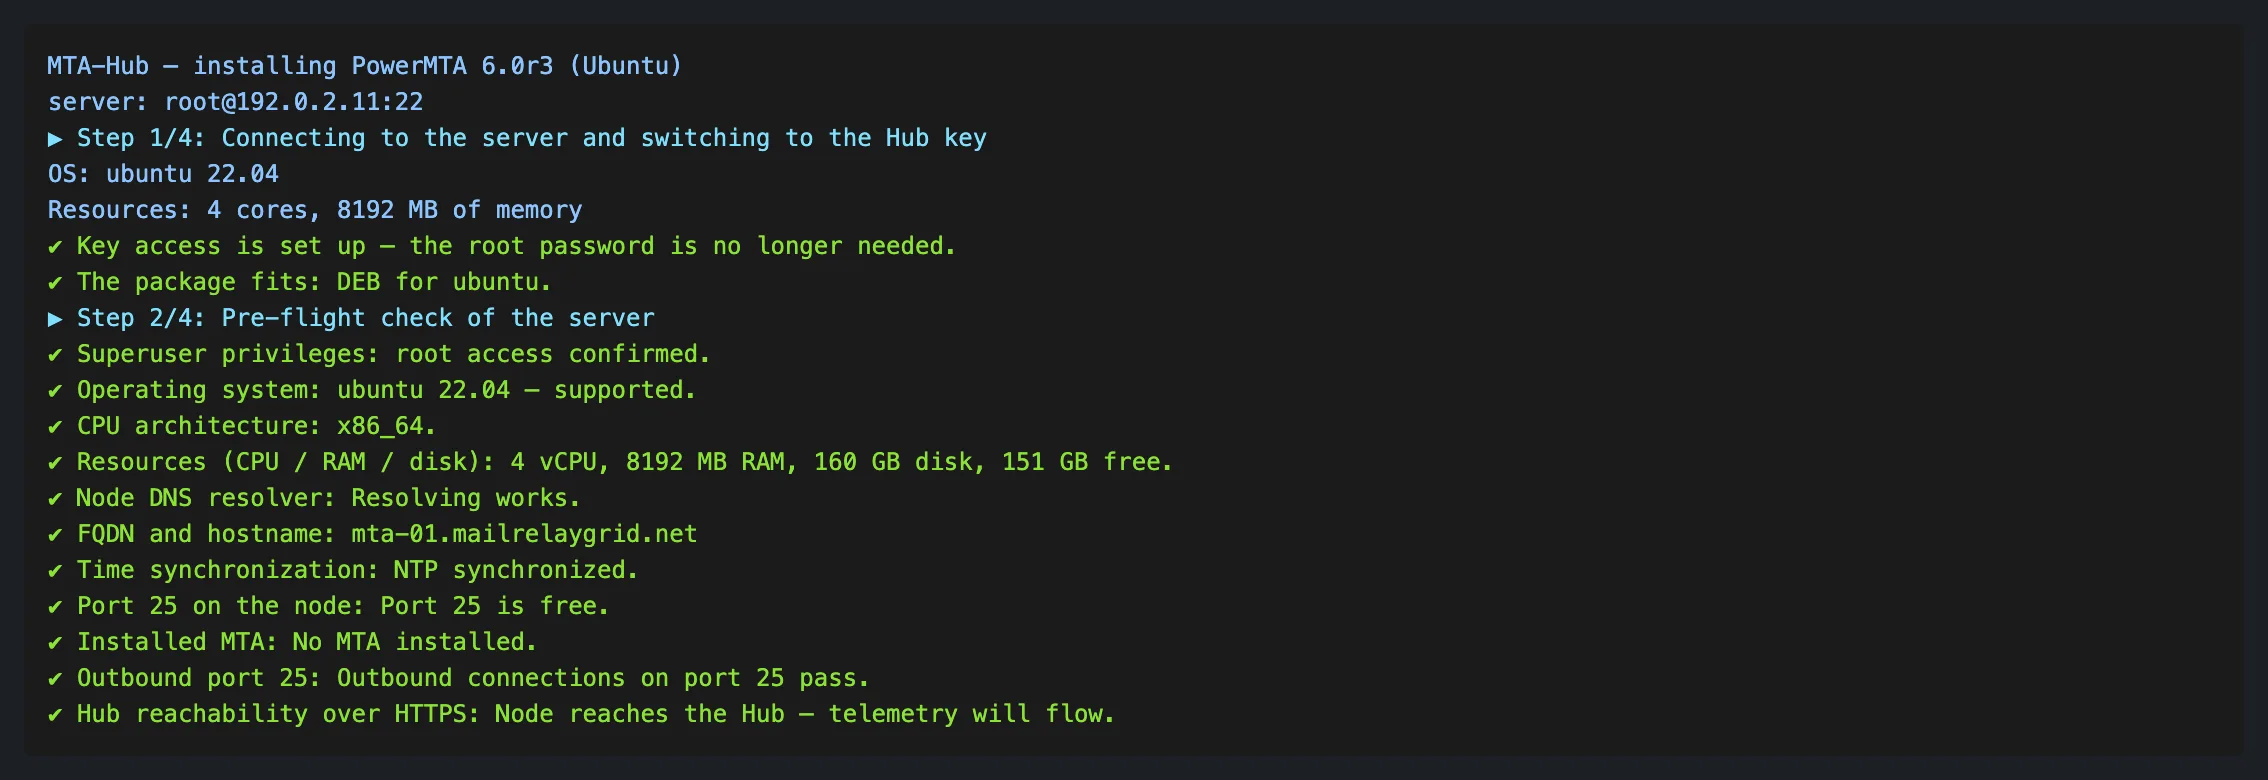 Enlarge
Every check shows its result. Commands and notes are highlighted in color.
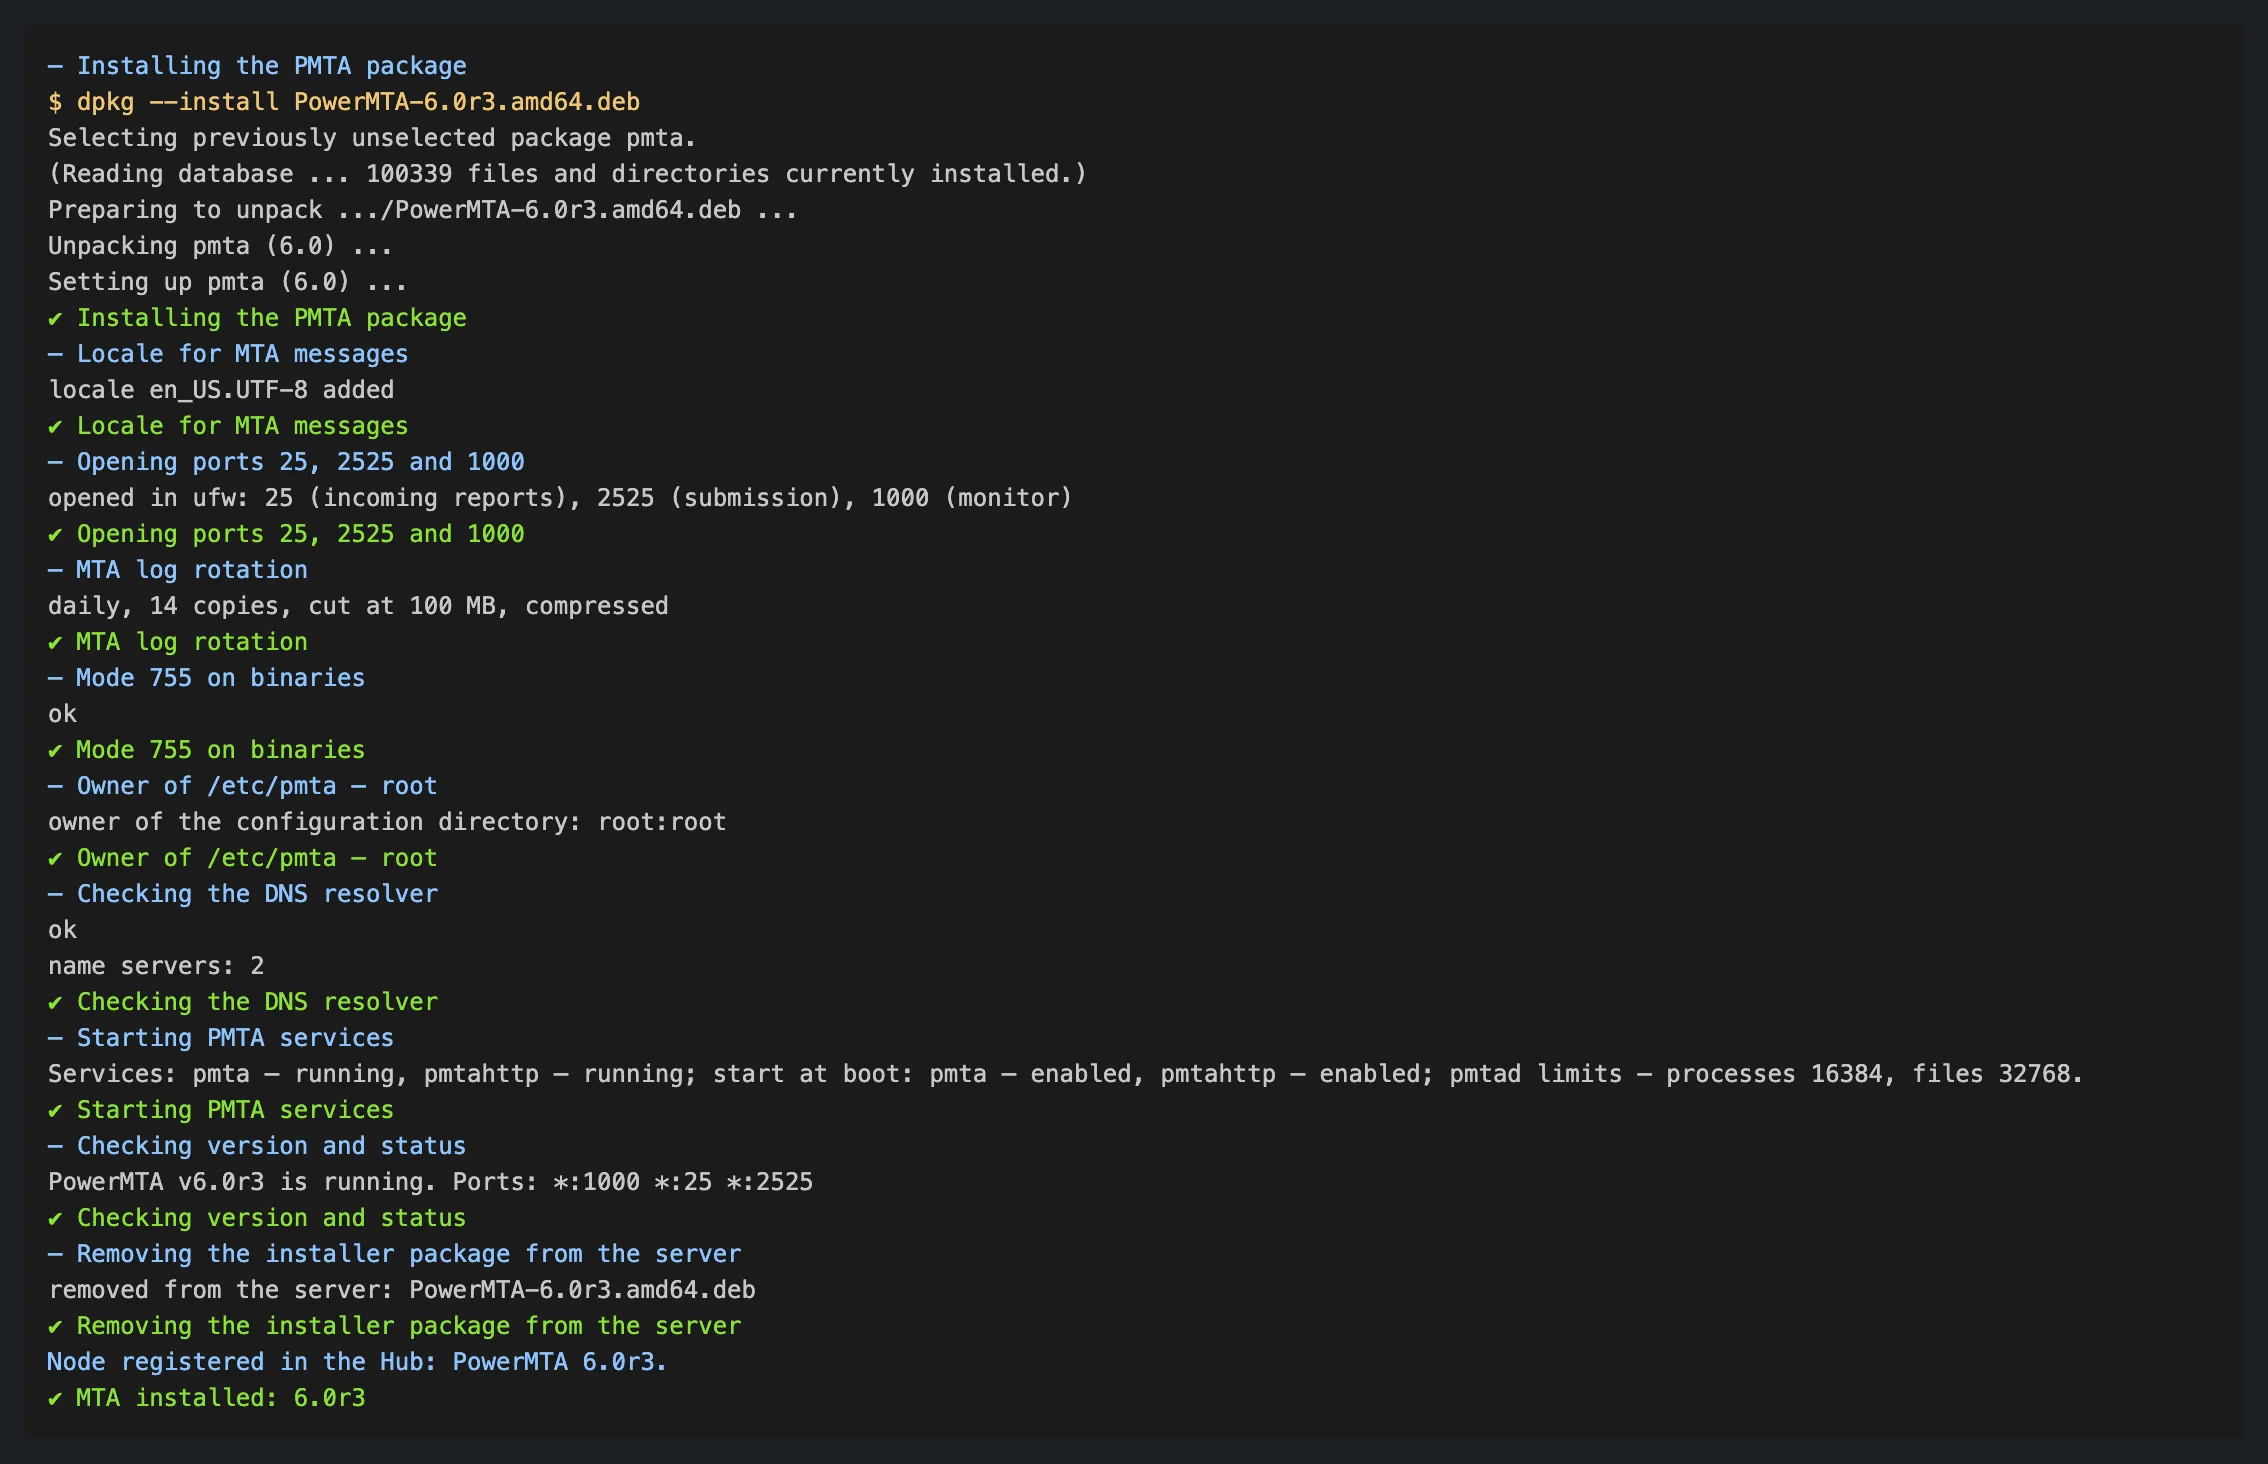 Enlarge
The installation runs step by step: the package, services, checks and removal of the installation files.
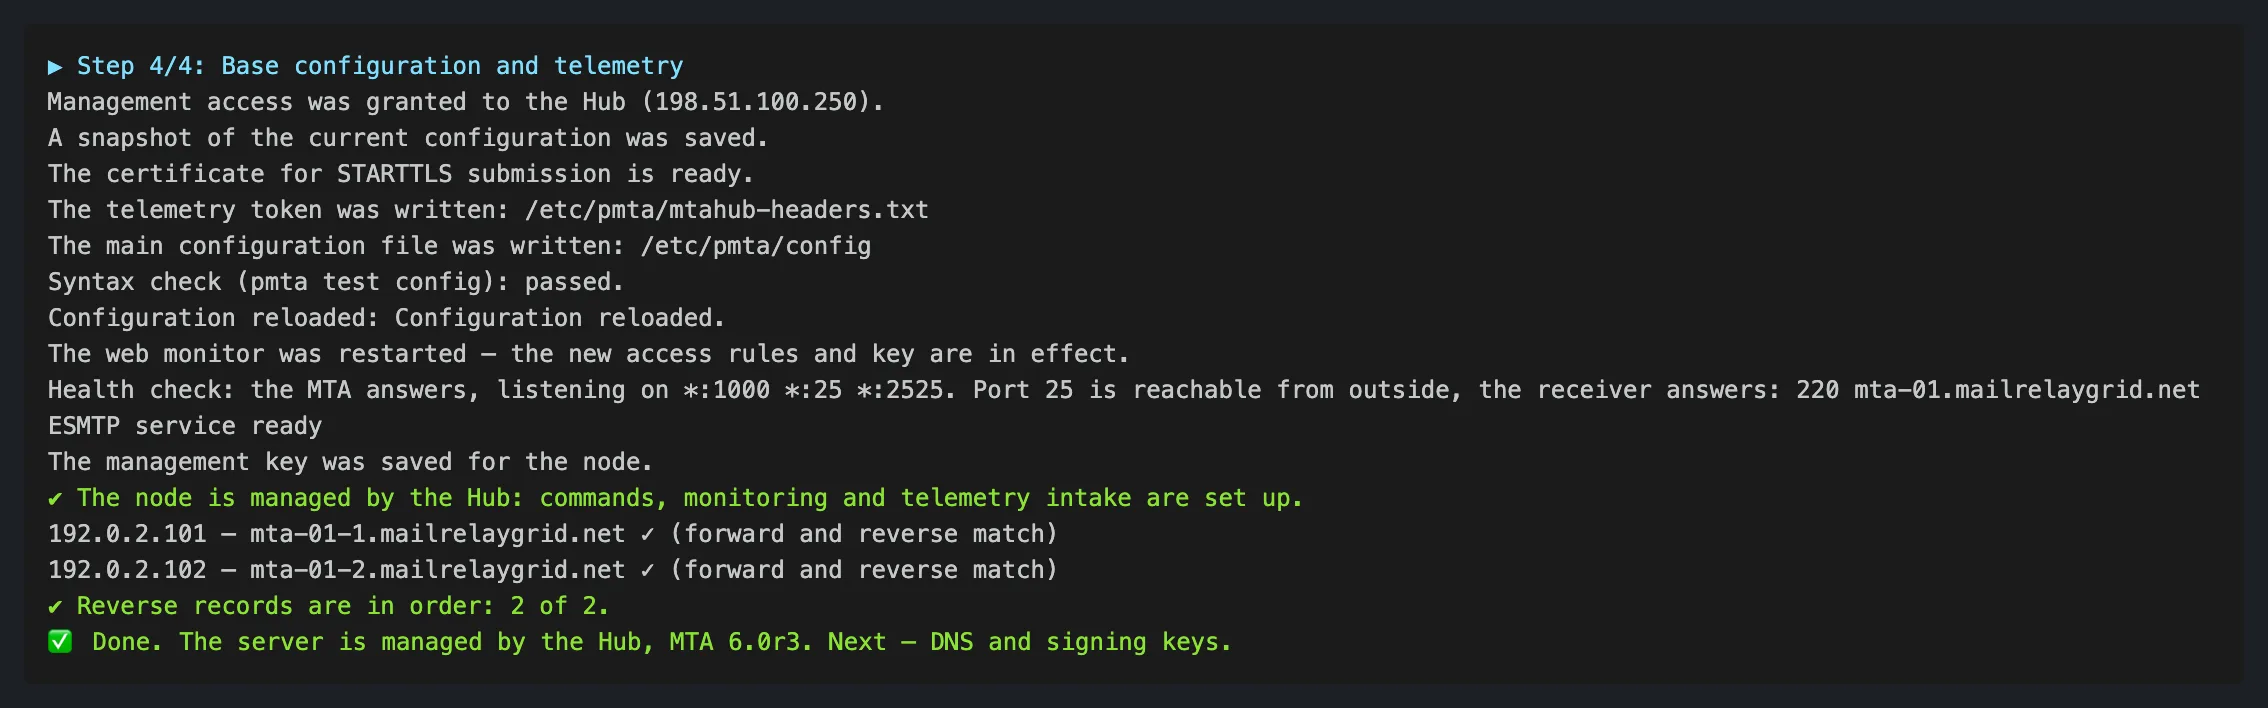 Enlarge
Once the settings and services are checked, the server comes under the Hub's management. Next — DNS and signing keys.
05 / The interface in detail
28 real screens: installing PowerMTA, creating a MailerQ cluster, installing on a server that is already connected, and the task consoles.
This is where a PowerMTA installation starts. First you see what you already have: how many servers are running and on which MTA, whether any are free and which packages are in the Hub. Next you choose a package for the server's system, enter a new server or pick one that is already connected, see all four installation steps in advance and check the summary before you start. The Hub does the connection, check, installation and base setup itself, in the right order — you do not need to remember commands or their sequence.
The header of the installation section answers “what do I already have” before you choose anything. It shows how many servers are already running and on which MTA, whether there are free servers, which packages are uploaded and how many installations are running right now. These numbers tell you at once whether you can install an MTA on a server you already have or need a new one. You can install on several servers at once — up to ten installations at the same time — but only one per server. If there are no free servers, the header says so — “nowhere to install — a new server is needed” — and you add a new server further down in the form.
 Enlarge
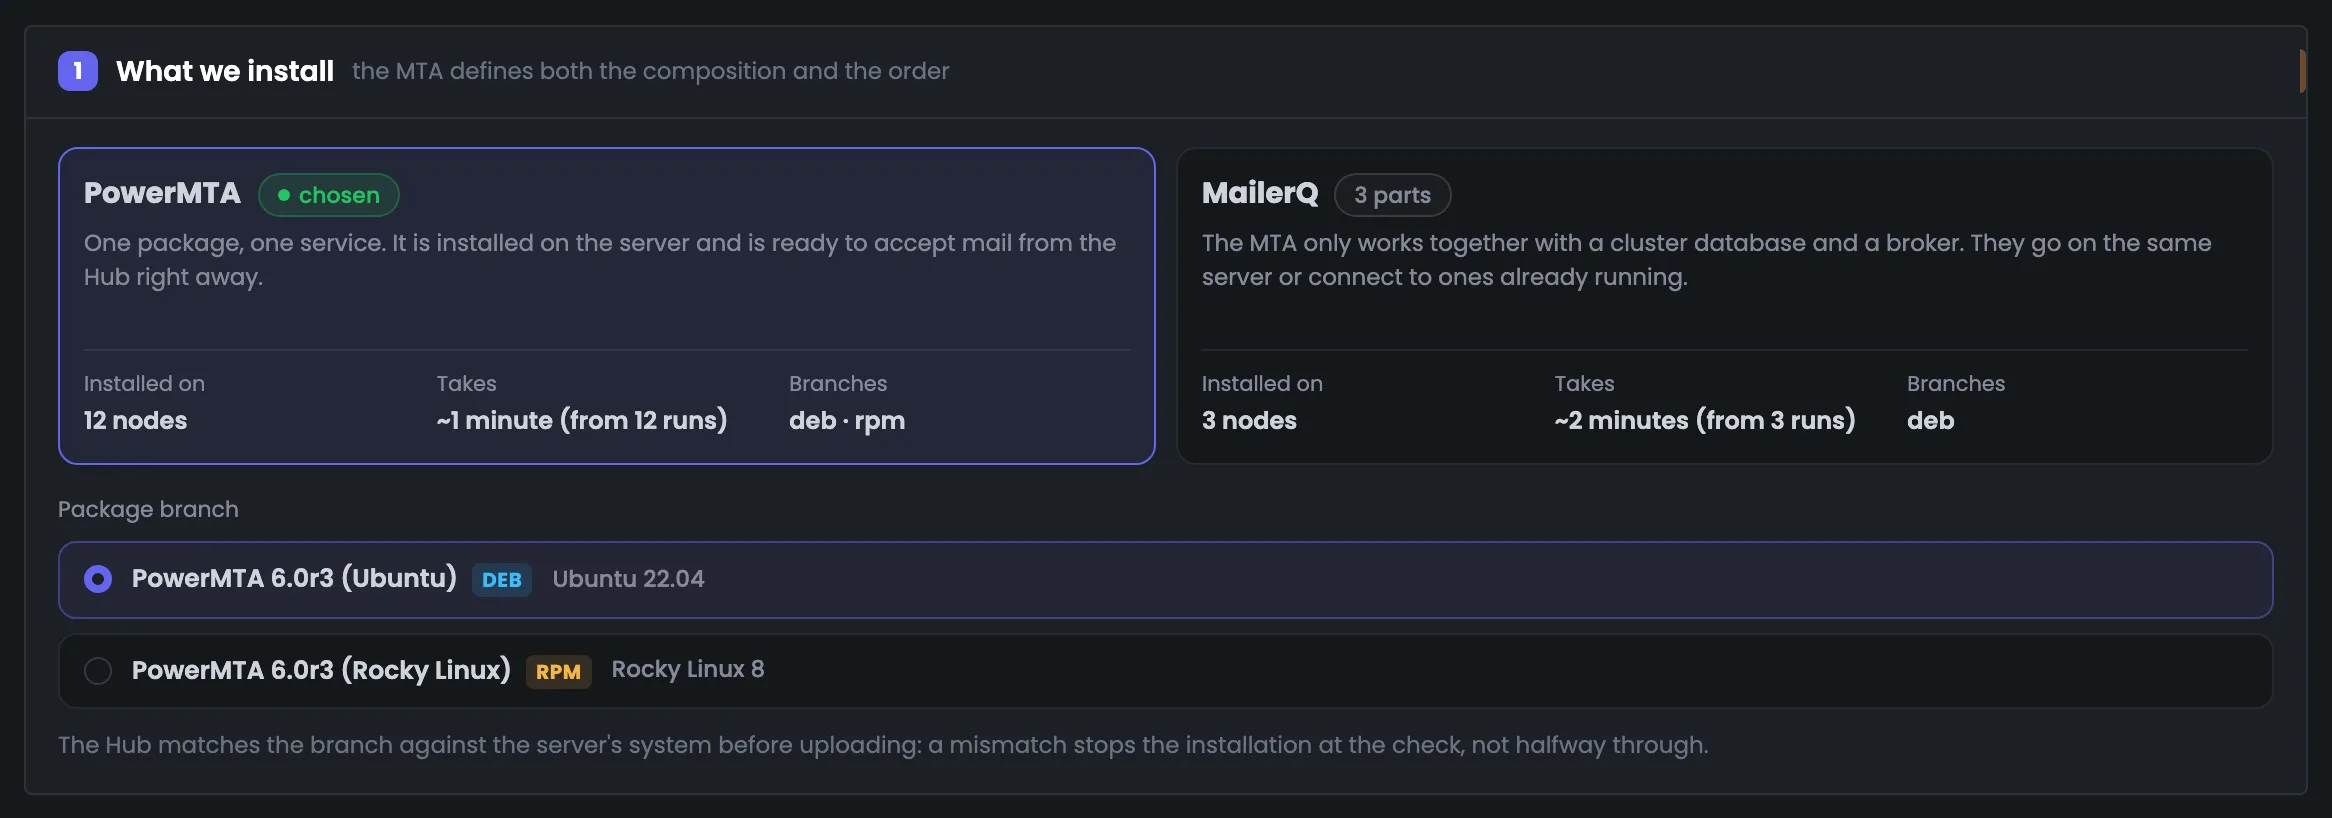
The first installation step is choosing the MTA. The choice decides both what gets installed and in what order: PowerMTA is one package and one service, MailerQ is a three-part cluster. Each MTA card shows how many servers already run it and how long an installation usually takes, based on your own past installations. Below, you choose the package branch for the server's system — DEB for Ubuntu 22.04 or RPM for Rocky Linux 8 — and the Hub matches it against the system before uploading the package. The Hub works out the time from your successful installations — the median of the last twenty — and shows how many measurements it is based on; in the example, PowerMTA installs in about a minute.
 Enlarge
The time on the card is based on earlier successful installations in your Hub.
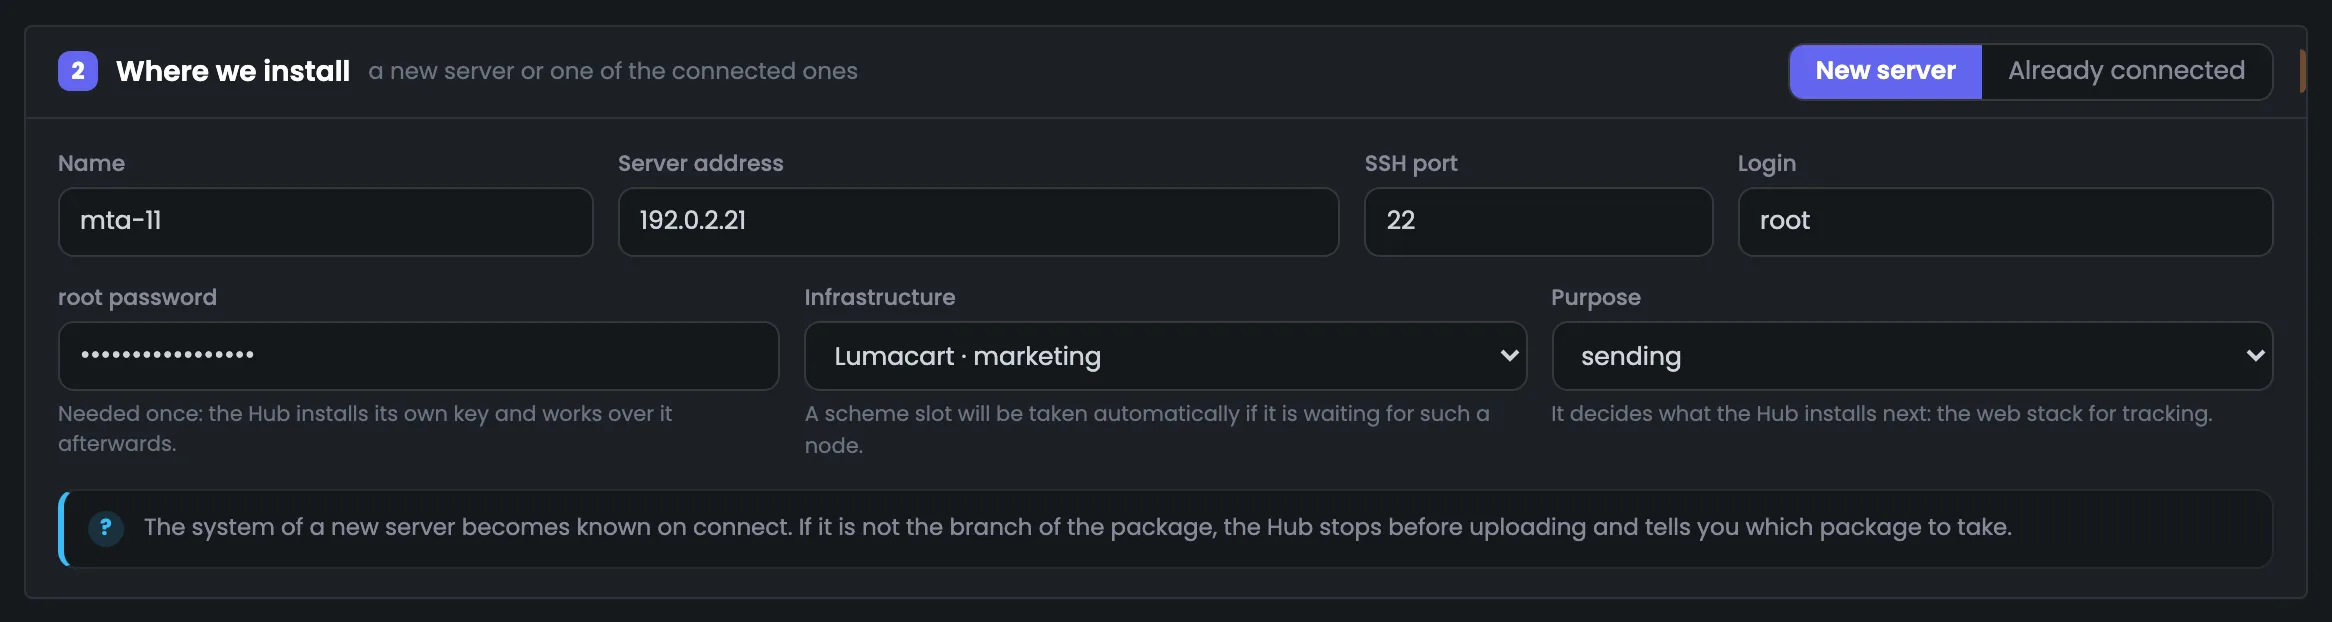
The second step is where to install. For a new server you need a name, an address, an SSH port, a login and the root password. The password is needed only once: the Hub signs in with it, puts its own SSH key on the server and from then on uses only the key. Here the server is also assigned to the right infrastructure and given a purpose — sending, tracking or both. The purpose decides what the Hub installs next: for example, a web stack for tracking. You cannot add the same IP address twice: the Hub shows the server that already has it. If the infrastructure diagram has a slot waiting for such a node, the slot is filled automatically.
 Enlarge
You cannot add the same IP address twice: the Hub shows the server that already has it.
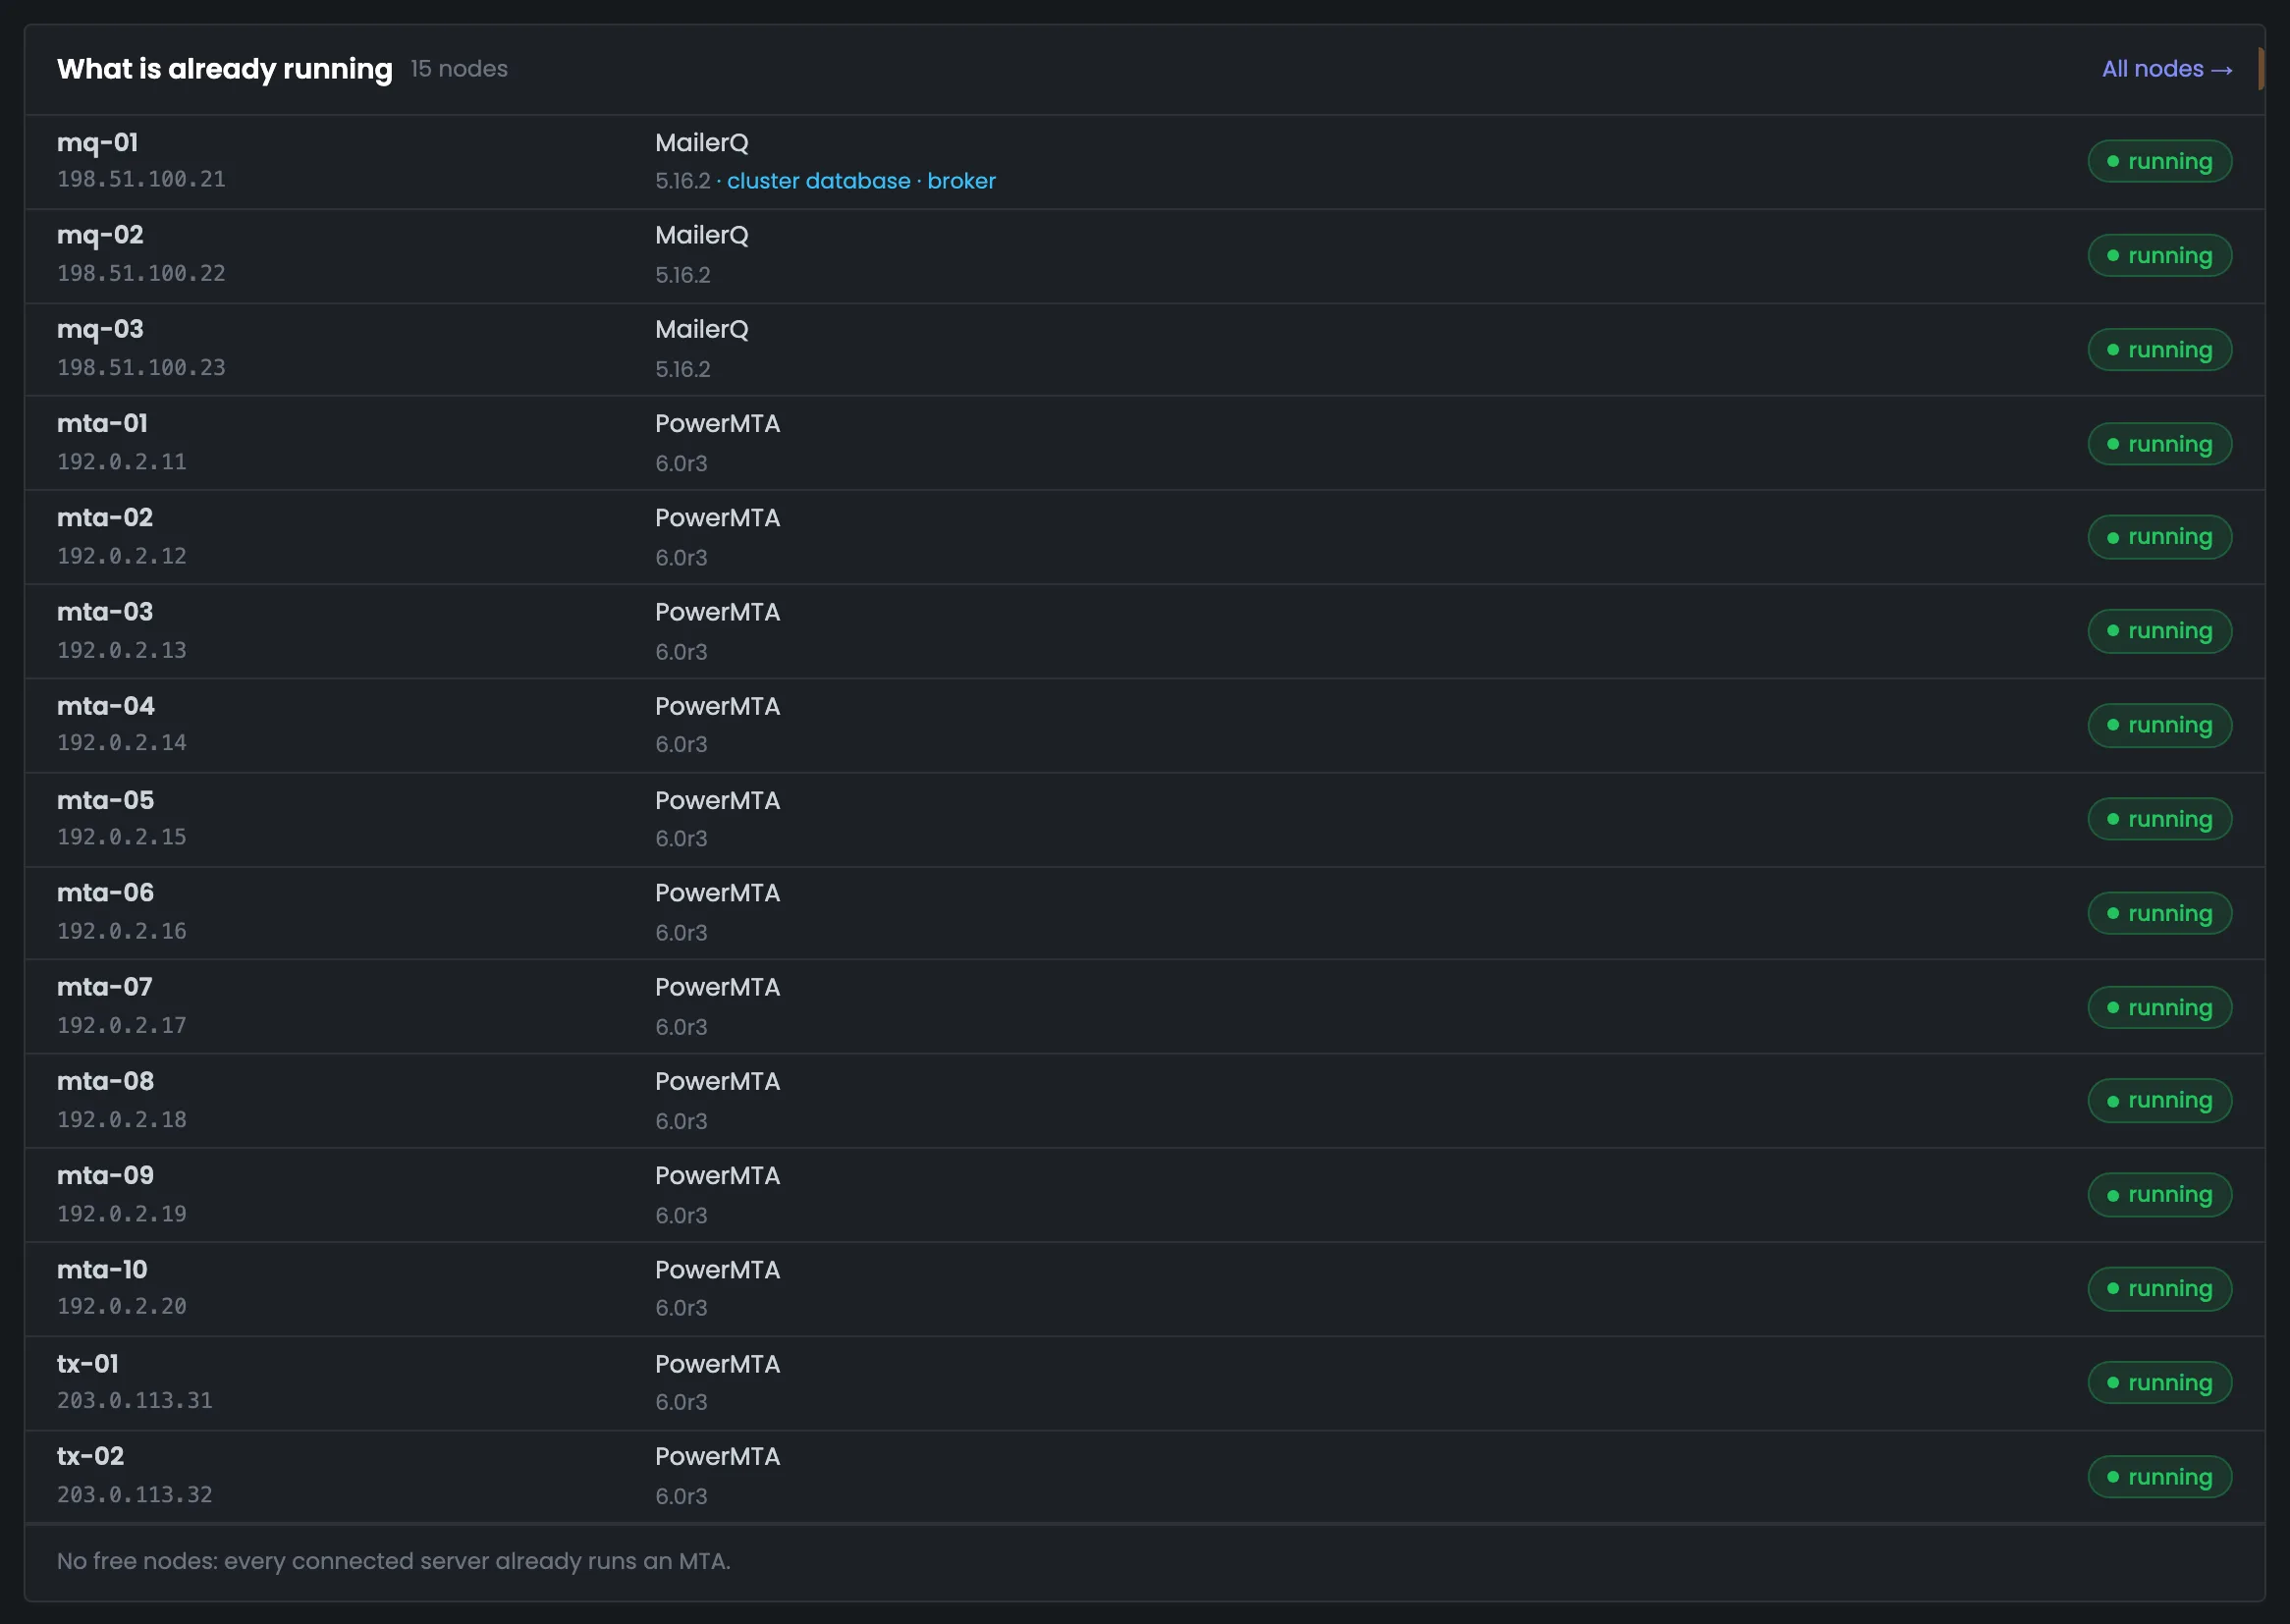
The table of all connected servers shows what each one already runs — MailerQ 5.16.2 or PowerMTA 6.0r3 — and its state: running, stopped, failed or being installed right now. It helps you choose where to install a new MTA and shows at once whether there are free servers without an MTA. For MailerQ servers, it also marks where the shared cluster parts — the database and the broker — are running. If there are no free servers, the line at the bottom says so plainly. In the example, the fleet has 15 servers from mq-01 to tx-02, all “running”, and the MailerQ database and broker are on mq-01.
 Enlarge
Before you start, you see exactly what will happen — in the same words the console will use later. A PowerMTA installation always runs in four steps: connection, pre-flight check, MTA installation and base configuration. The list is live: for a server that is already connected, the first step is shorter because the Hub key is already there. If the server does not fit, the installation stops at the check, before the package is uploaded, and the line at the bottom says what to do after installation. After installation, the node's addresses and domains, signing keys and mail intake are set up in the “Configurations” section.
 Enlarge
The last check before work begins: everything chosen above, on one line. You see which package is installed, on which server and how the Hub will sign in, how many steps there are and how long they usually take. If something is missing in the form, a red line says so before the start, not in the middle of the installation. The “Install” button creates the task and opens its console, after which you can leave the page: the installation runs on the Hub side. A closed tab will not stop it, and you can open the task console later from the server's card. In the example, PowerMTA 6.0r3 is installed on the new mta-11 with root password sign-in, and it will take about a minute.
 Enlarge
MailerQ does not work alone: every MTA needs a PostgreSQL cluster database — the queue, statistics and settings — and a RabbitMQ broker for exchange between the cluster's MTAs. The first server usually gets all three parts at once, and later ones get only the MTA, connected to the same database and the same broker. Here you decide which part goes on this server and which is taken from another, set the credentials, and see which ports between servers the Hub will open and which you need to open by hand. This is how a cluster grows one node at a time, and the Hub opens access to the database and broker for each new server itself.
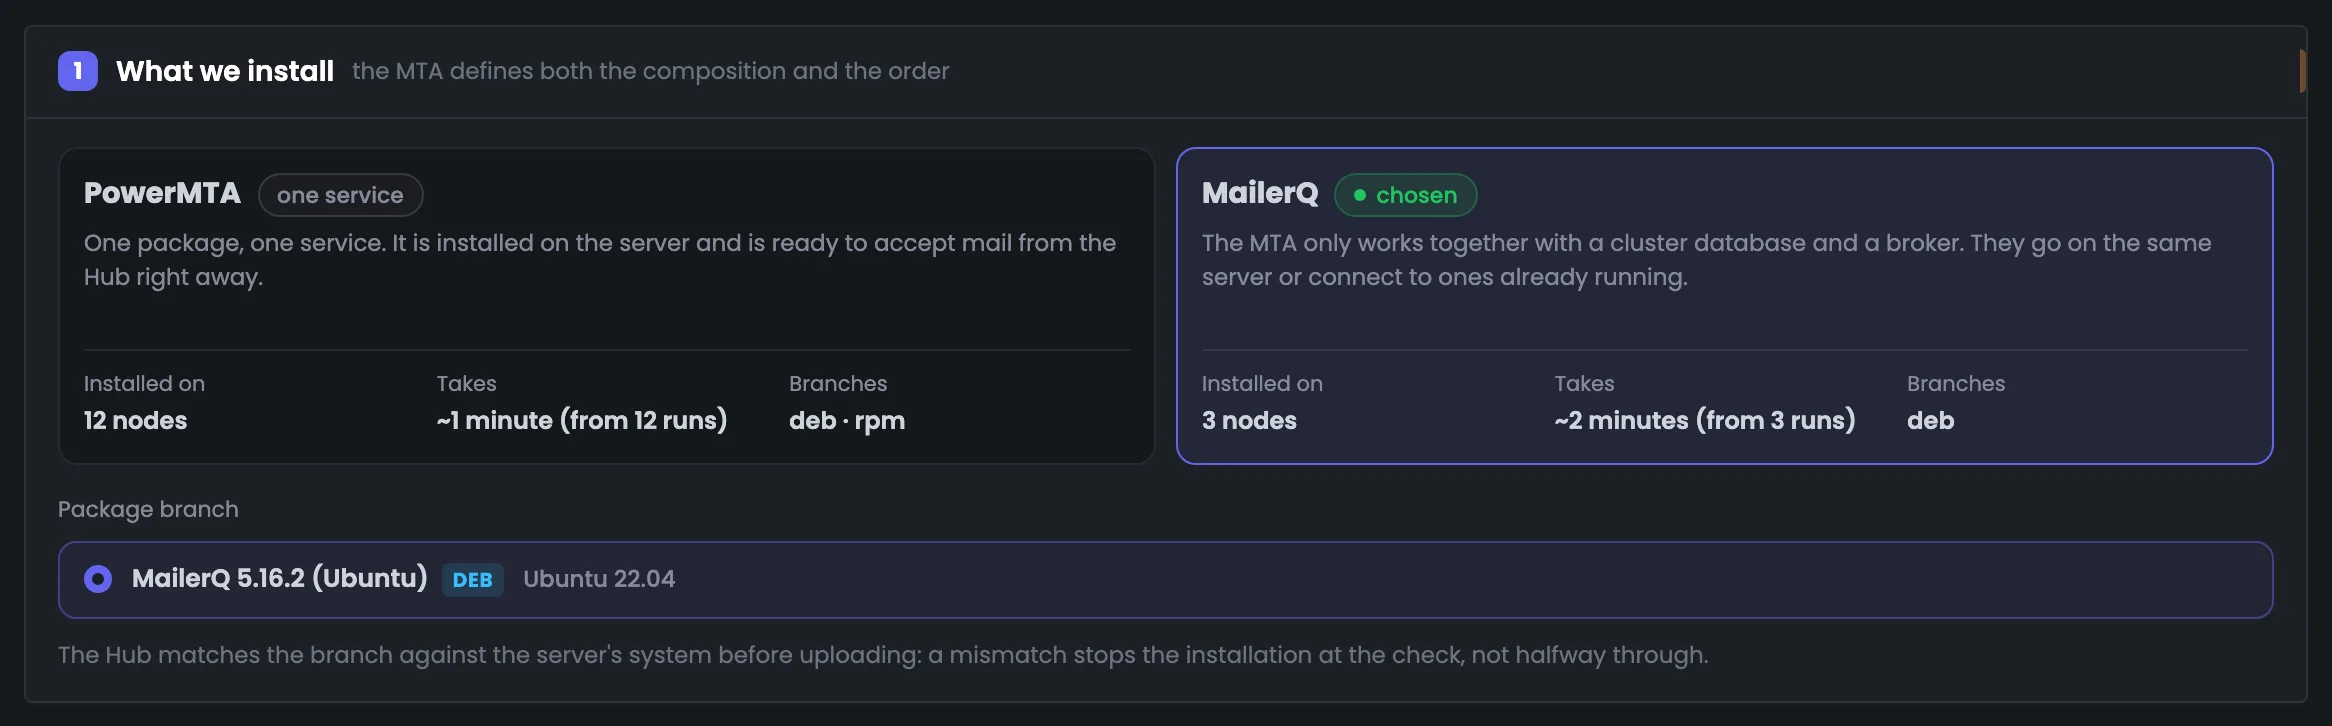
The same first step, but with MailerQ chosen — an MTA that works only together with a PostgreSQL cluster database and a RabbitMQ broker. Its card shows how many servers already run it and how long its installation takes based on your measurements. There is one branch — the MailerQ 5.16.2 package for Ubuntu 22.04. Next to it in the Hub are the MailerQ web panel and a ready set of RabbitMQ packages, so the broker installs without reaching out to third-party repositories. The branch vs. system check is the same as for PowerMTA: if the branch does not fit the server, the installation stops at the check, before the package is uploaded. In the example, MailerQ runs on 3 nodes and installs in about 2 minutes.
 Enlarge
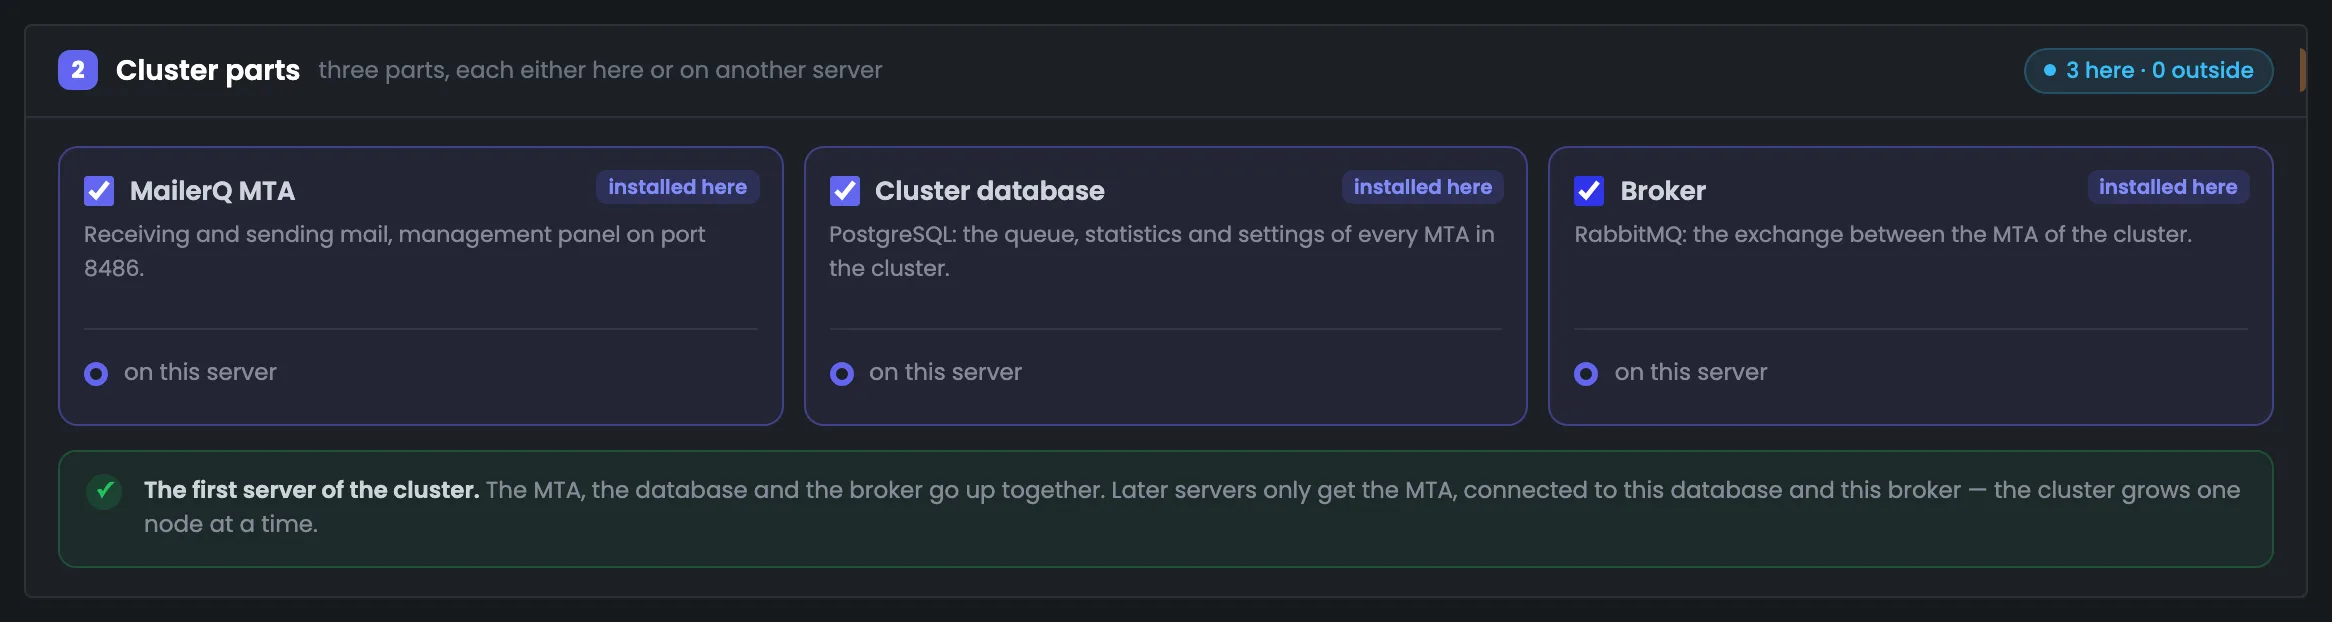
When there is no database or broker anywhere yet, all three parts are installed on one server, and the page offers this option itself. This creates the foundation of a MailerQ cluster: the MTA, a shared PostgreSQL database and a RabbitMQ broker. The counter at the top shows “3 here · 0 outside” — everything goes on the chosen server. Later servers get only the MTA, connected to this database and this broker, so there is no need to install the database and broker again. The MTA gets a management panel on port 8486 right away, and the credentials for all three parts — database, broker and panel — are set on the next screen, with the Hub generating the passwords itself.
 Enlarge
The first server of a cluster has the most credentials: for the database, the broker, the MailerQ panel and SMTP mail intake. They all go into the node's config, and the Hub fills them in itself — you only need to check the values. The passwords are generated at once, in a form that does not break the connection address: the broker password never contains @, a colon, a slash, % or spaces. You can view the credentials later in the “Configurations” section, on the MTA card. In the example, the database name and user are mailerq, the panel login is mqconsole, and the SMTP intake port is 25251; the “Copy all” button puts all credentials on the clipboard in one click.
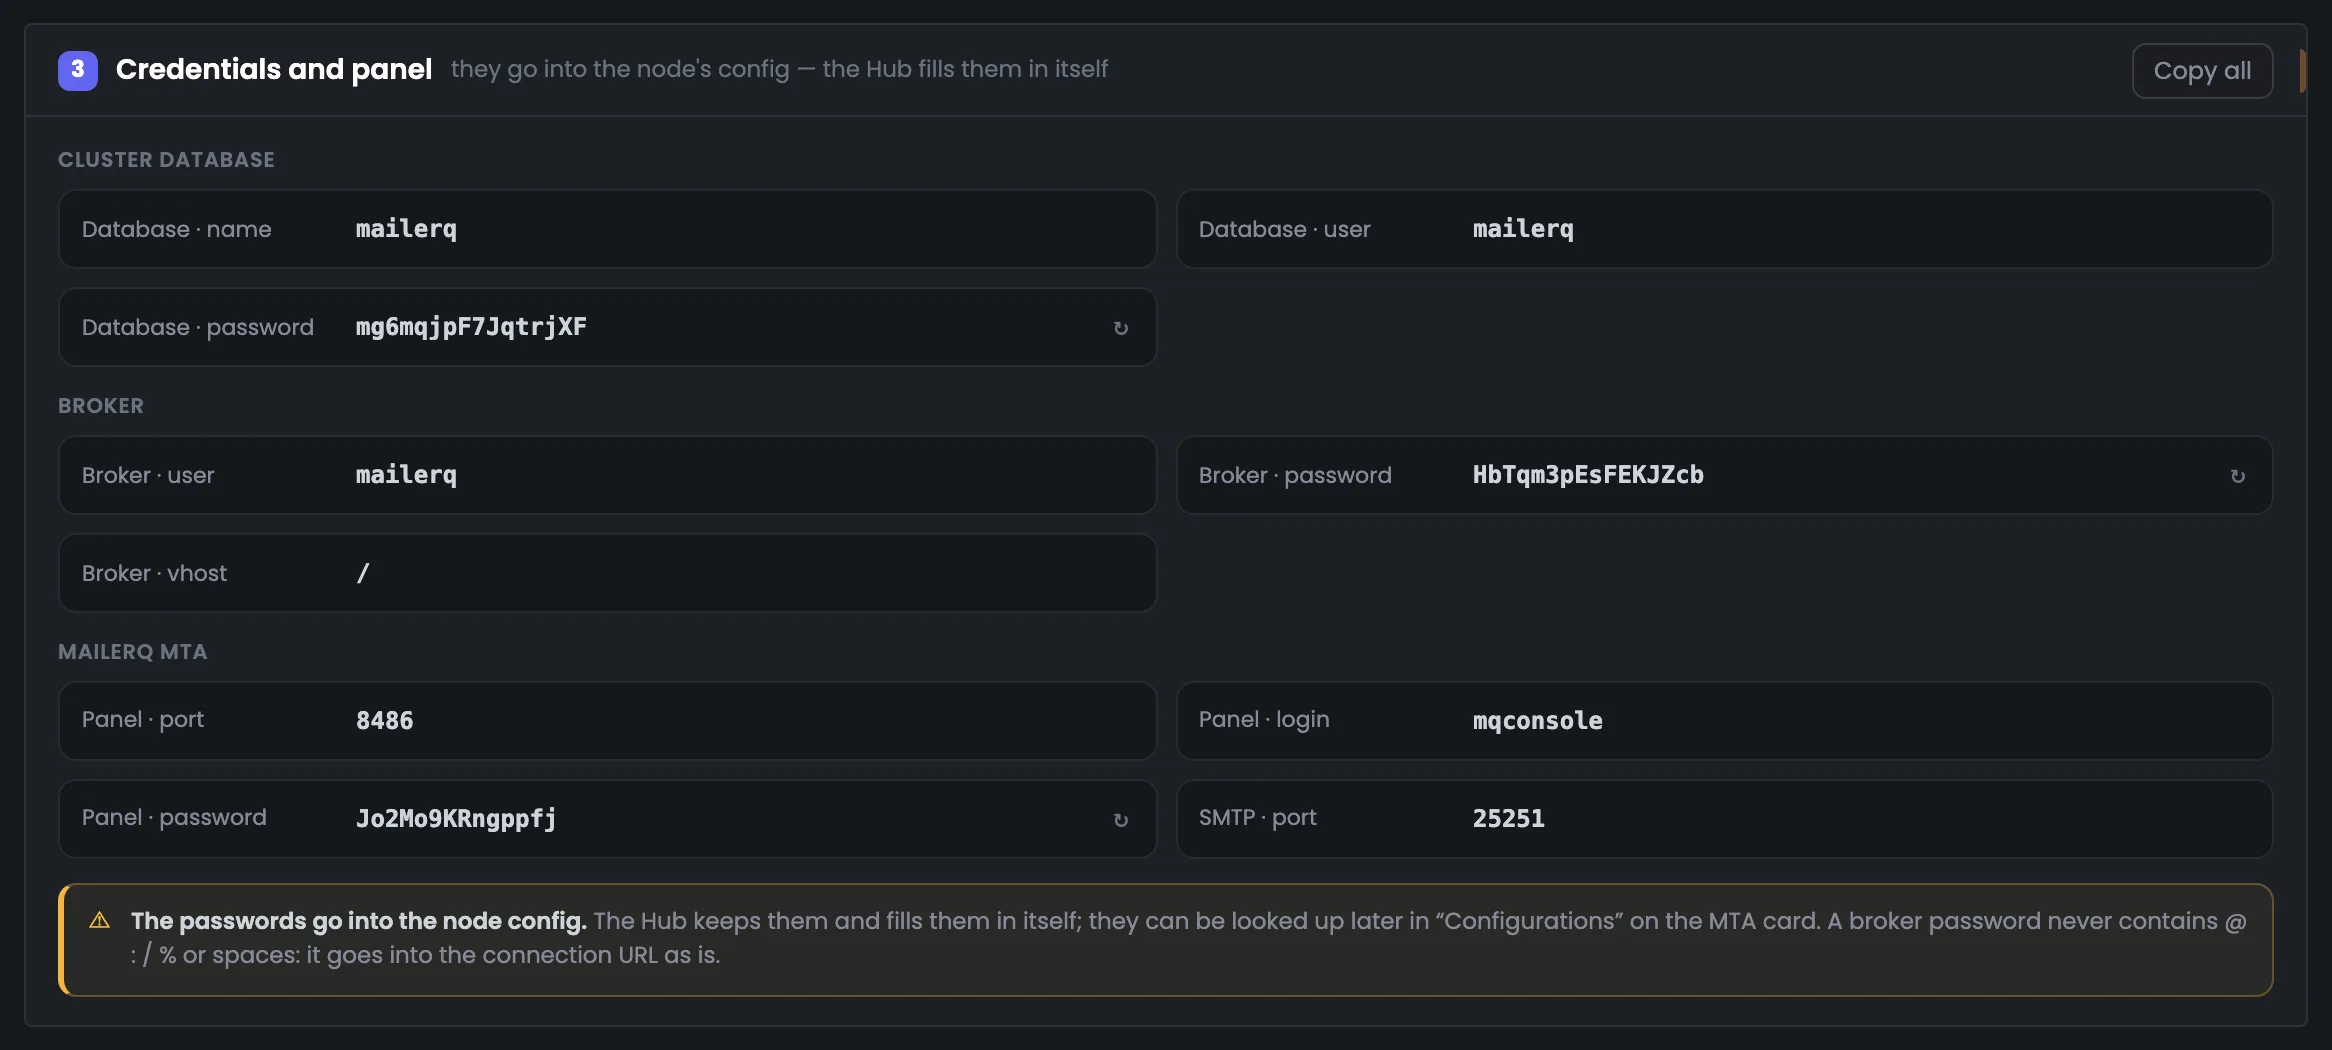 Enlarge
Future MTAs of the cluster will connect to the database and broker on the first server, so they need open ports. The table shows which port is for what and who opens it. On its own servers the Hub opens the database and broker ports itself, while management panels are opened by hand — only from your address. This way the database and broker are reachable for future cluster nodes, while the broker and MTA panels are not exposed to the internet. On a third-party machine that the Hub does not set up, the rules are opened by hand. When a new node later joins the cluster, the Hub opens access to the database and broker on this server for it automatically.
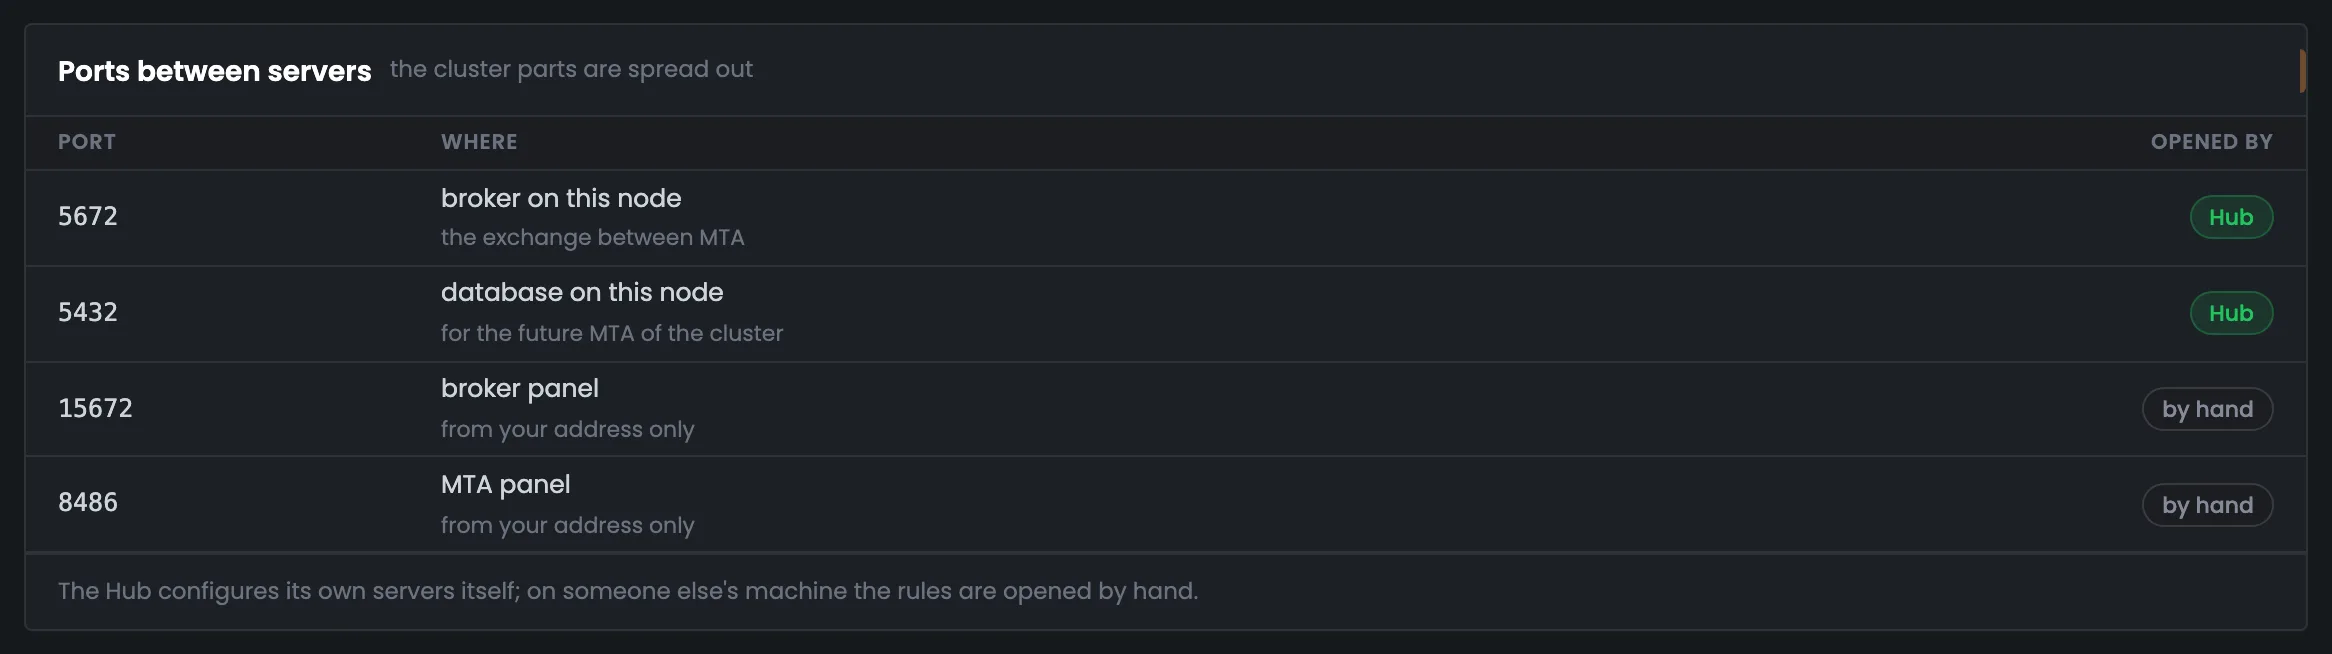 Enlarge
The second option for MailerQ is a new server joining a cluster that is already running. Each of the three parts is either installed here or taken from outside: in the example, only the MTA goes on the new server, while the PostgreSQL database and the RabbitMQ broker come from node mq-01, where the Hub has already set them up. The counter at the top shows “1 here · 2 outside”. You can pick the database and broker from the Hub's servers — then it fills in the credentials itself — or enter your own, in which case you open access for the new node's addresses yourself. This is how a MailerQ cluster grows: each next node is added the same way, without installing the database and broker again.
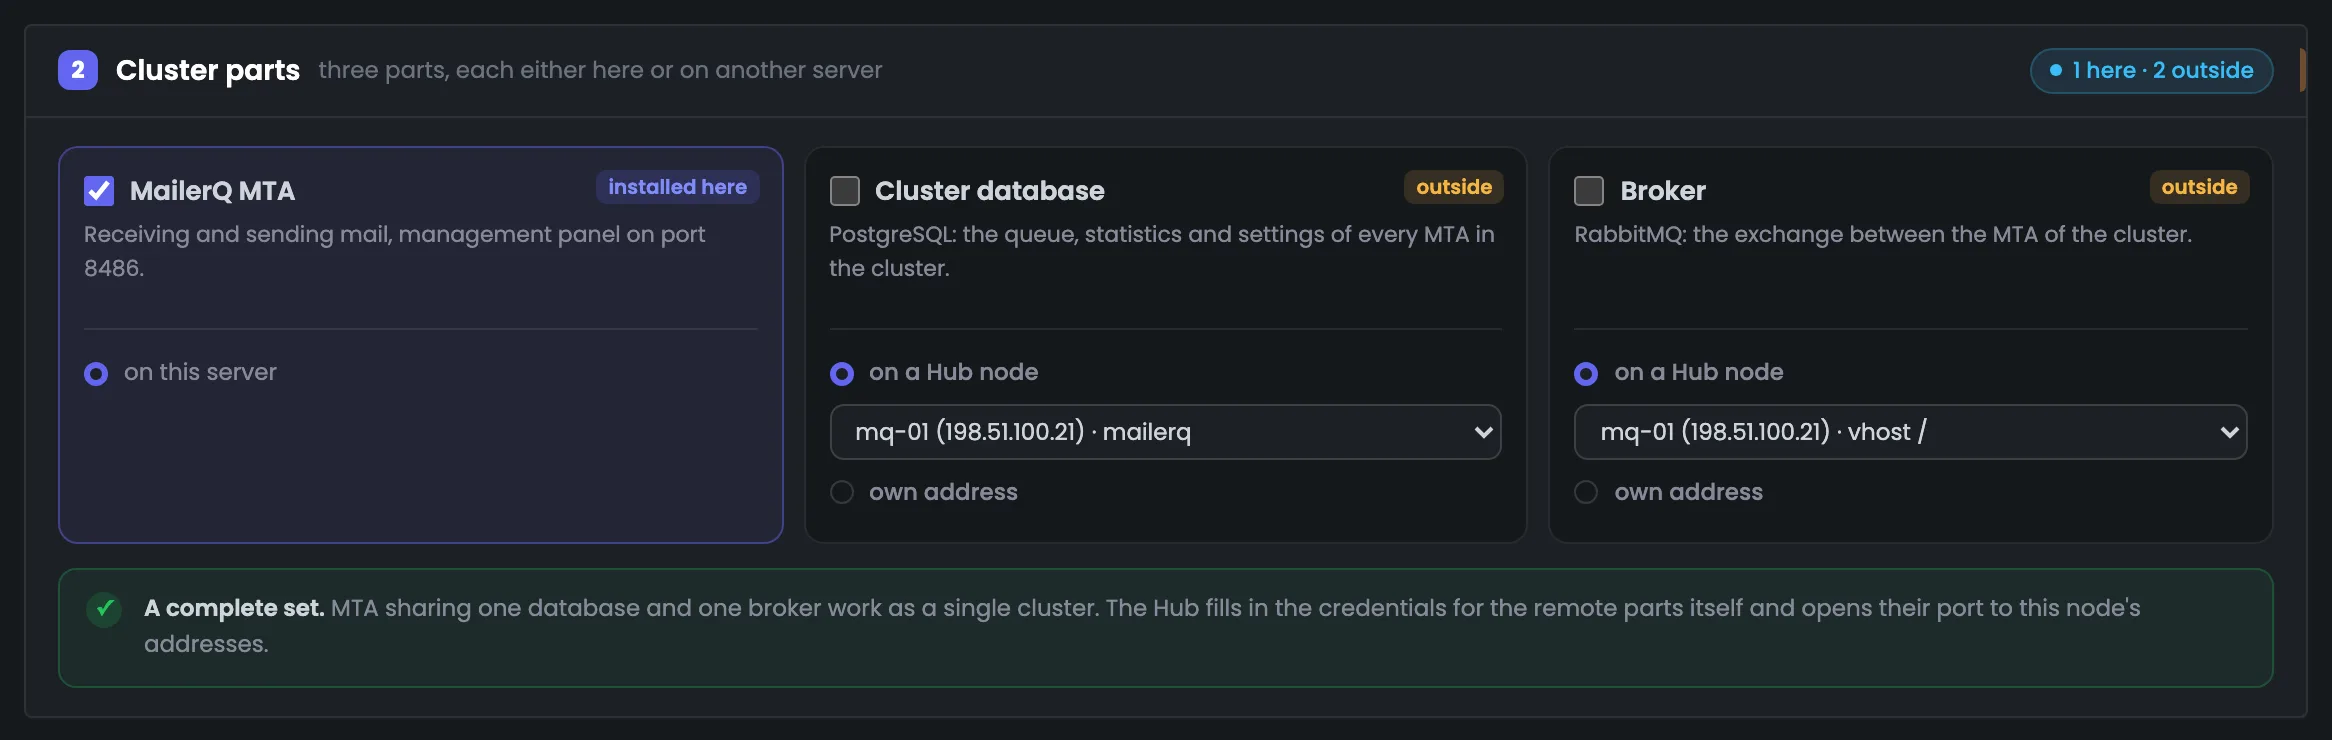 Enlarge
A shared database and broker unite MTAs into one cluster.
Everything that goes into the new MailerQ node's config is gathered here. For parts on another server you do not need to enter anything — one line says the Hub will fill in the mq-01 credentials. For the MTA itself, you set the management panel and the SMTP mail intake port: in the example, panel port 8486 with login mqconsole and intake port 25251. The Hub generates and stores the passwords, and you can view them later in the “Configurations” section. If the database and broker run on a third-party server rather than a Hub node, you need to open access to them for the new node's addresses yourself: on someone else's machine, the rules are opened by hand.
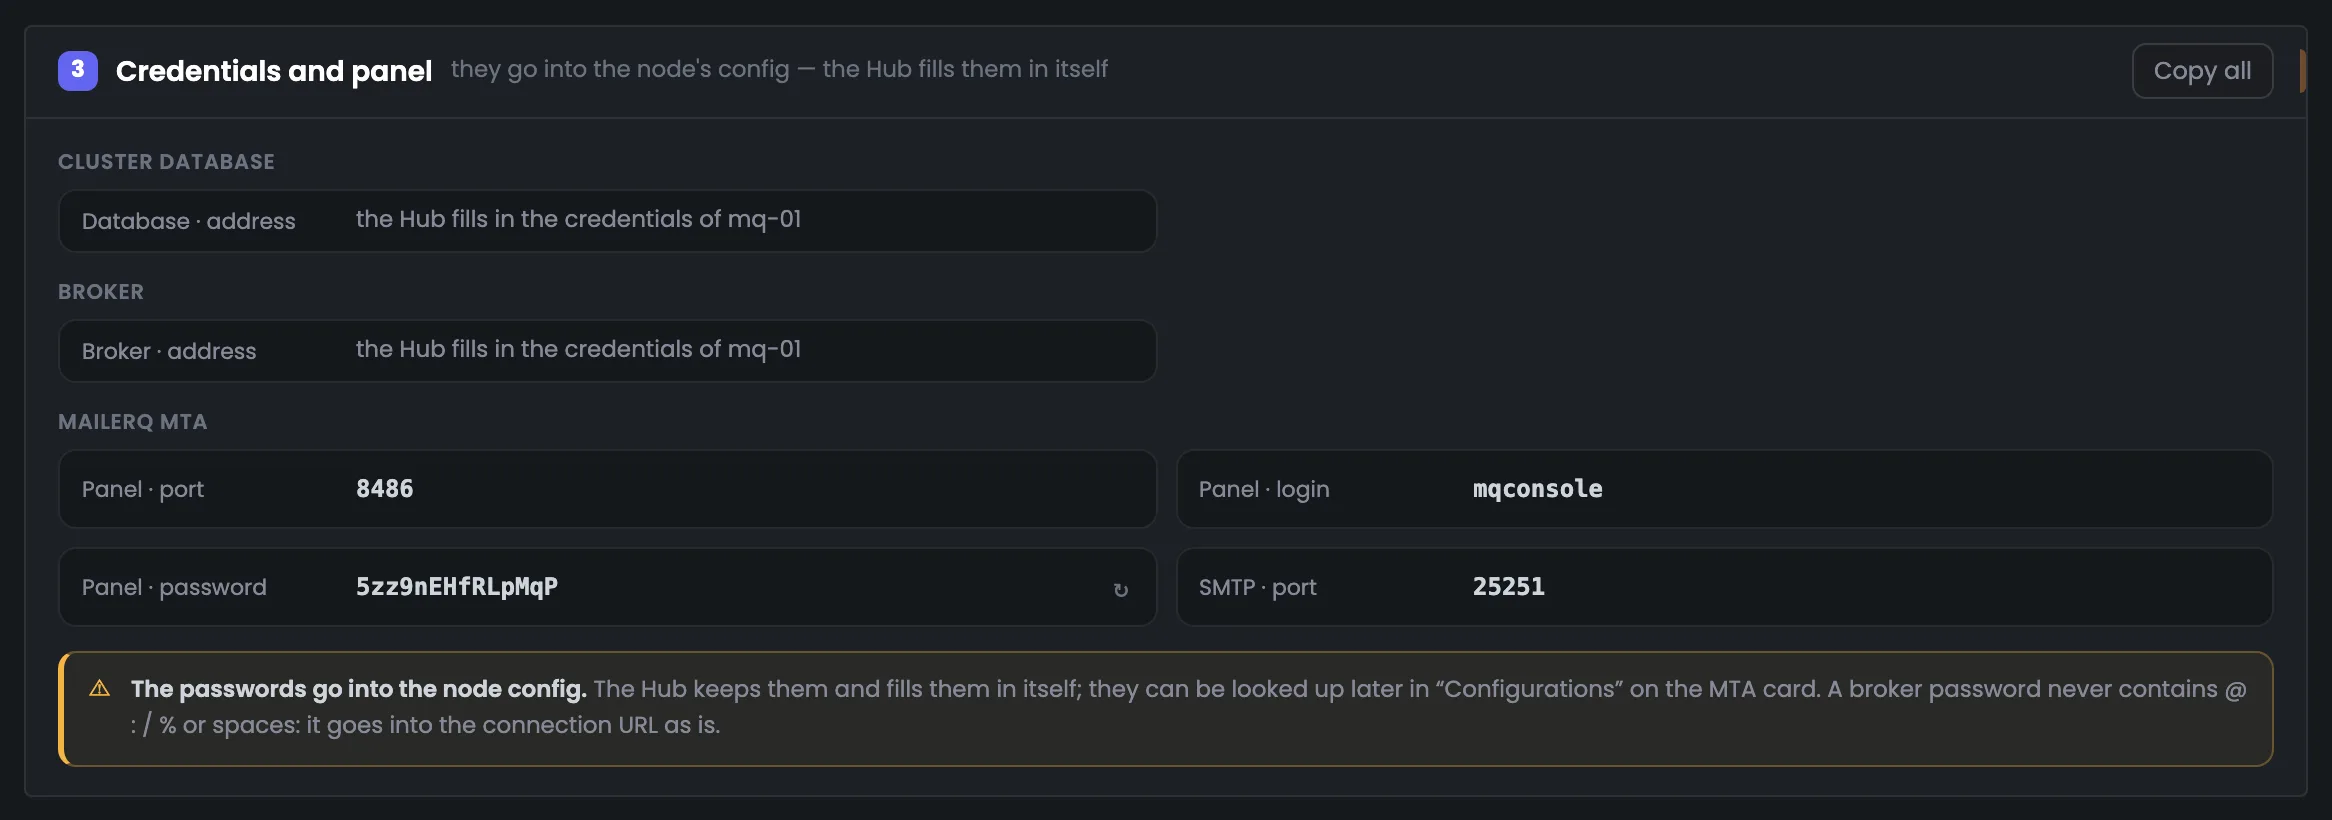 Enlarge
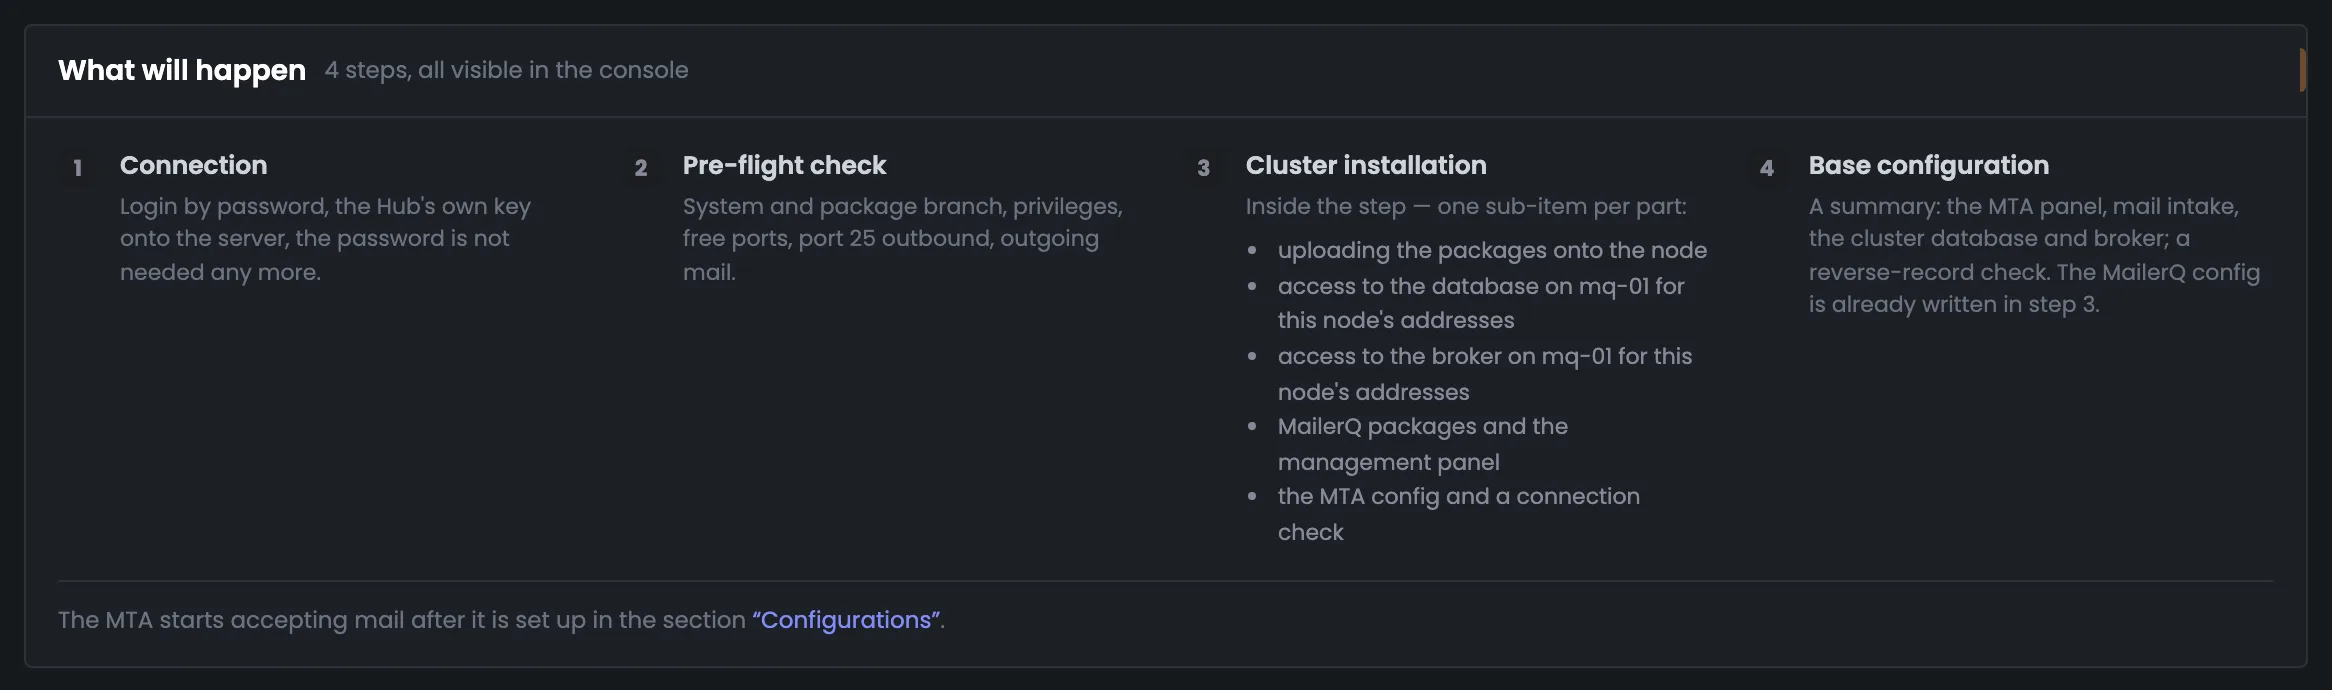
The MailerQ installation order is the same — four steps — but the third one opens into sub-items, one for each part of the cluster. The set of sub-items changes along with your choice in “Cluster parts”. In the example, the server joins a ready cluster, so the plan includes access to the database and broker on mq-01. The MailerQ config is already written in the third step; the fourth is a summary, and the MTA starts accepting mail after you set it up in the “Configurations” section. If you choose in “Cluster parts” to install the database and broker on this server, their installations replace the mq-01 access in the plan.
 Enlarge
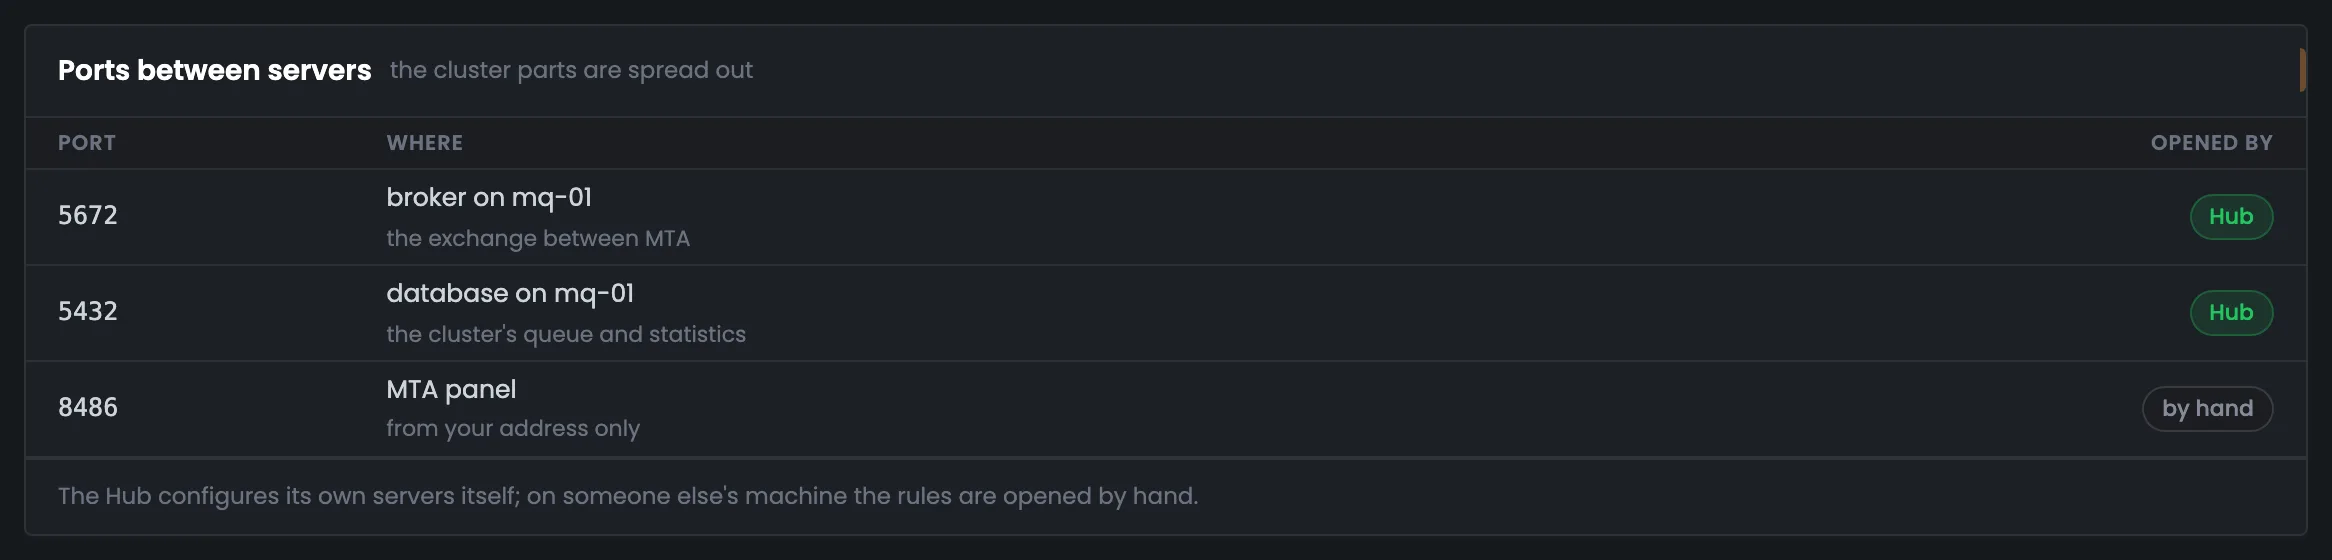
When the cluster parts are spread across different servers, they need open ports to talk to each other. The table shows which port leads where and who opens it. On its own servers the Hub opens the database and broker ports itself, and only for the new node's addresses; on a third-party machine, the rules are opened by hand. The MailerQ panel port is opened by hand and only for your own address: a management panel should not be exposed to the internet. In the example, these are 5672 and 5432 on mq-01, which the Hub opens, and 8486 for the MTA panel, which you open yourself. Without access to the shared database and broker, the new node will not become part of the cluster.
 Enlarge
The last check before launching MailerQ. Besides the package, the server and the number of steps, it shows what goes on this server and where the other cluster parts live: in the example, only the MTA is installed on mq-04, while the database and broker stay on mq-01. The installation will take about 2 minutes — the Hub works out the time from your past installations. The “Install” button creates the task and opens its console, and you can leave the page after that. If something is chosen wrong, go back up: everything shown here is put together from your choices on the previous screens, and the server's system is checked on connect.
 Enlarge
You can install an MTA on a server that is already connected to the Hub — without adding a new one. The Hub key is already there, so no root password is needed and the connection step is shorter. If an MTA is already running on the chosen server, the installation replaces it rather than running alongside it. The page names in advance what will be interrupted and asks you to confirm the start separately, so a replacement never happens by mistake.
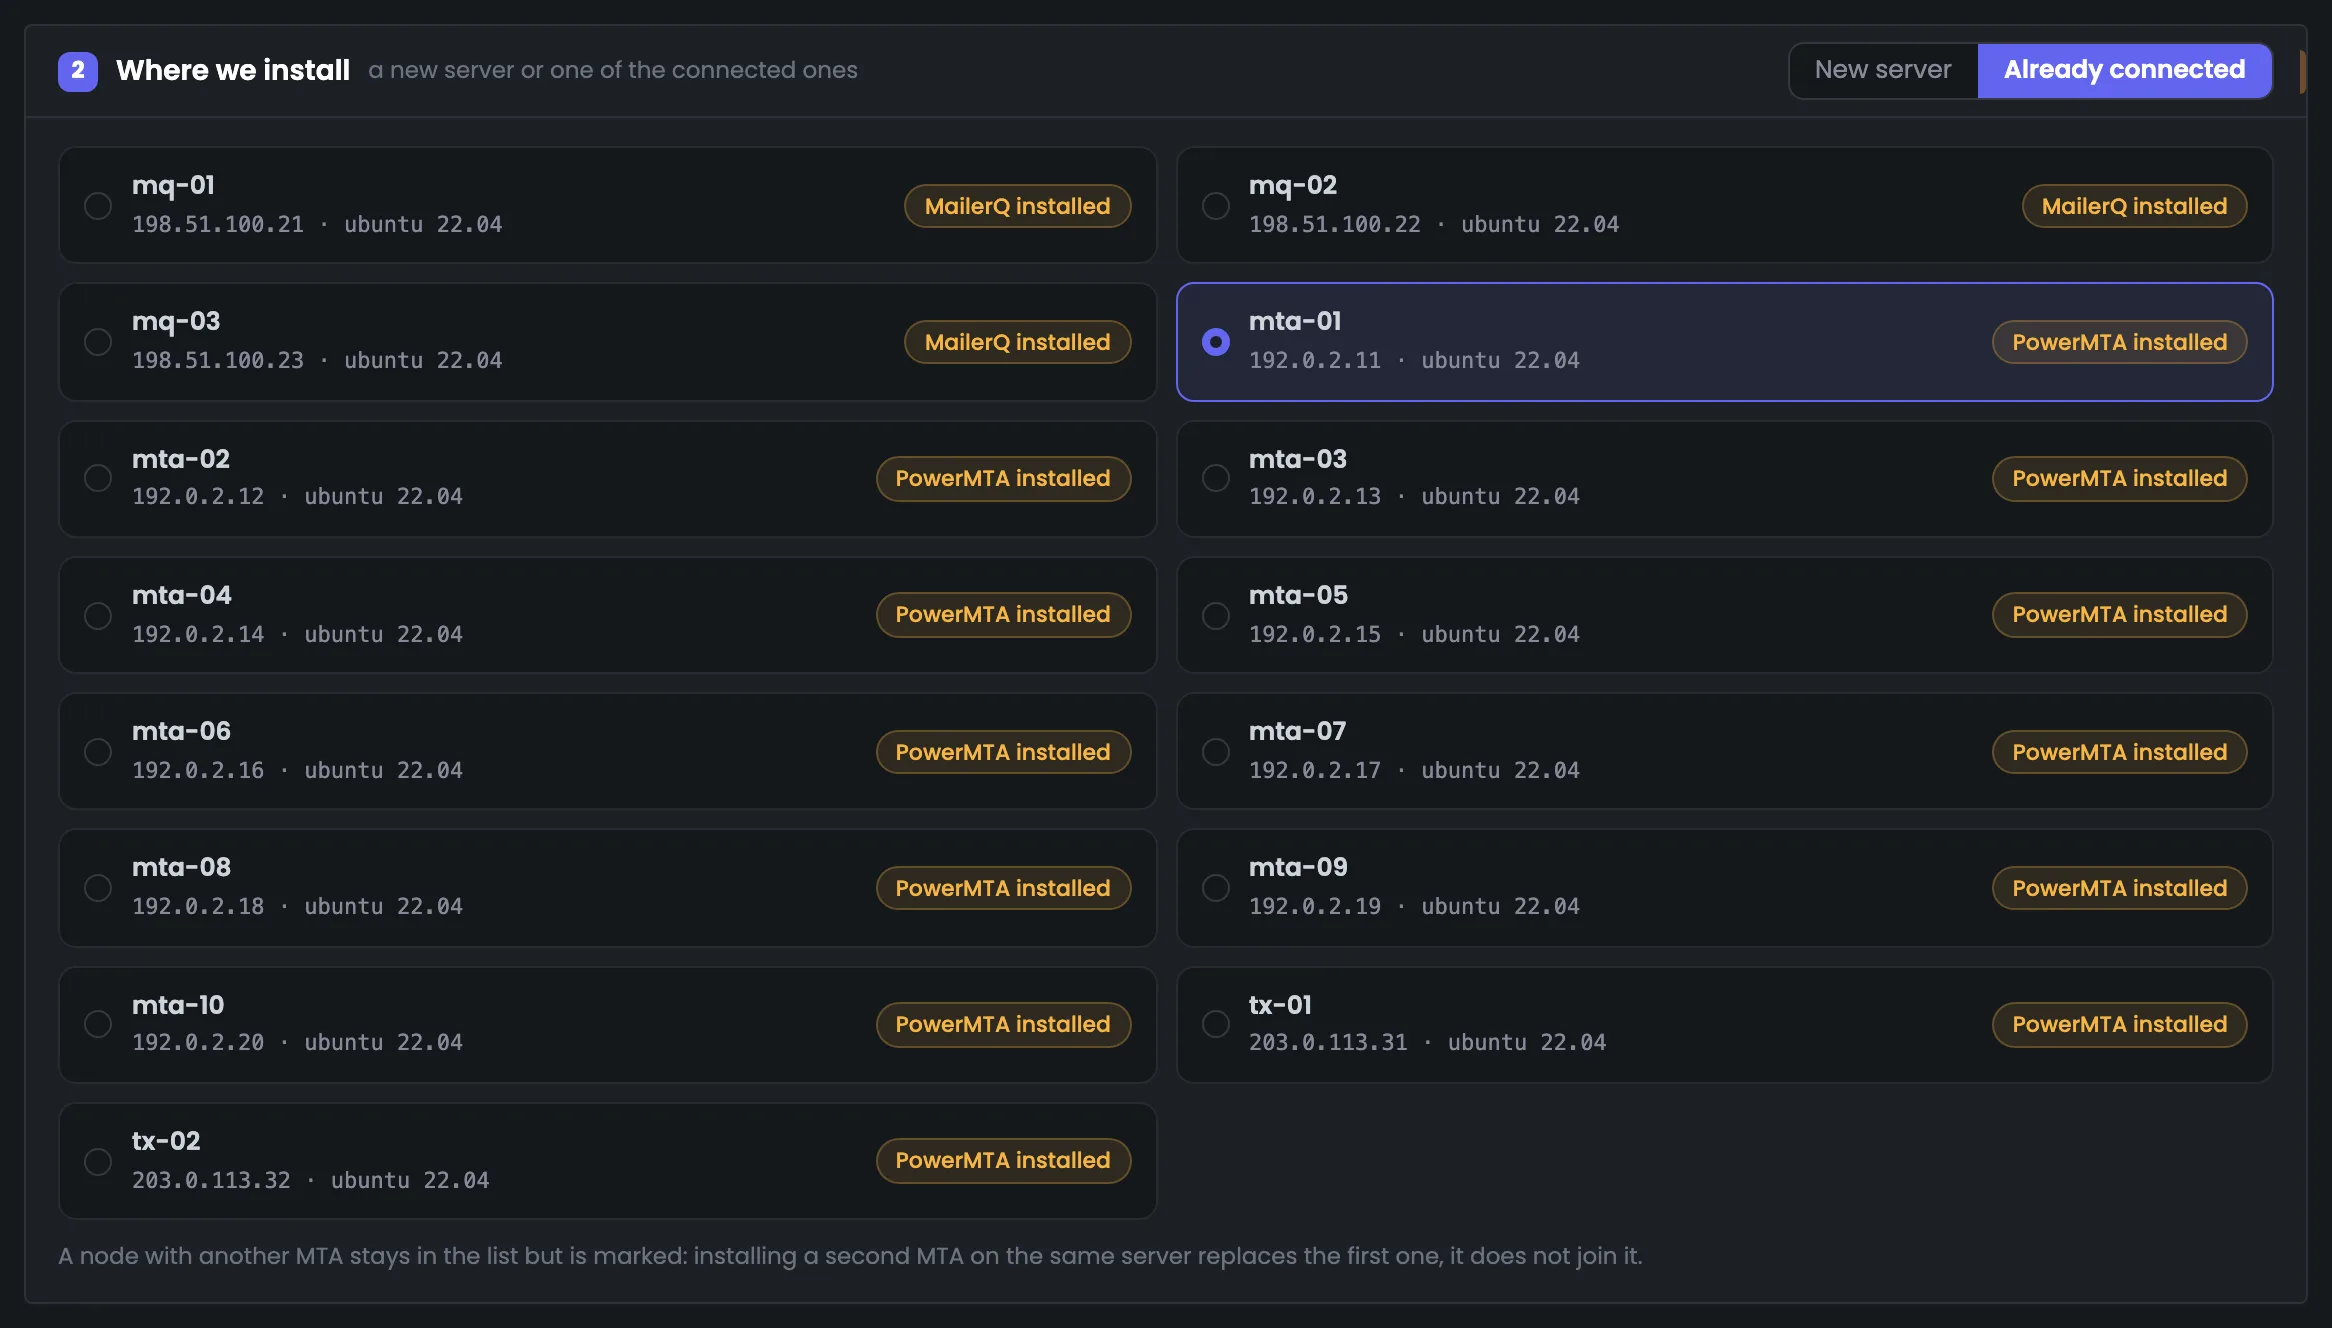
Instead of a new server, you can pick one that is already connected — the quick route when the server is already in your fleet and you only need to put an MTA on it. Servers are shown as tiles: name, address, system and what runs on the server now. The Hub key is already on them, so no root password is needed and the connection step is shorter. Servers with another MTA stay in the list but are marked: installing a second MTA on such a server replaces the first rather than running alongside it. In the example, all servers run Ubuntu 22.04, and mta-01 (192.0.2.11) is selected. If it already has another MTA, the next screen warns you what exactly will be interrupted.
 Enlarge
If an MTA is already running on the chosen server, the summary line changes. The Hub names which MTA will be replaced and what exactly will be interrupted: a running warm-up, the last day's mail or simply the previous MTA. In the example, warm-up is running on mta-01: the replacement will cut off sending and break the ramp-up, and the volume will have to be built up again. The button reads “Replace the MTA”, and before the start the Hub asks for confirmation once more, in words — so a replacement never happens by mistake. The package branch is already checked here — “branch fits the system” — because the Hub already knows the server's system. The order is the same: 4 steps, about a minute based on your installations.
 Enlarge
After the start, the page moves to the task console, which shows the whole PowerMTA installation command by command. Lines are colored by meaning: light blue — steps and notes, yellow — commands, white — server output, green — success, orange — warnings, red — errors. The output of long commands appears as it is produced, not in one piece at the end. If the installation stops, the console shows at which step and why, and it stays with the task — you can open it after the installation from the node card.
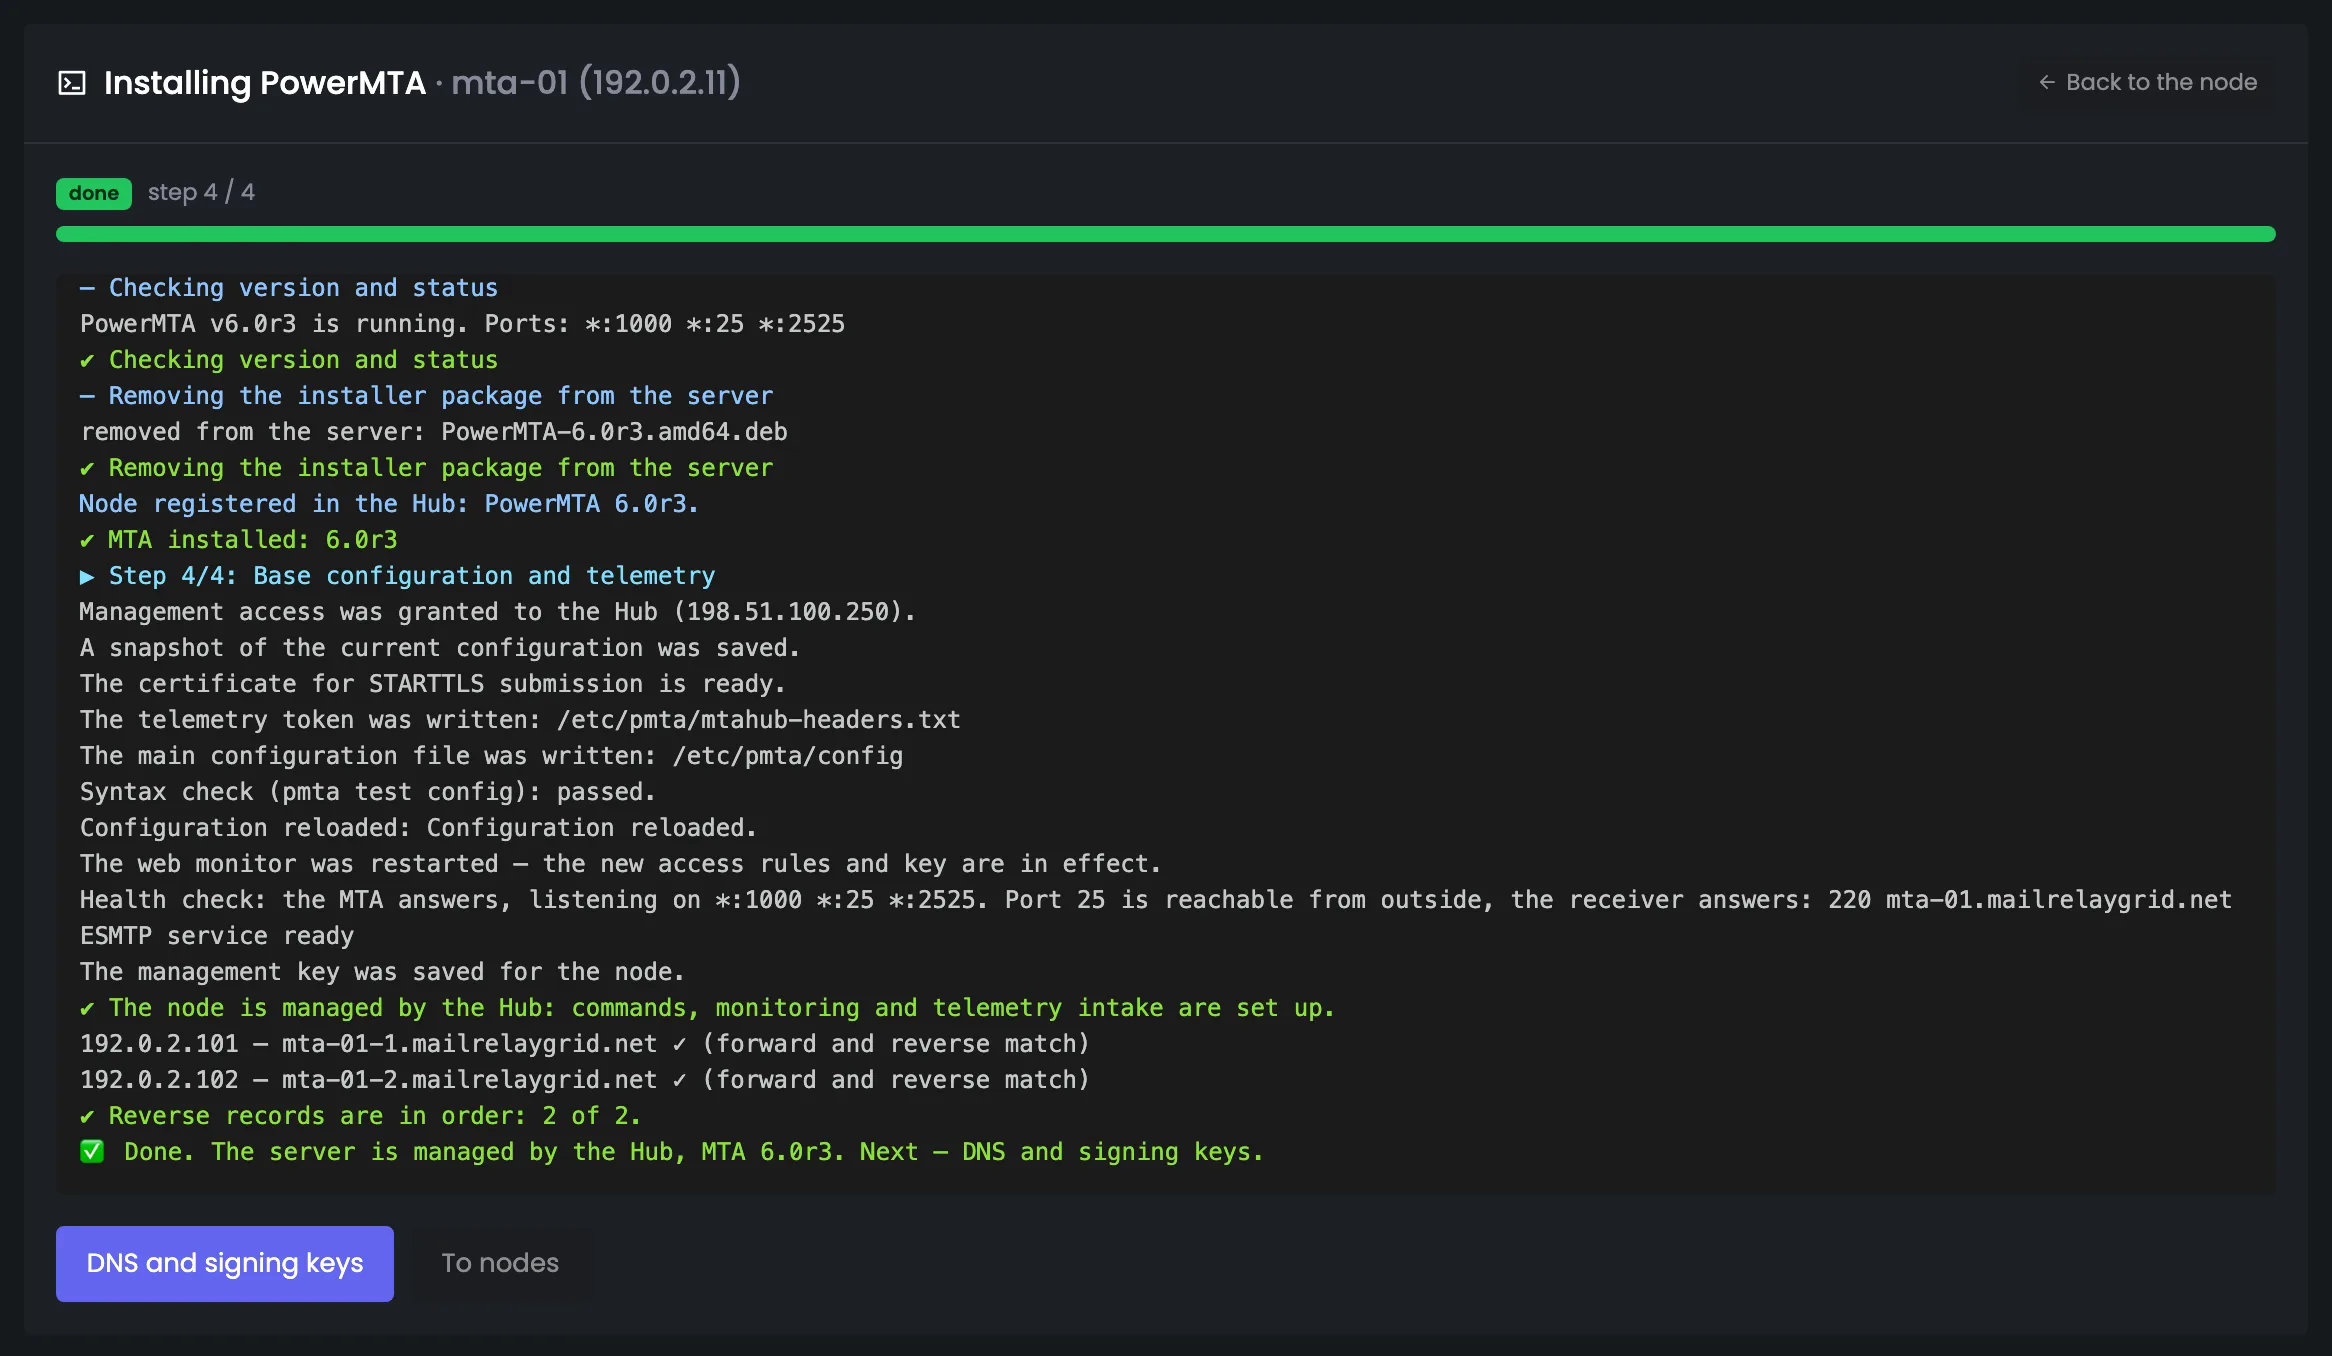
This is how the console looks at the end of a PowerMTA installation: all four steps are done and the progress bar is green. The last lines show the version check, removal of the installation package, the base configuration and the reverse DNS check. In the example, PowerMTA 6.0r3 is running and listening on ports 1000, 25 and 2525, and the forward and reverse records of both addresses match. The final line says the server is managed by the Hub, and the buttons lead to the next stage — DNS and signing keys. If the installation had stopped earlier, you would see here the step where it stopped and the reason. The console stays with the task — you can open it later from the node card.
 Enlarge
The screen shows an example of a completed PowerMTA 6.0r3 installation.
The start of the log: what is being installed and where, then the first two steps. In the first, the Hub connects, learns the server's system and resources, installs its key and matches the package branch against the system. In the second — eleven server checks, each with its own answer: permissions, system, resources, DNS, host name, time, port 25 and the link to the Hub. If any check fails, the installation stops before the package is uploaded. In the example, a server on Ubuntu 22.04 with 4 cores and 8192 MB of memory passed everything. If a check fails, fix the cause on the server — for example, ask the hosting provider to open outbound port 25 — and run the installation again.
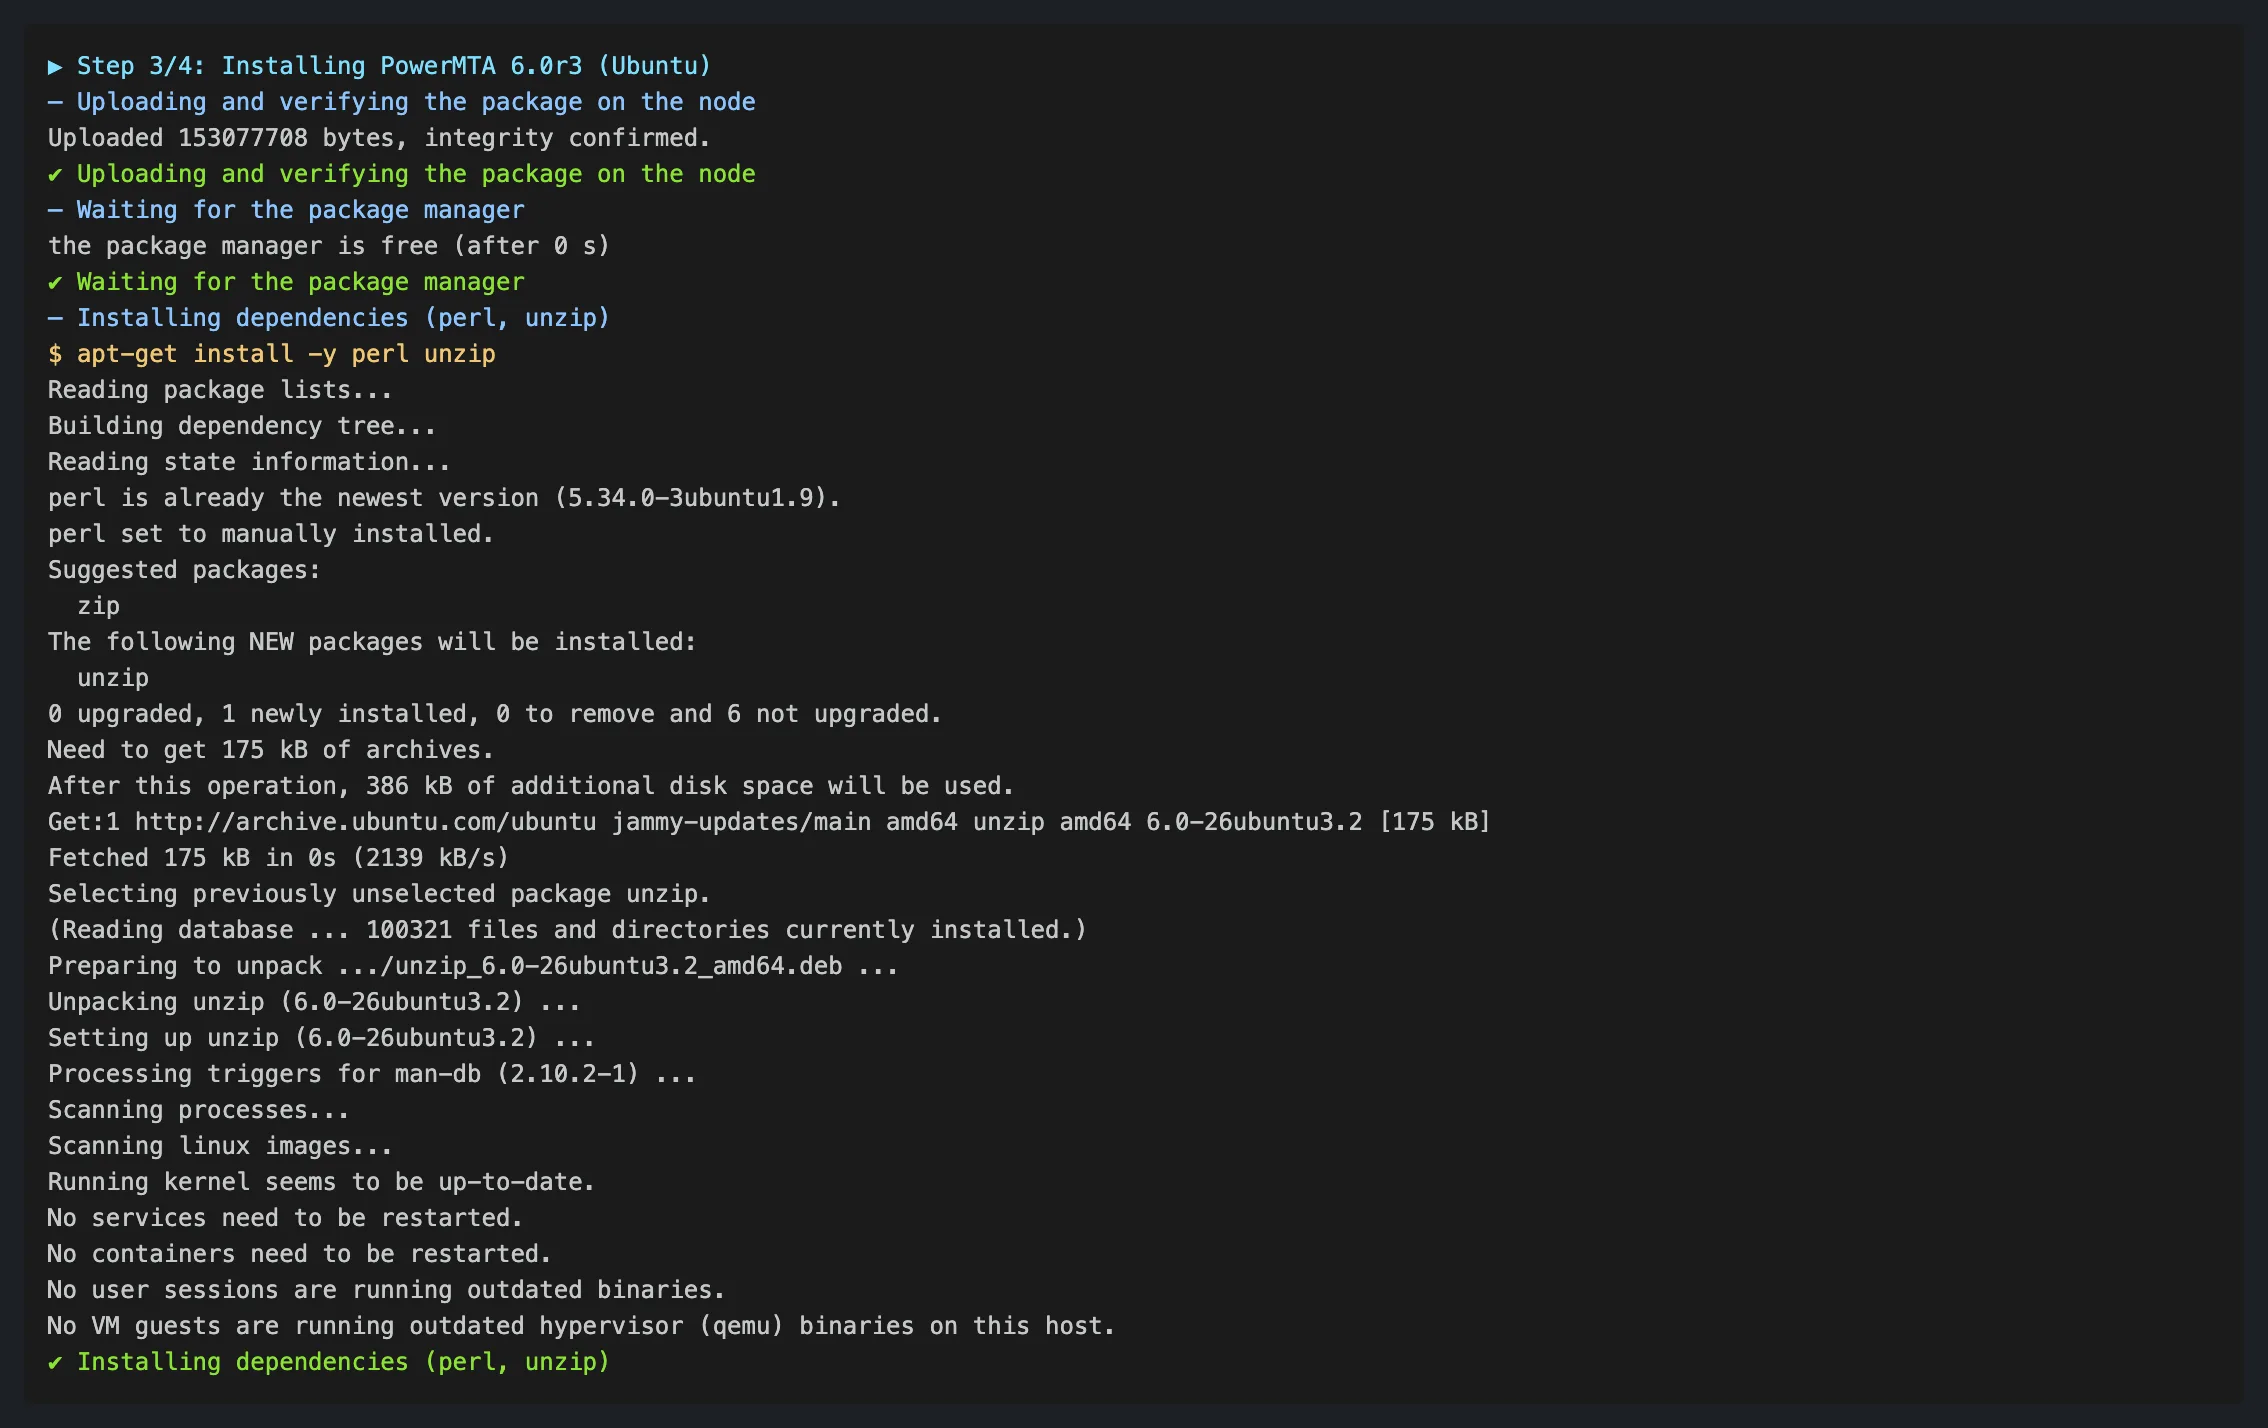
EnlargeStep 3 starts by uploading the PowerMTA package to the server and checking that the file is not corrupted. Then the Hub waits until the server releases the package manager and installs the dependencies. A fresh server is often busy with automatic updates, so the installation waits up to ten minutes instead of failing with an error. Command output goes into the console as is, as it is produced, not in one piece at the end: yellow is the command itself, white is the server's response. Integrity is checked before installation: in the example, 153,077,708 bytes were uploaded and the check confirmed the file is intact. A green tick at the end of a line marks a sub-step that finished successfully.
 Enlarge
Step 3 then goes sub-step by sub-step, each with a one-line result. The Hub installs the package, sets the system language for MTA messages, opens ports, and sets up log rotation, permissions and services. At the end, it checks the MTA version and that it works, removes the installation package and registers the node in the Hub. The distribution with the license inside does not stay on the server, and the pmta and pmtahttp services start at boot. The log rotates daily with 14 copies kept, and ports 25, 2525 and 1000 are opened in ufw. The service limits are raised to 16,384 processes and 32,768 open files, and the /etc/pmta directory is owned by root.
EnlargeStep 4 makes the server manageable from the Hub. The Hub writes the settings, checks them for errors, reloads them and makes sure the MTA is running and reachable from outside: it connects to port 25 itself and receives the server's greeting. Management access is allowed only for the Hub, and the previous configuration is saved as a copy. At the end — a check of the reverse DNS (PTR) of every server address: in the example, forward and reverse records match for 2 of 2 addresses. The telemetry token and the main config are written to /etc/pmta/mtahub-headers.txt and /etc/pmta/config, and the syntax is checked with pmta test config before the reload.
EnlargeThe MailerQ console is longer than PowerMTA's: on the first server of a cluster it runs three installations at once — the database, the broker and the MTA itself. On a server joining a ready cluster, instead of installing the database and broker, the Hub opens access to them on the neighboring server. Both options end with a summary: what is on the server, where the management panel is, which database and broker the node is connected to and when mail intake opens. Passwords in the console are hidden behind asterisks, and the installation files are removed from the server afterwards.
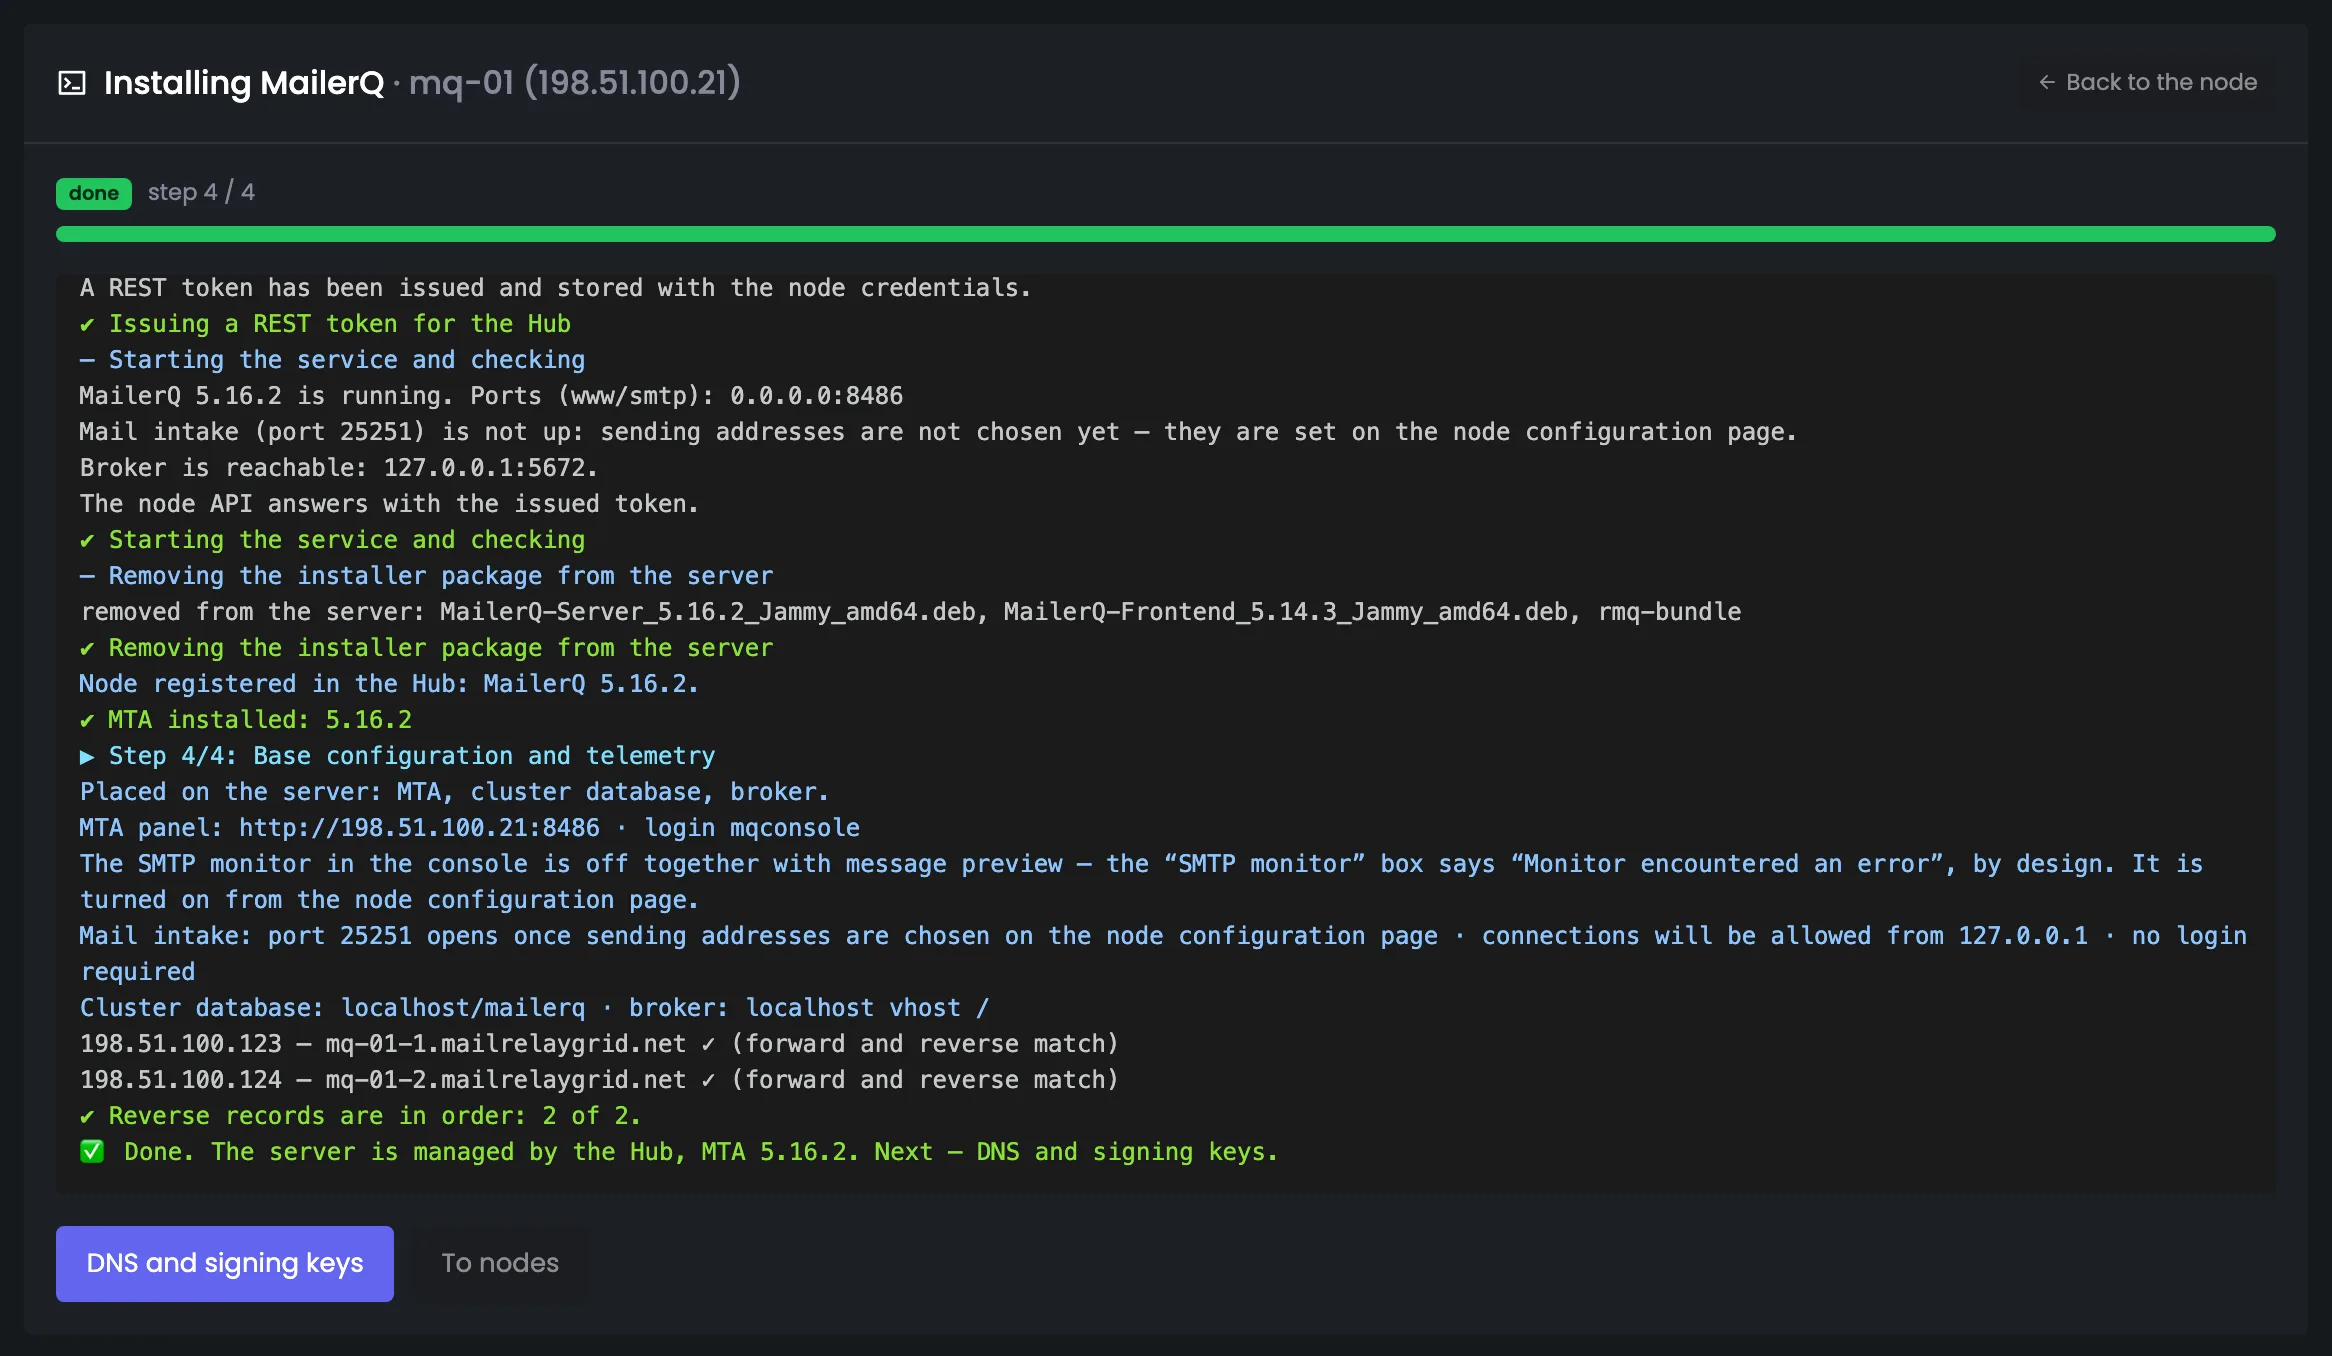
The end of the installation of a MailerQ cluster's first server. Three installations ran in one log — the database, the broker and the MTA itself — and all four steps are complete. MailerQ 5.16.2 is running, the panel works on port 8486, and the node API answers with the token; mail intake on port 25251 is not up yet. At the bottom — a summary for the next stage and the final line “Done”. The console stays with the task, so you can open it after the installation, and the installation files have already been removed from the server. The step 4 summary says where the database and broker are, the panel's address and login, and when mail intake opens.
 Enlarge
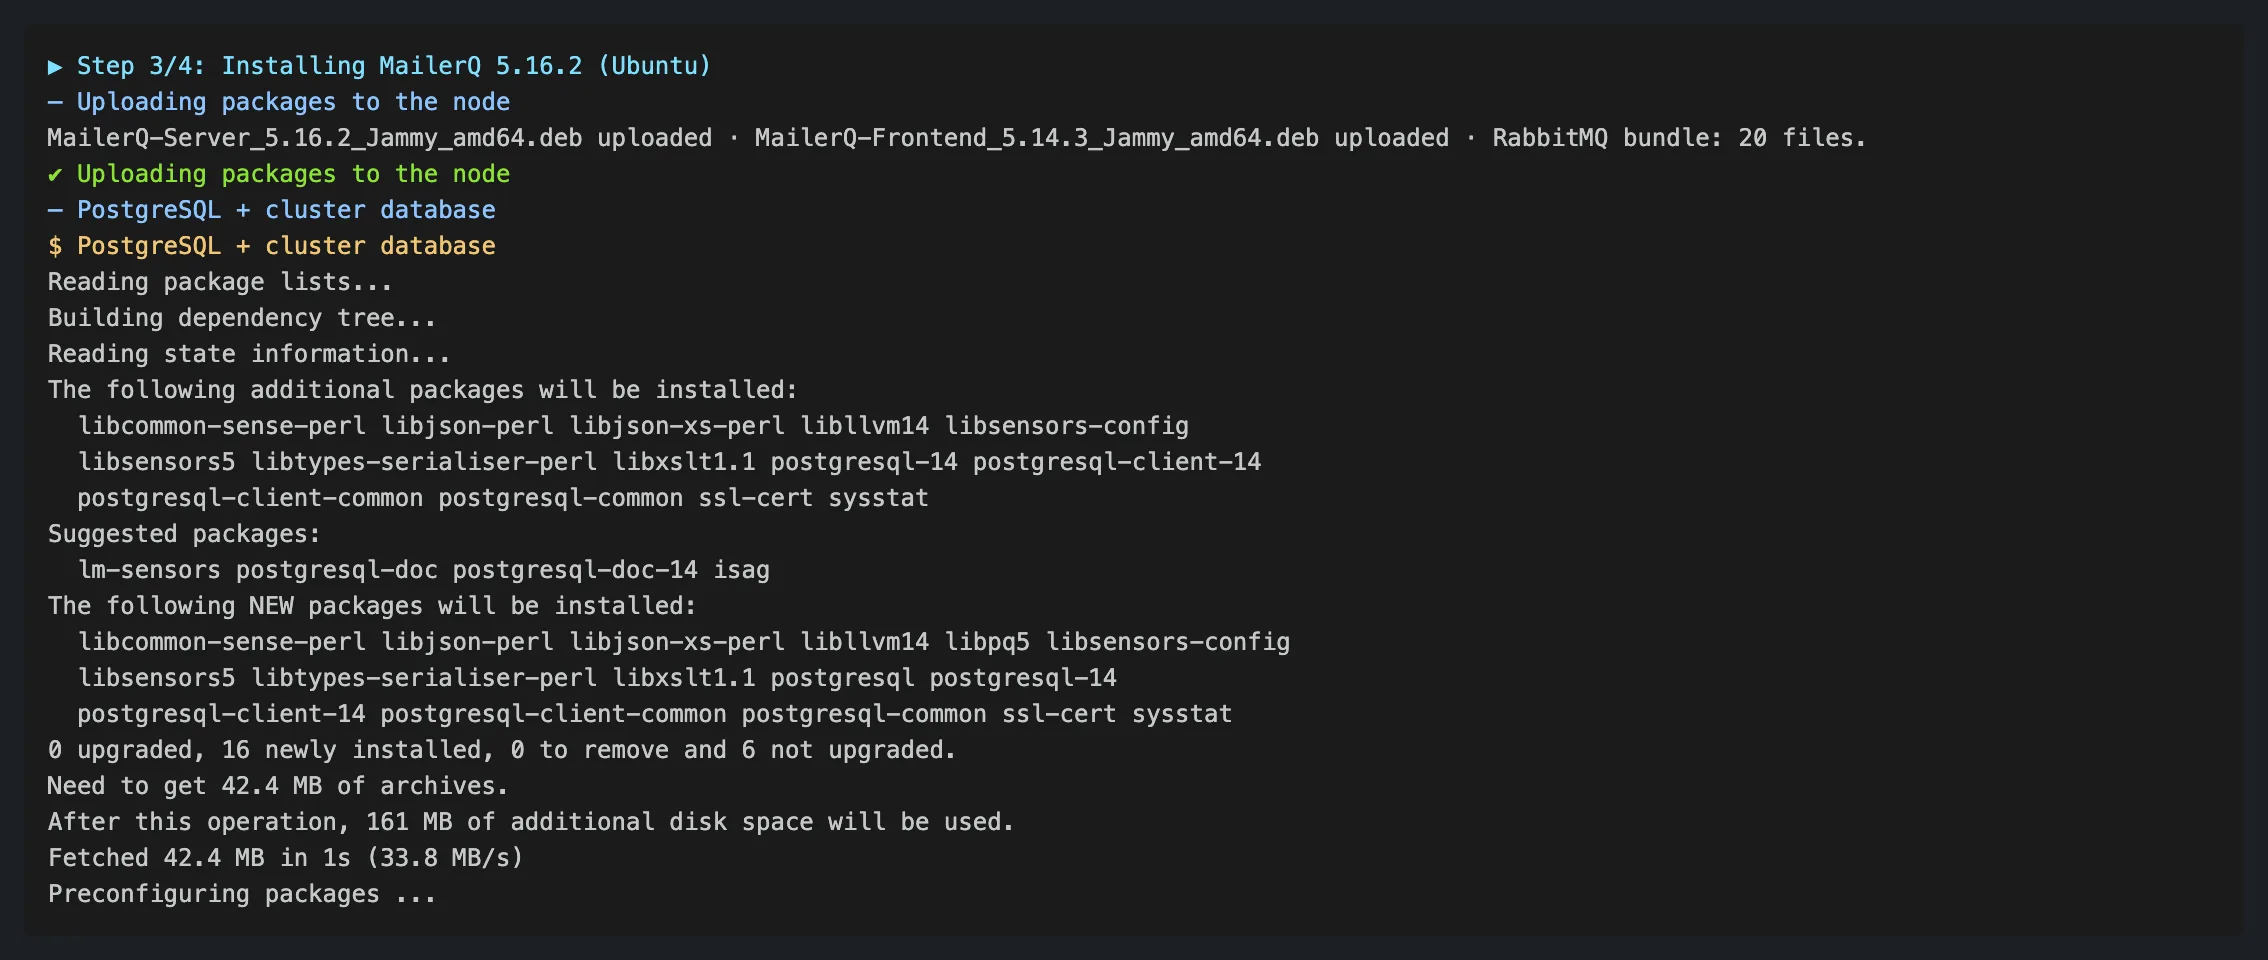
For MailerQ, step 3 starts by uploading all the packages it needs to the server — in the example, 20 files: the MailerQ 5.16.2 package, its web panel and the RabbitMQ bundle. Then the chosen cluster parts are installed: first PostgreSQL with the cluster database and its user, then RabbitMQ from the ready bundle, its panel, the cluster administrator and permissions on the vhost. The installation output goes into the console as is — you can see which packages the server installs and how much space they will take. After the database and broker, the same step installs the MailerQ packages and the PostgreSQL client; PostgreSQL itself comes from the Ubuntu repository.
 Enlarge
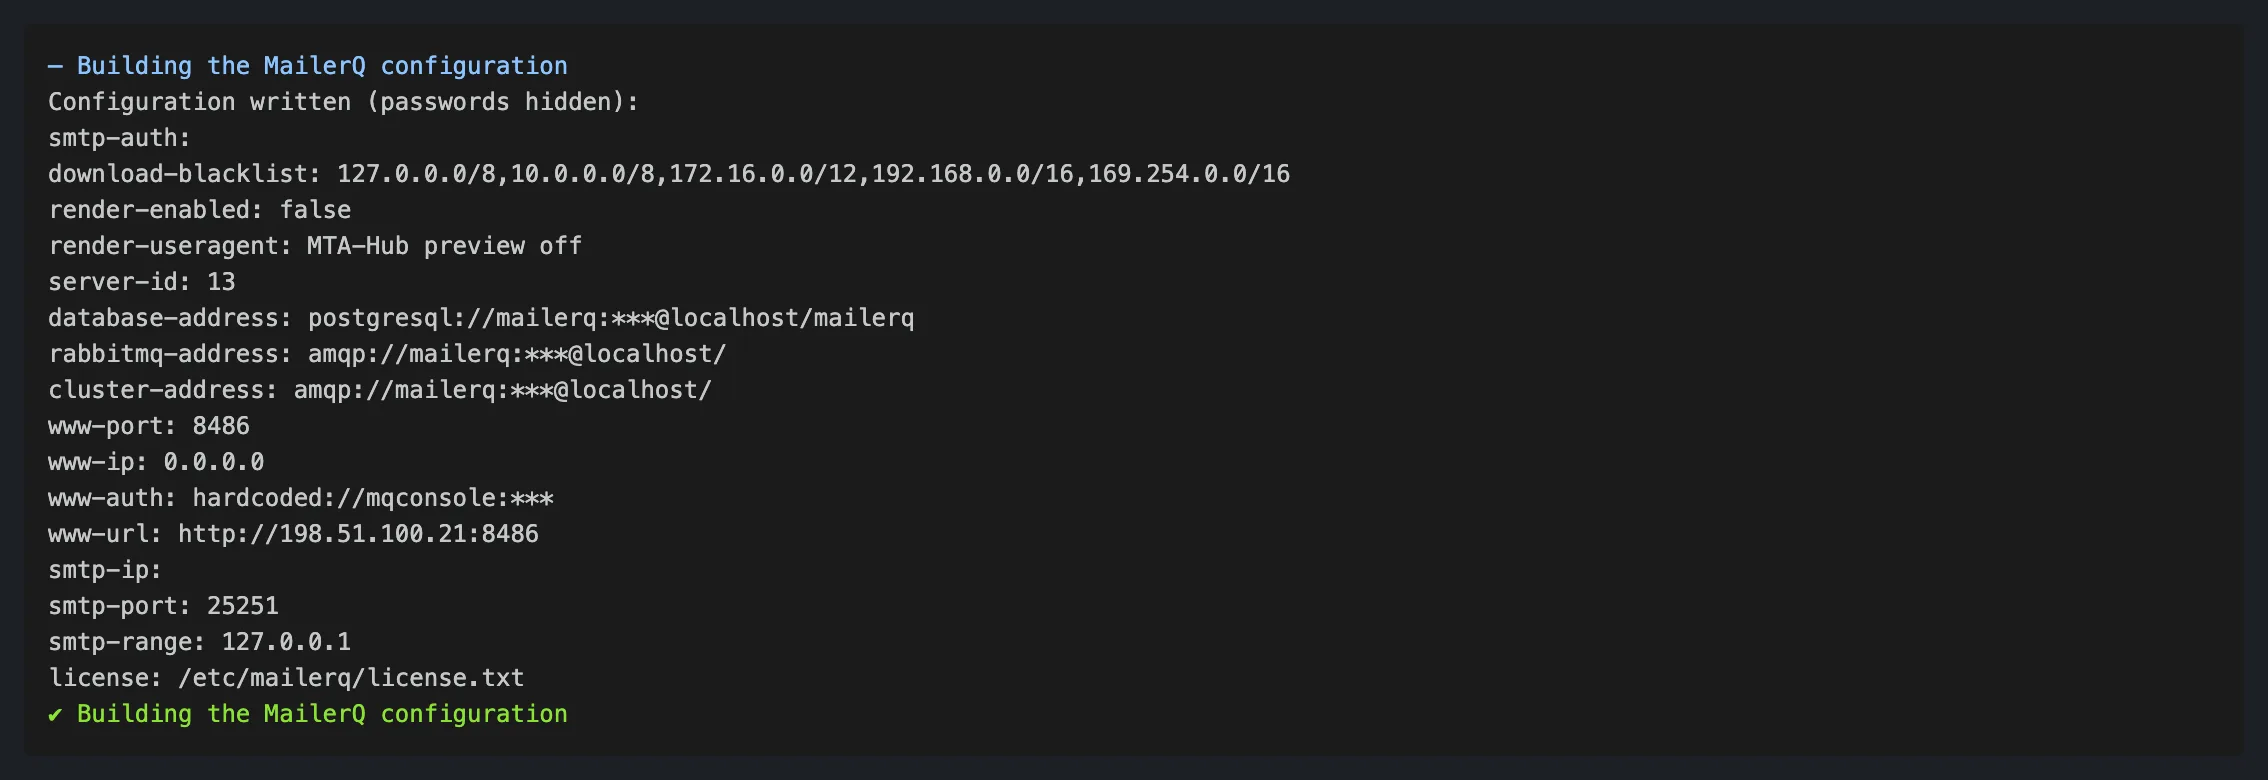
The console shows exactly what is written into the MailerQ config, with passwords hidden behind asterisks. The config holds the database and broker addresses, the management panel, mail intake, the license and safe defaults: downloads from local networks are forbidden and message preview is off. In the example, the database and broker run on this same server, and the panel is on port 8486. The mail intake addresses are left empty on purpose for now: they are chosen on the node configuration page. This output makes it easy to check that the credentials were filled in correctly without logging in to the server. The path to the MailerQ license file is also visible in the config.
 Enlarge
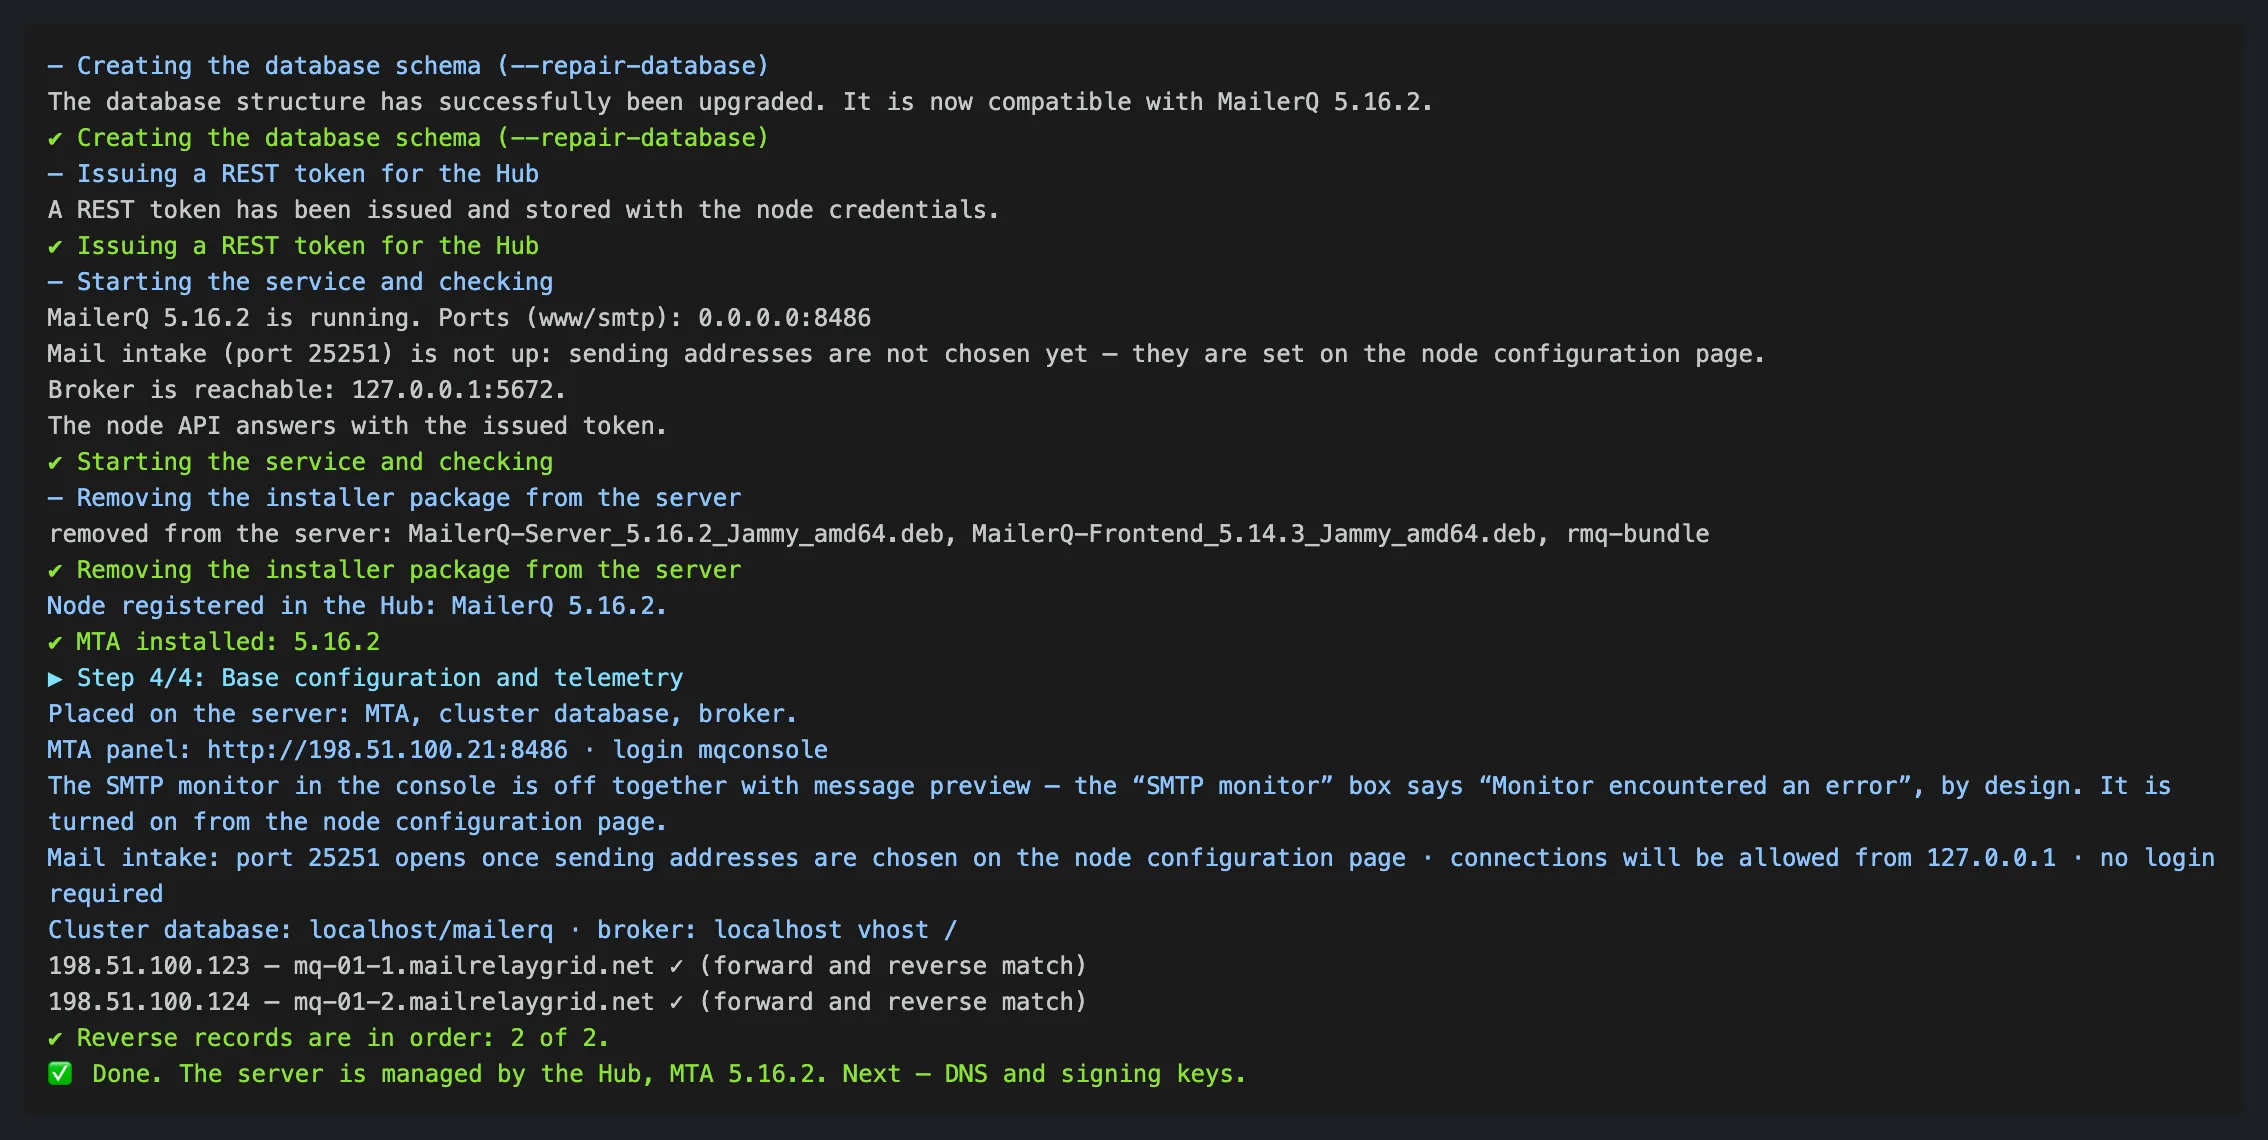
The end of step 3 and step 4 for MailerQ. The Hub prepares the database structure with mailerq --repair-database, issues a REST API token so the node API works from the first minute, starts the MTA and checks every part, and then removes the installation files. The summary explains where the components are and why SMTP is not accepting mail yet: port 25251 is not up by design — until sending addresses are chosen. The reverse records of the server's addresses are checked here too; in the example, 2 of 2 match. The REST token is saved in the node's credentials, so the Hub works with the MTA through the API right after installation.
 Enlarge
SMTP mail intake turns on when you choose addresses in the server configuration.
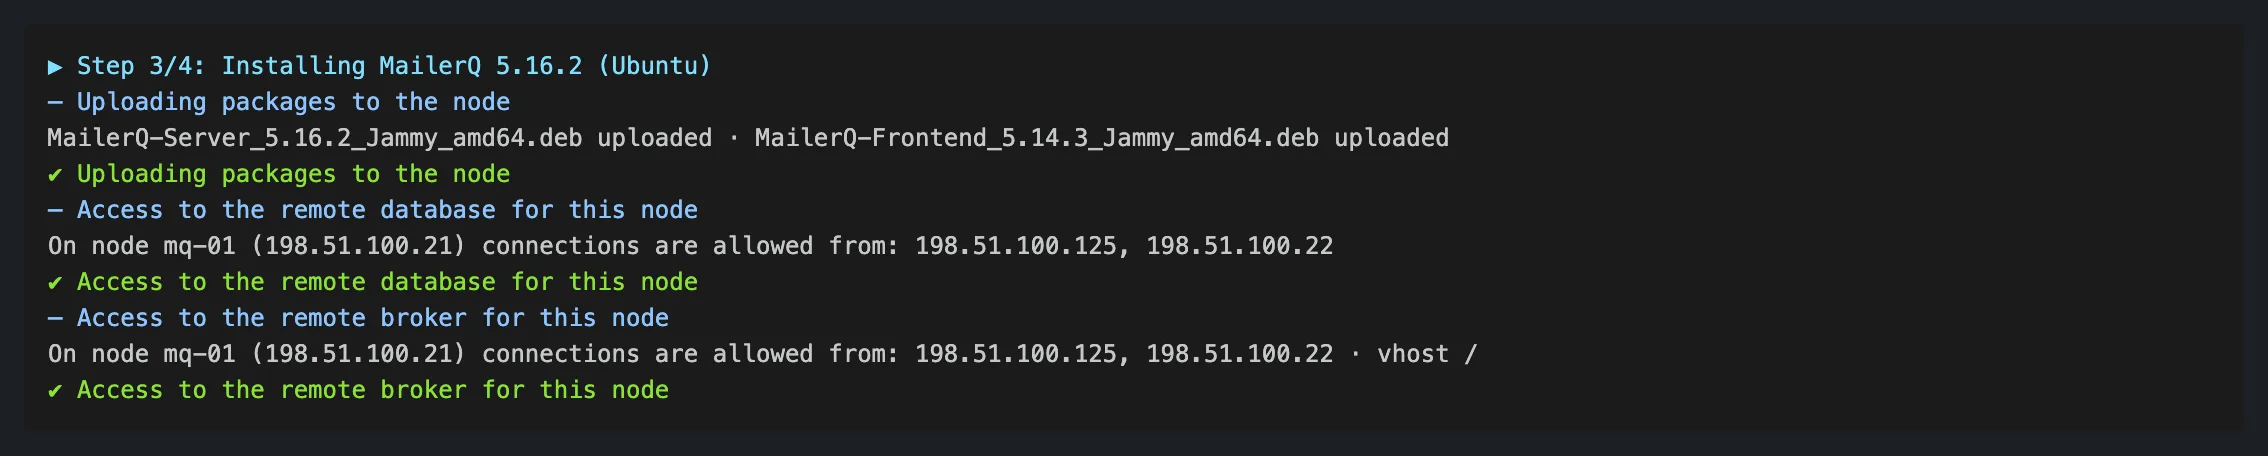
This is what step 3 looks like for a server joining a ready MailerQ cluster. There is no database or broker installation here: the Hub itself signs in to the server where they run and opens access there for the new node's addresses. Only the MailerQ 5.16.2 package and its web panel are uploaded to the server, without the RabbitMQ bundle. The REST token is not issued a second time — it is already in the shared cluster database, and nothing has to be done by hand on the neighboring server. Access is opened only to the new node's addresses, for the broker with vhost “/”; in the example, the database and broker run on mq-01 (198.51.100.21).
 Enlarge
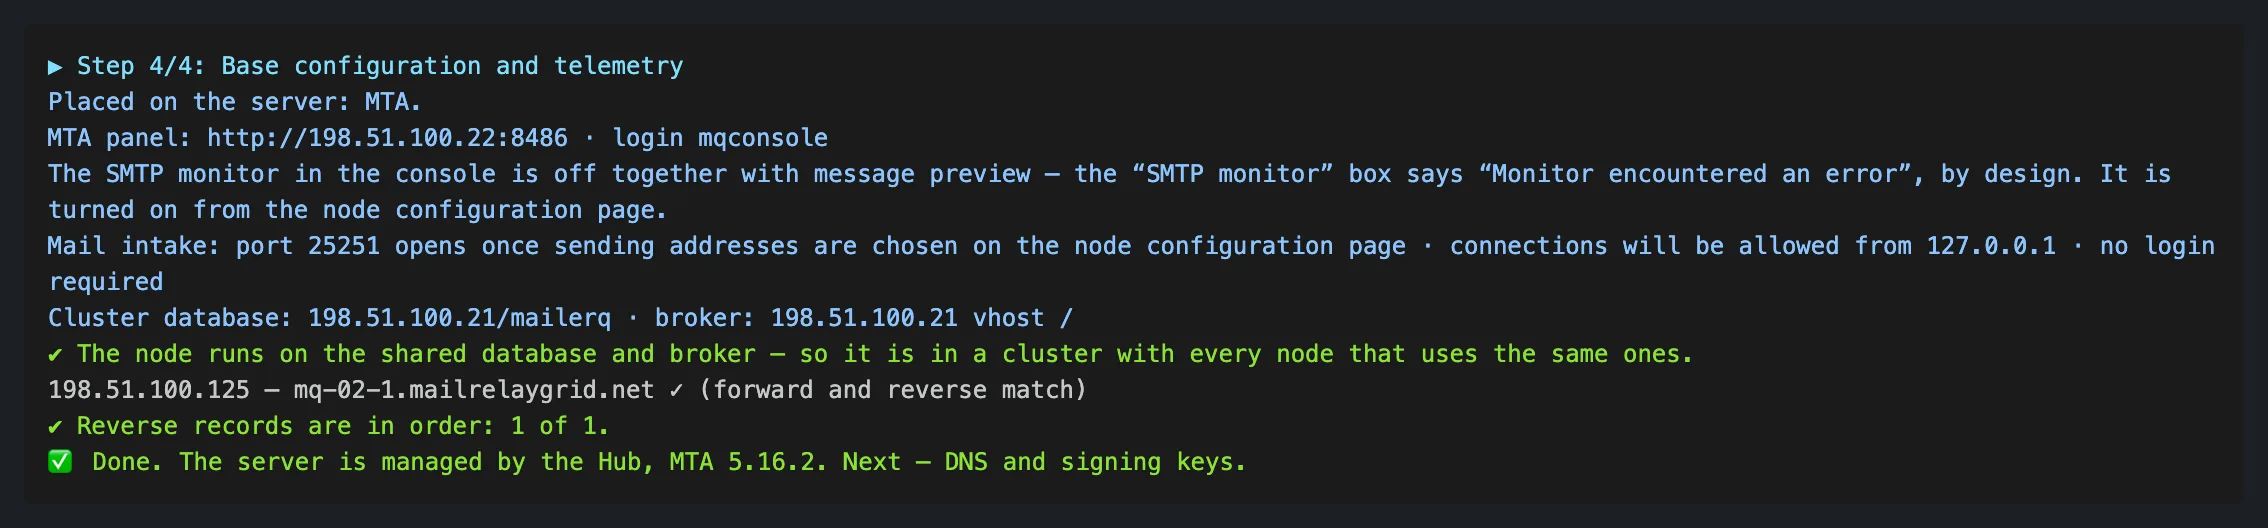
The summary of a joined MailerQ node. Only the MTA runs on the new server, while the database and broker stay on the cluster server — in the example, on mq-01 (198.51.100.21). The main line confirms that the node works on the shared database and broker — so it is in a cluster with everyone who uses the same ones. Mail intake on port 25251 opens once sending addresses are chosen in the node configuration, and the final line “Done” confirms that the server is managed by the Hub. The reverse record of the new node's single address matches — in the example, 1 of 1. From here, the node is set up the same way as the first: addresses, domains and DNS.
 Enlarge
06 / Questions and answers
About compatibility, packages, replacing an MTA and moving from installation to sending.
Not for a normal installation. You choose the MTA, the package and the server, and the Hub carries out all the steps itself, showing the commands and their output in the console. If a check finds a problem, the reason will be in the log.
The installer supports PowerMTA 6.0r3 for Ubuntu 22.04 and Rocky Linux 8, and MailerQ 5.16.2 for Ubuntu 22.04. The architecture is x86_64. Which package variants are available to you is shown in your Hub. Whether a package fits the server is checked before installation.
The Hub owner places the MTA installation files and the bundles they need in the packages folder on the Hub server in advance. In the interface, you choose a ready package. Whether you have an MTA license and what its terms are has to be checked separately.
Yes. The Hub runs the installation itself, and it carries on after you close the tab. The console is saved — you can open it from the server's card.
If the Hub finds a problem that makes installation impossible, the installation stops and the console explains why. Warnings are shown separately. Fix the problem and run the installation again.
Yes, but the Hub treats this as a replacement and shows in advance what it will affect. If the server is sending or warming up, that may be interrupted. You have to confirm the start separately.
Choose to install the MTA on a new server, and for PostgreSQL and RabbitMQ point to the ones already running in the cluster. If they are on Hub servers, the Hub fills in the credentials itself and opens access for the new server's addresses. Access to a third-party database and broker is set up separately.
Not right away. After installation the server is under management and monitoring. To send, you need to prepare addresses and domains, DNS and DKIM, and then finish setting up the MTA. For MailerQ, SMTP mail intake turns on after you choose addresses. Warm-up is a separate stage.
07 / Next stage