Addresses and mail nodes
Basic records and service names are built according to which sending node the domain is assigned to.

Mail DNS records for your sending domains
The Hub builds A, MX, SPF, DKIM and DMARC records for your nodes, publishes them and checks the result through Google and Cloudflare.
Changed values, publishing delays, extra records and PTR problems — all in one place.
01 / DNS records for mail
The Hub builds the mail records itself — from the server's addresses, connected proxies, signing keys and the DMARC policy you choose. You don't need to write A, MX, SPF, DKIM and service subdomains by hand. Each record shows its purpose, value, TTL and state.
Basic records and service names are built according to which sending node the domain is assigned to.
The node's addresses and the proxies' outgoing IPs are included. Extra sources are set in the domain settings.
The Hub issues keys, builds the selector records and shows whether signing is ready on the MTA.
The records use the policy you chose and the address for reports. If someone changes the value, the check catches it.
Bounce, complaint and proxy subdomains are part of the set. For proxies, the Hub links the names to the outgoing IP addresses and includes them in SPF.
Proxy example02 / Checking DNS records
A record saved in a provider's panel doesn't yet mean the rest of the internet can see it. So the Hub compares the expected record with the answers of Google's and Cloudflare's public DNS servers. You see whether the value matches, where it's already visible and what to do next.
The Hub knows what value should be in DNS: it built it itself from the domain settings and sent it to where the zone is kept. In the example, the DMARC policy is “quarantine”.
The Hub asks Google's and Cloudflare's public DNS servers whether the record is visible and with what value — every night and when you click “Check in DNS”. There are three kinds of answer:
Both DNS servers returned the expected policy.
Google already returns the record, Cloudflare doesn't yet — you can run the check again.
The record was changed by hand. The “Export again” button restores the Hub's value.
03 / Where the DNS zone lives
For each domain, choose where its zone is kept: on your own name servers or in a DNS provider's panel. The Hub sends the records to your NS or through a connected DNS account, and creates a separate task for each place.
The Hub installs PowerDNS on your server and keeps your sending domains' zones there. You change the NS at your registrar — the Hub shows you what to enter and checks the delegation.
The zone stays in the provider's panel; the Hub sends records there through a connected DNS account and checks whether they're visible through public DNS servers.
04 / DKIM rotation
A DKIM signing key is changed from time to time, and the new key gets a new selector. The Hub tracks its publication and keeps the old record for a transition period based on the TTL — so mailbox providers never see a signing error.
A new key pair is created under its own selector and gets its own DNS record.
Until the new key's record is visible at Google and Cloudflare, messages are signed with the previous key.
The previous record stays in the zone for a time tied to the TTL. The state of both keys is shown on the card.
hub2604Used for signinghub2610Awaiting publication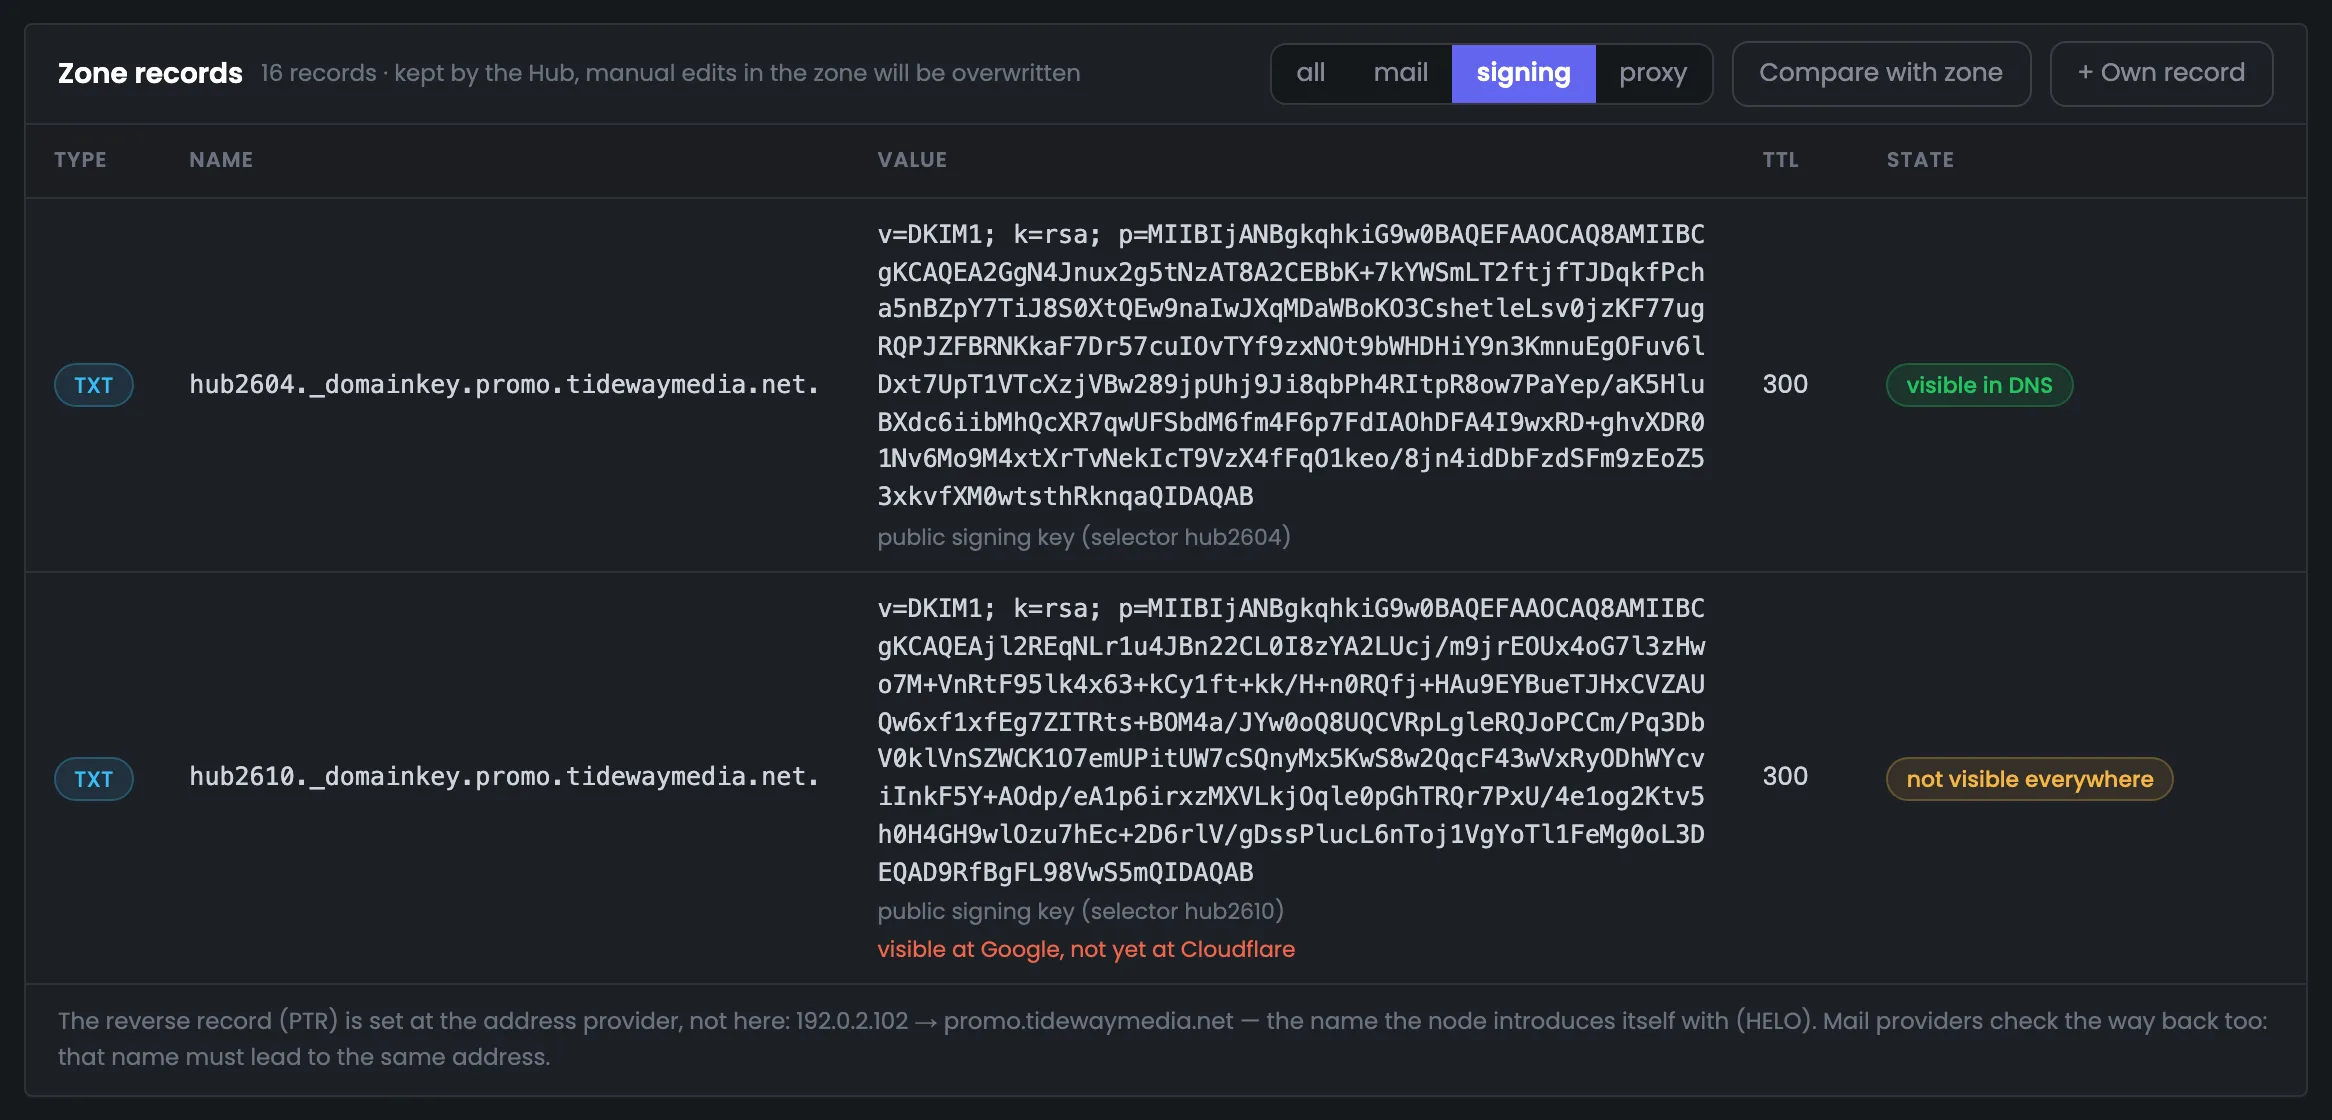 Enlarge
In the screenshot, the new selector already answers at Google but isn't visible at Cloudflare yet. The previous key keeps working.
Managing signing keys05 / The interface in detail
All 15 screens of the module: domains, bulk actions, zone records, DKIM, settings and check results.
Working with DNS starts with the big picture across all your sending domains. At the top are six numbers: how many domains there are, where their zones are kept, how many records are already visible on the internet, how many domains have their signing keys on the servers, whether there are reverse DNS records, and whether the name servers at the registrar match. Below is a list of what needs fixing and a table of all domains. From here you can also export, check or reissue keys for a whole group of domains at once.
The summary is the section's first screen and the big picture across all sending domains in six numbers. Each number answers its own question: how many domains there are and where their zones are kept, how many records are already visible in DNS, whether signing keys are on the servers, whether there are reverse DNS records (PTR), and whether the name servers at the registrar match. The tile color shows at once whether all is well: in the example, the red tile is a record changed by hand, and the yellow one is a domain still waiting for its NS change. Choosing a server above the tiles recounts the numbers for that server only. If a tile isn't green, start with the “Needs attention” block below: the same problem is already listed there with a button that takes you to the fix.
 Enlarge
The numbers in the screenshot belong to an example infrastructure, not to the module's limits.
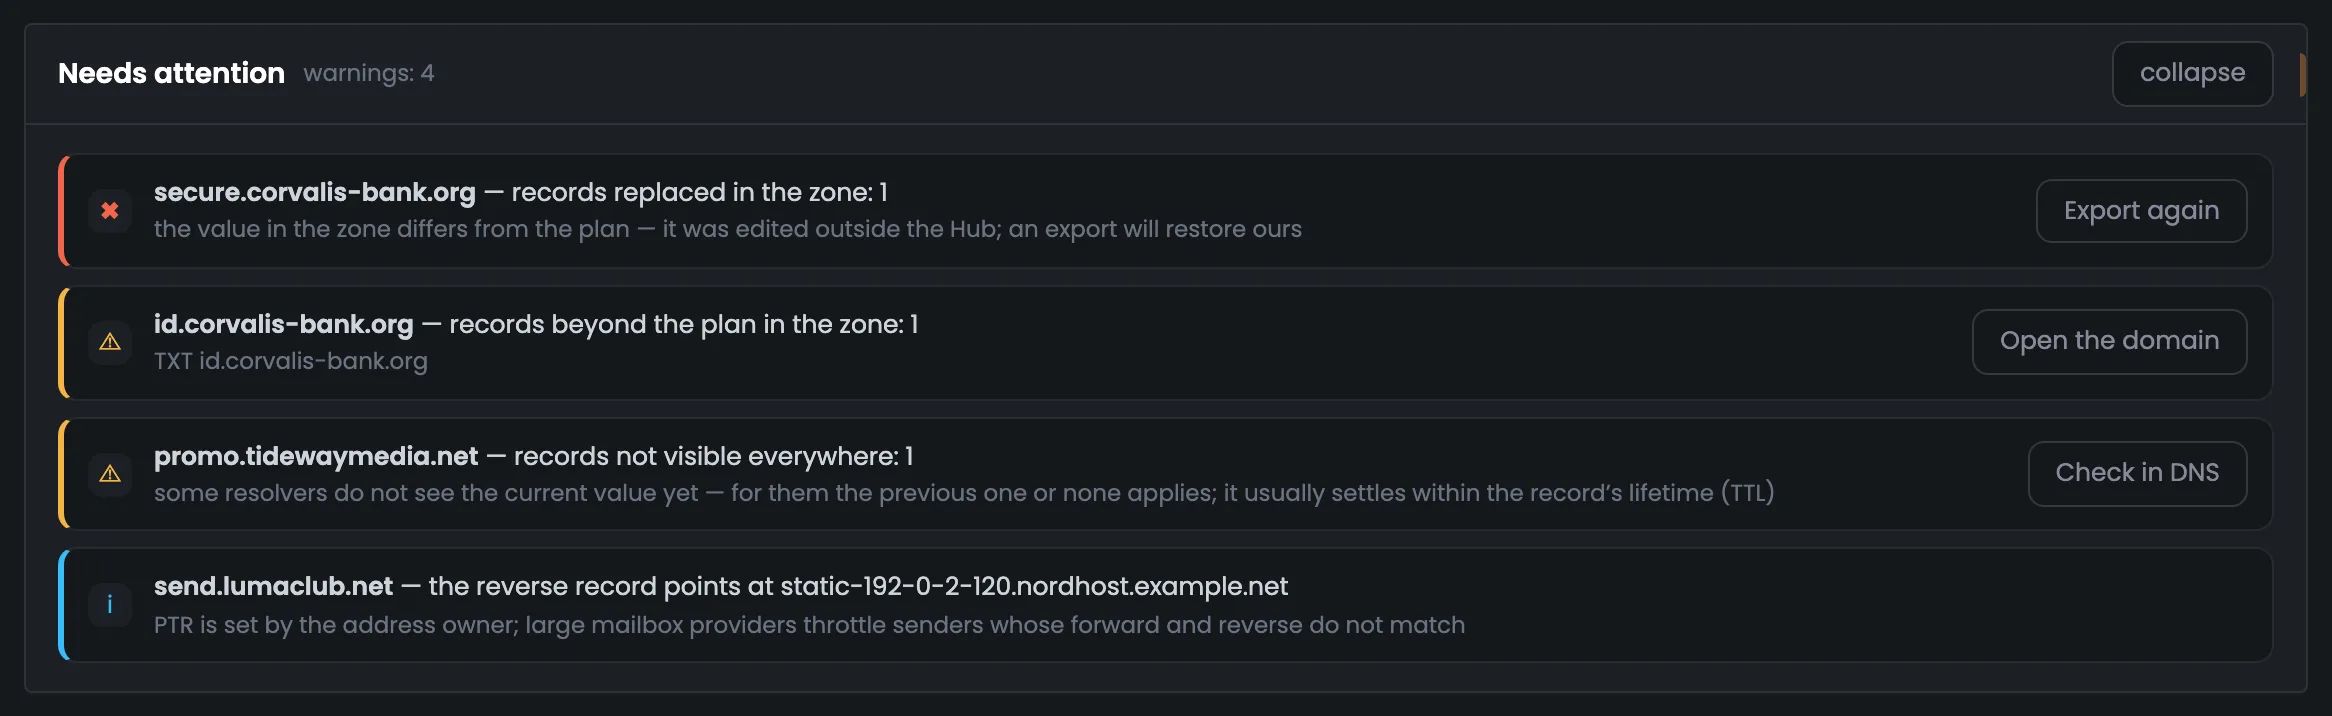
The “Needs attention” block is a list of what needs fixing in DNS, starting with what's most dangerous for delivery. It holds only real problems: records changed by hand, extra records in the zone, records not yet visible everywhere, and wrong reverse DNS records. Each row has a button that takes you to the fix: “Export again”, “Open the domain” or “Check in DNS”. This list is a handy place to start your daily domain check: while it isn't empty, some messages may not arrive. A new domain whose records haven't been exported yet isn't listed here: that's a normal setup step, not a problem, and such a domain shows up in the domain table.
 Enlarge
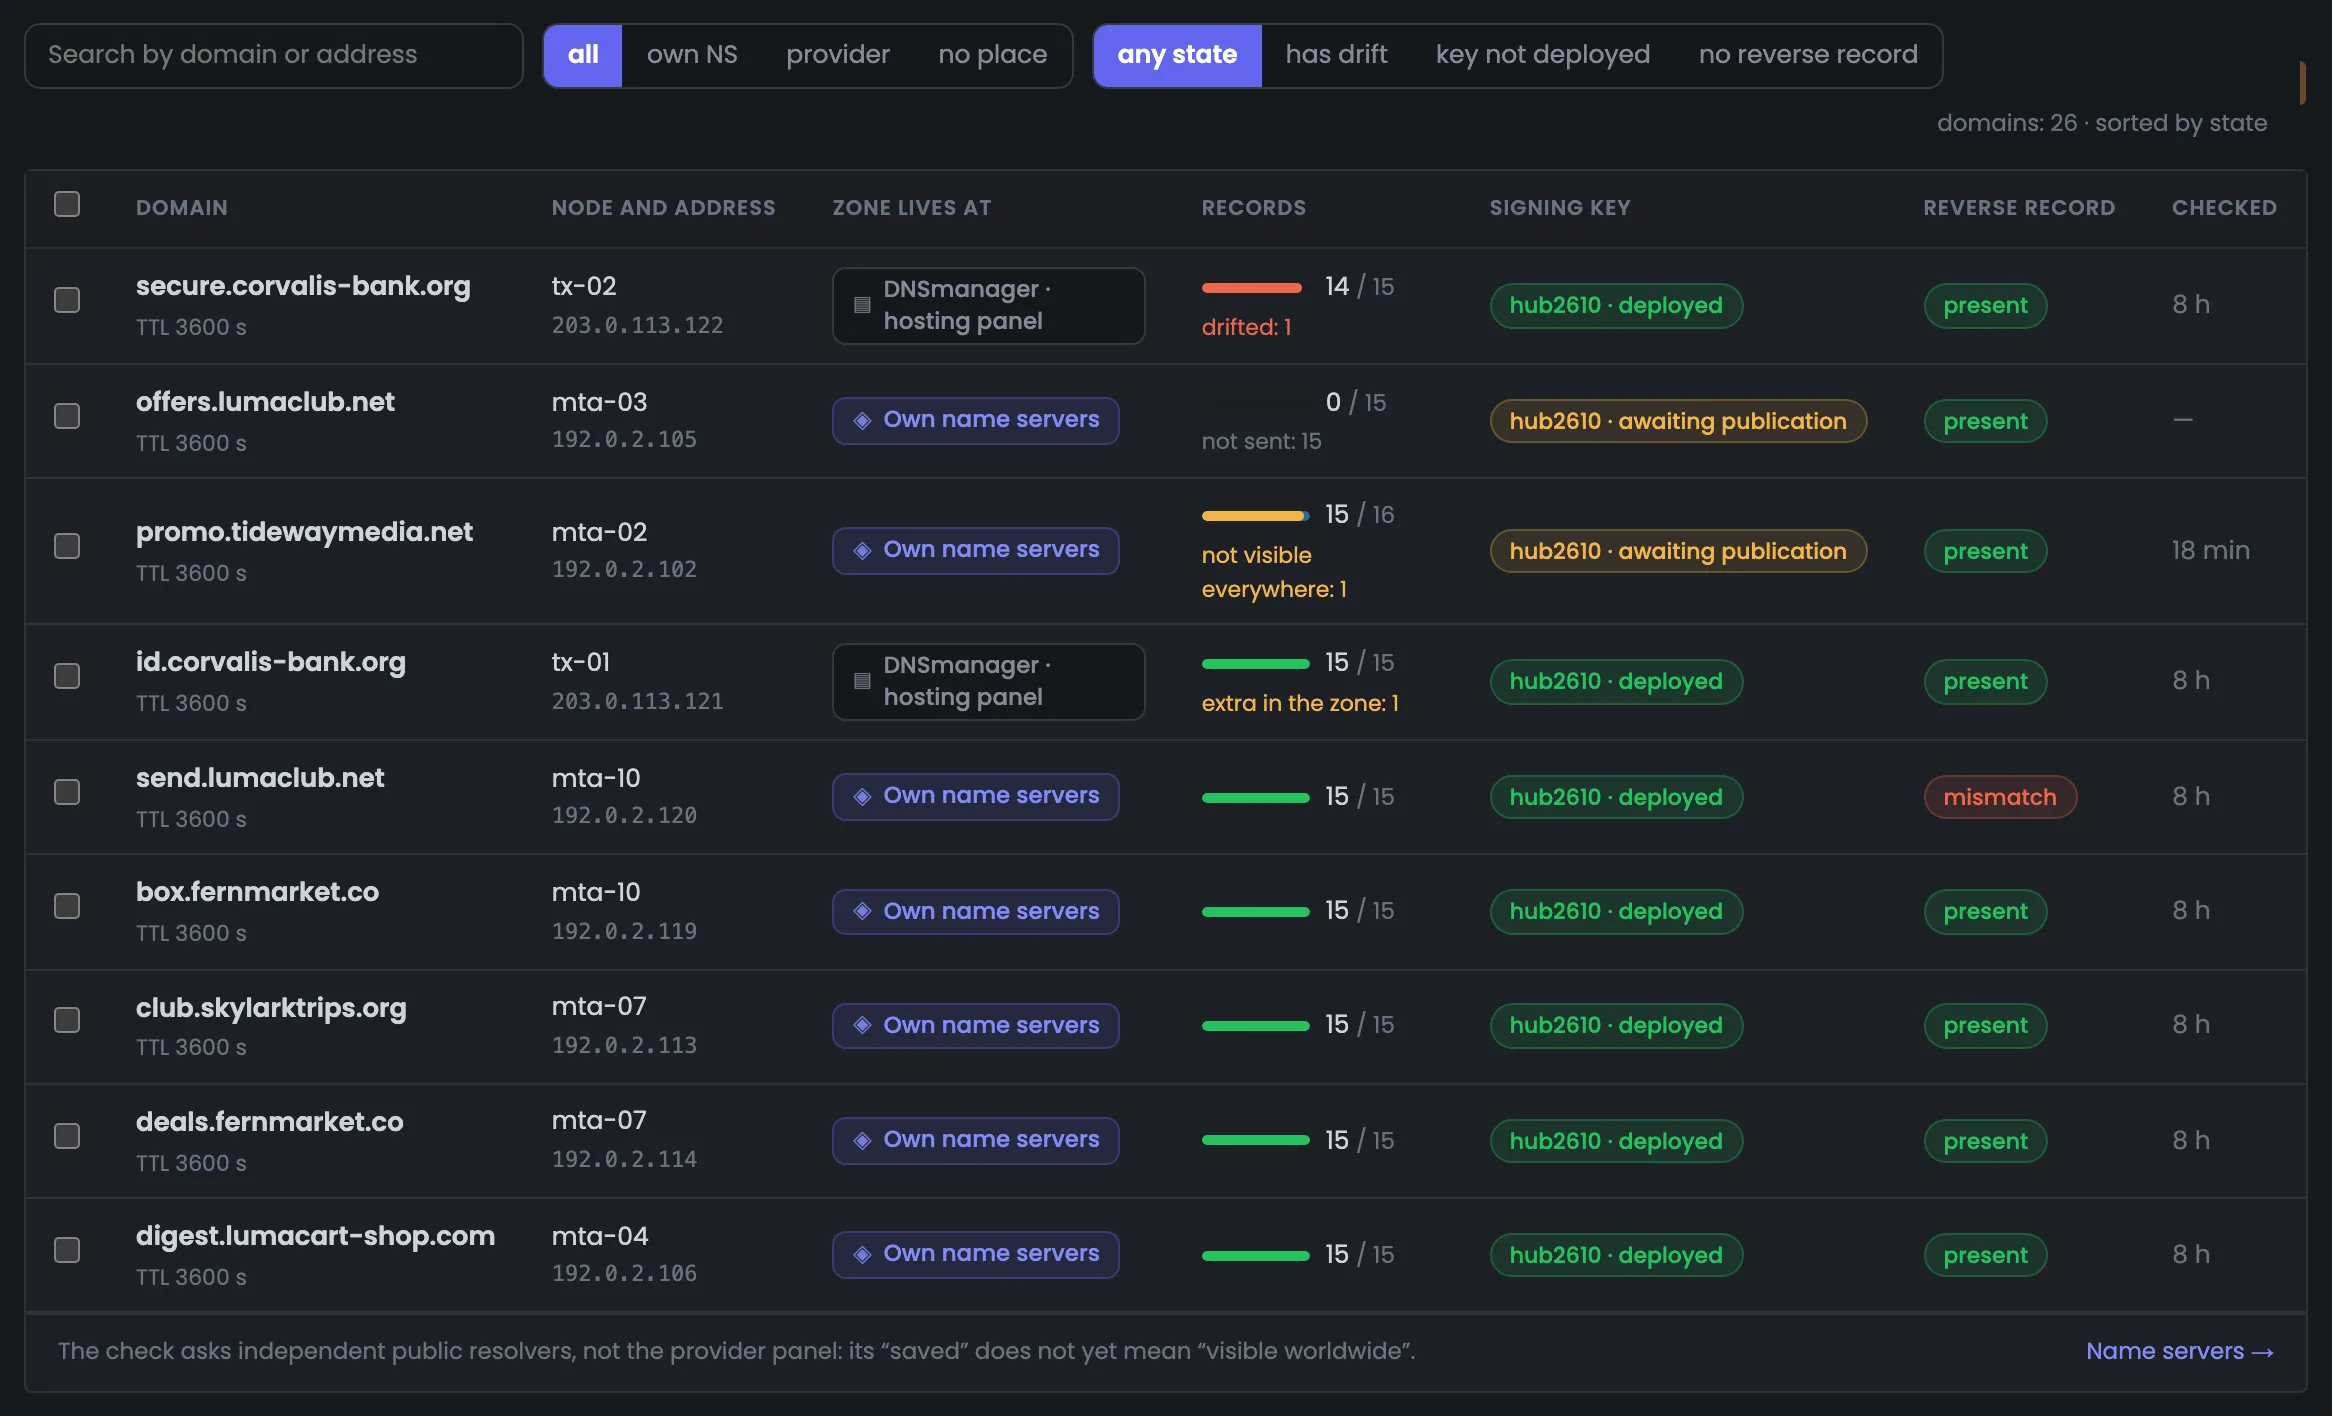
The domain table is the working list of all your sending domains: one row per domain. A row shows which server and address it sends from, where the zone is kept, how many records are visible in DNS, whether the DKIM signing key is ready, whether there's a reverse DNS record and when the domain was checked. Domains with problems are at the top and the rest are alphabetical, so whatever hurts delivery doesn't get lost among healthy rows. Filters by zone location and by problem help you pick out the group you need quickly. In the example, all 15 records of the new offers.lumaclub.net haven't been exported yet: you tick such a domain in the table and export its records as the next step.
 Enlarge
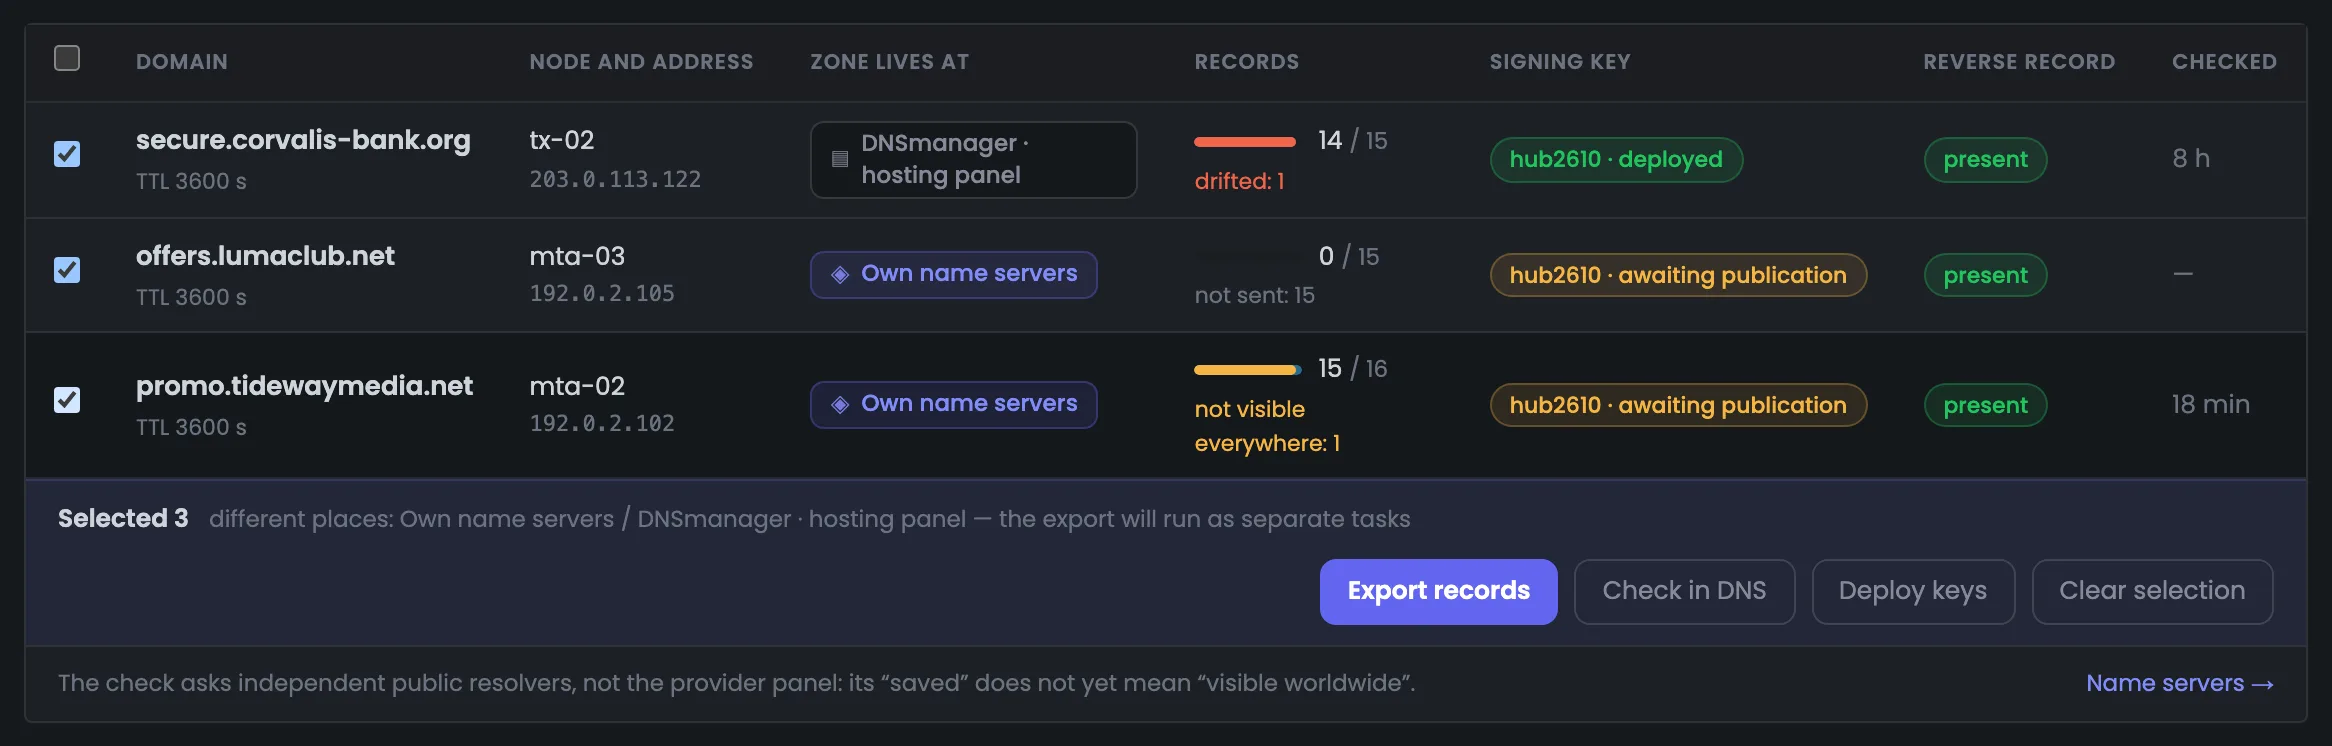
Bulk actions help when you have many domains and need to do the same thing for a whole group. Tick several domains and run one action for all of them at once: export records, check them in DNS or issue keys. The line above the buttons tells you in advance where the records will go — to your own name servers or to a provider's panel. If you tick domains from different places, the Hub creates a separate task for each place, and each task's progress is shown in a console. A typical case: after adding a group of new domains, export all their records at once, then check in one go whether they're visible in DNS.
 Enlarge
Everything about one domain: how to add it, where its zone is kept, which records it should have, and the rules the Hub uses to build them. Adding a domain only builds the records and issues the key — they go to DNS in a separate step, when you start it yourself. The domain card shows the state of each record and four key answers: are the records visible, is the signing key ready, do the name servers match, and is there a reverse DNS record.
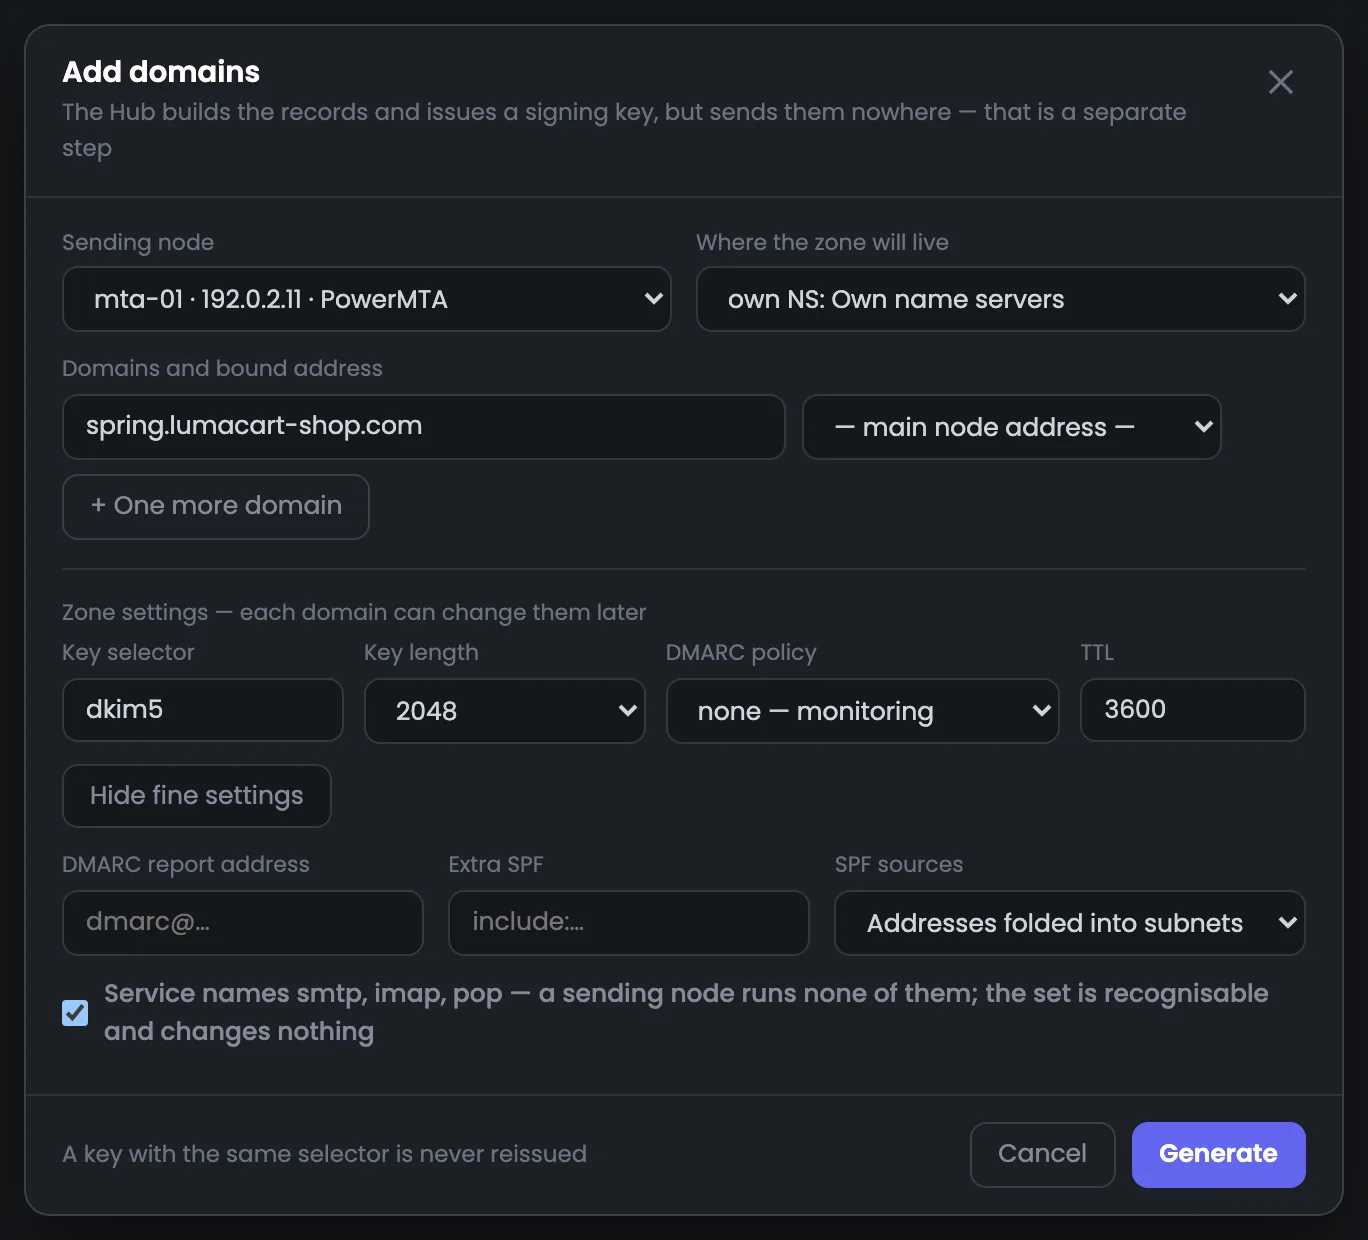
The add-domains form: new sending domains are connected in one step, and you can add several at once. Choose the sending server, where the zone will be kept, and the IP address to assign the domains to; below, set the record settings — DKIM selector and key length, DMARC policy and TTL. The Hub builds the records and issues the signing key, but doesn't send them anywhere: exporting is a separate step that you start. This way you can review the record set before it reaches DNS. Once added, the domain appears in the domain table, and its records are exported from the domain card or with a bulk action for the whole group at once.
 Enlarge
A 2,048-bit DKIM key is used by default.
The domain card brings together everything about one sending domain on one page. At the top: where the zone is kept, the server and address, the signing key and the records' time to live (TTL). The buttons next to it act on this domain only: export the records, check them in DNS, deploy the key to the server, change where the zone is kept, or remove the domain. That way you can't accidentally touch anything else — this is the place to go when you need to fix one problem from the “Needs attention” list. If the check showed a record isn't visible everywhere, you check it again right here with the “Check in DNS” button — other domains aren't affected.
 Enlarge
Four key answers about a domain that tell you whether it's ready to send mail. Are the records visible in DNS, is the DKIM signing key ready, do the name servers at the registrar match, and is there a PTR reverse DNS record. They show right away what setup step the domain is at and what's left to do. In the example a key change is under way: the new key is still awaiting publication, so messages are signed with the previous one, and one of 16 records isn't visible everywhere yet. If any of the four answers shows a problem, further down the same page are the zone records table and the log of the last check: they show exactly which record is lagging.
 Enlarge
In the example the new selector is awaiting publication, while the previous key keeps signing.
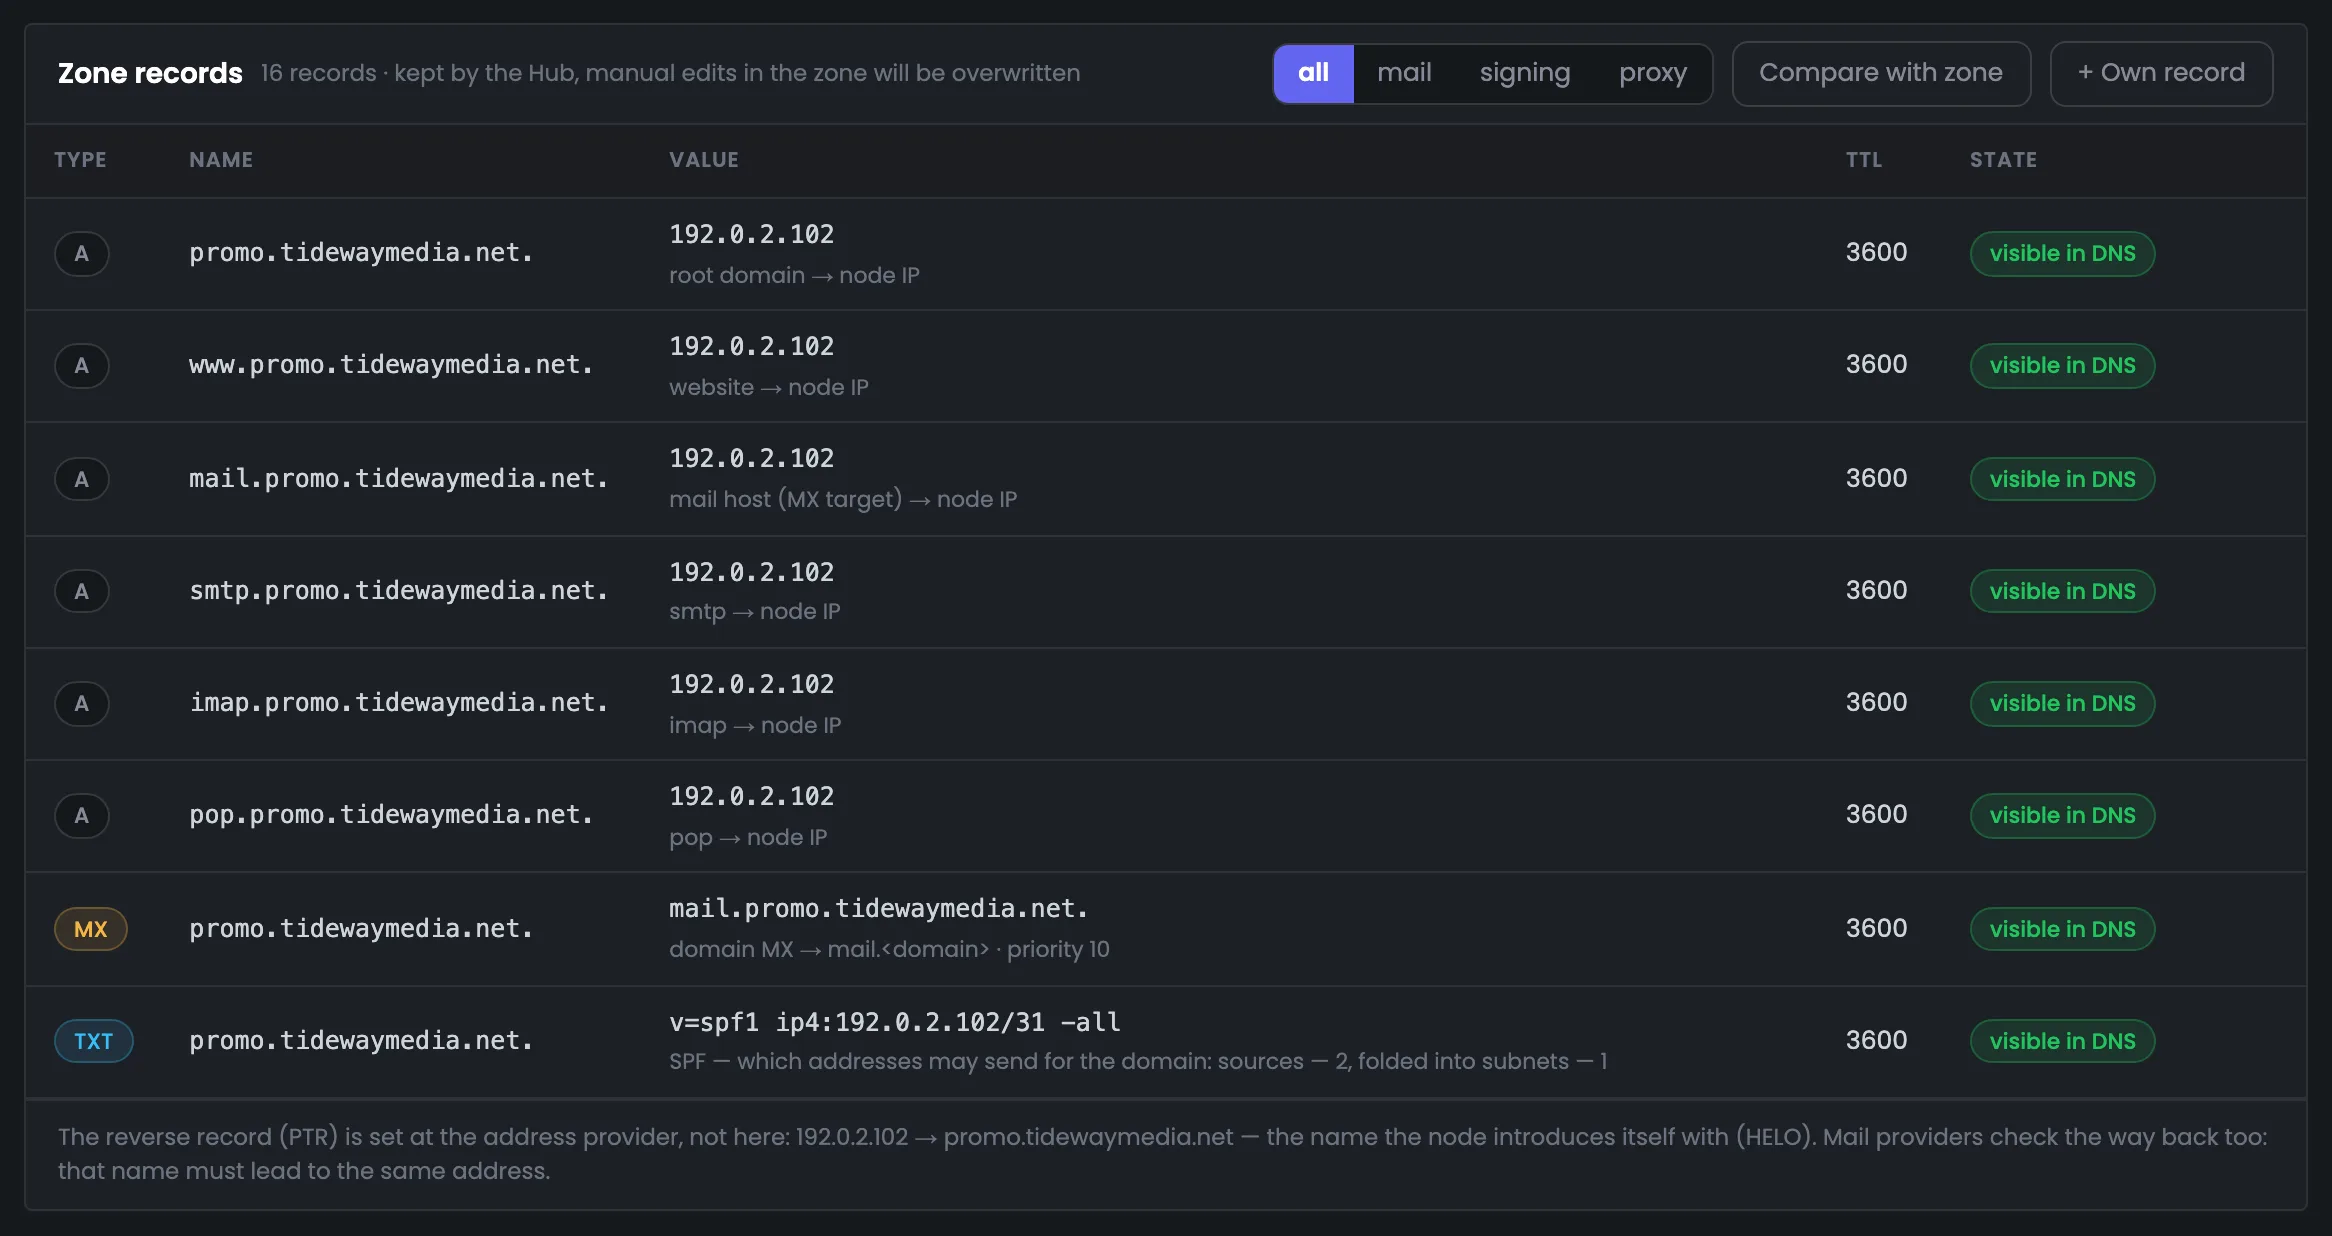
All DNS records of the domain's zone in one table — what the Hub has built for this domain's mail. Each record has its value, a note on what it's for, its time to live and its state: whether it's visible in DNS. You can filter records by purpose — mail, signing, proxy — and the “Compare with zone” button compares them with what's in DNS right now. At the bottom the Hub suggests the exact value for the address's reverse DNS record: it's set by the address provider, not the Hub. If a record was changed by hand in the provider's panel, you see the mismatch with the Hub's value here, and the “Export records” button in the card header restores the correct value.
 Enlarge
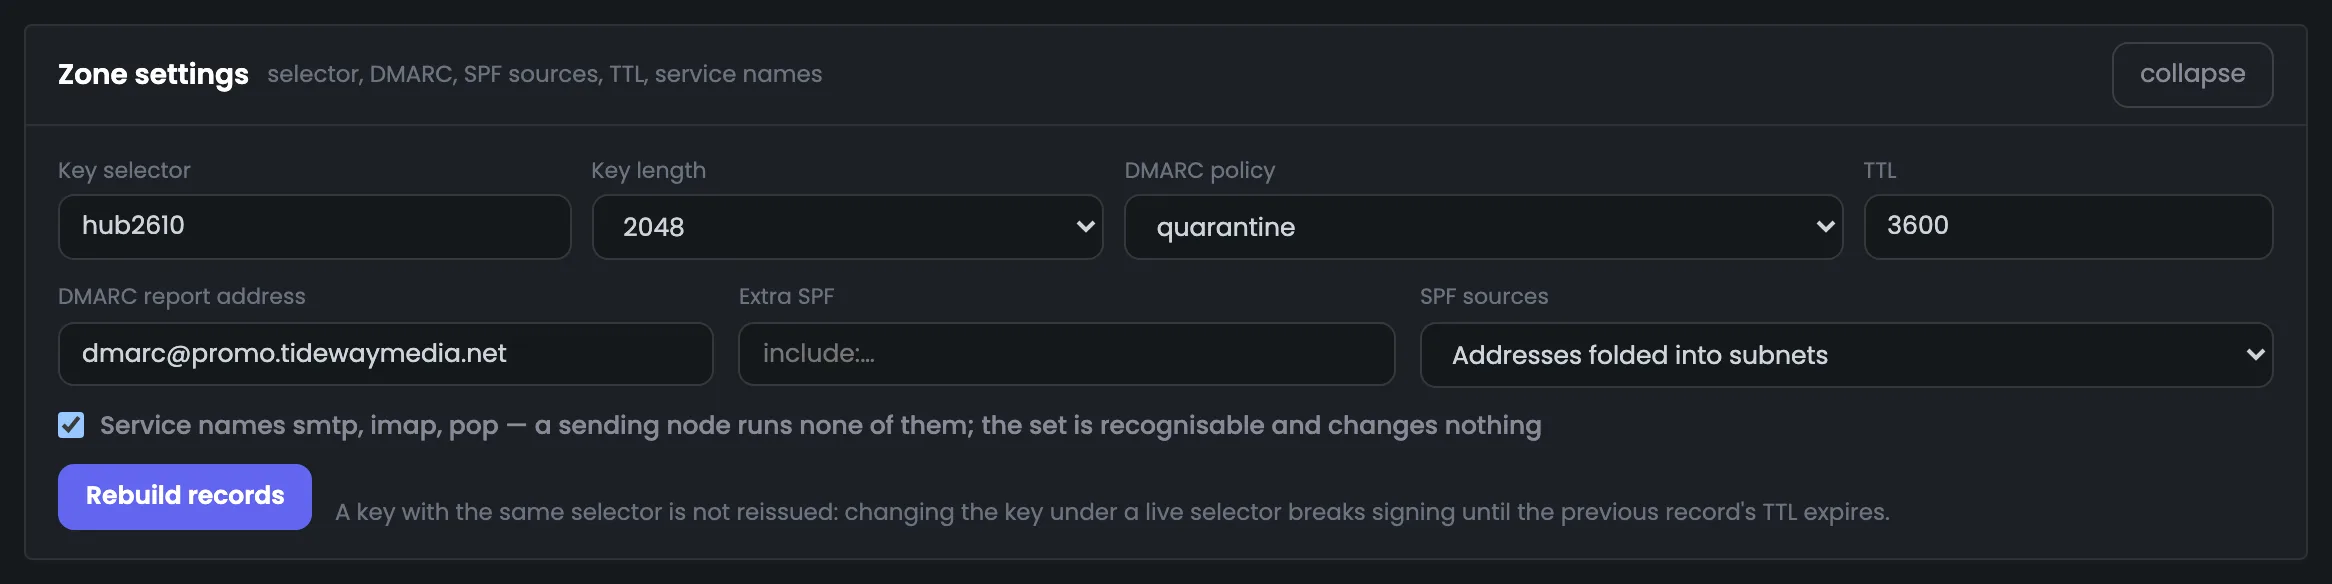
DNS zone settings are the rules the Hub uses to build this domain's records. Here you change the signing key's name and length, the DMARC policy and report address, the records' time to live, extra SPF sources and the smtp, imap, pop service names. After a change, the records are rebuilt by the new rules with the “Rebuild records” button. A key with the same name isn't reissued in the process: there's a separate action for changing the DKIM key. For example, if you need to tighten DMARC or add another sending source to SPF, you change the rule here, then rebuild the records and export them to the zone.
 Enlarge
A DKIM signing key needs to be changed from time to time, and in a way that mailbox providers never see a signing error. The Hub issues a new key under a new name (selector), waits until its record is visible in DNS, and all that time messages are signed with the previous key. Here you see both keys, their state, and the log of each check — what each DNS server answered.
This is what a DKIM key change looks like in the zone records. The “signing” filter shows the records of both keys — the previous hub2604 and the new hub2610 — and whether they're visible in DNS. Google already sees the new key, but Cloudflare doesn't yet, so messages are still signed with the previous key. Signature checks at mailbox providers pass without errors, and the Hub switches signing to the new key only after its record becomes visible. Another MTA's public key is added when the domain signs mail not only through the Hub: then its record must also be in DNS next to the Hub's keys.
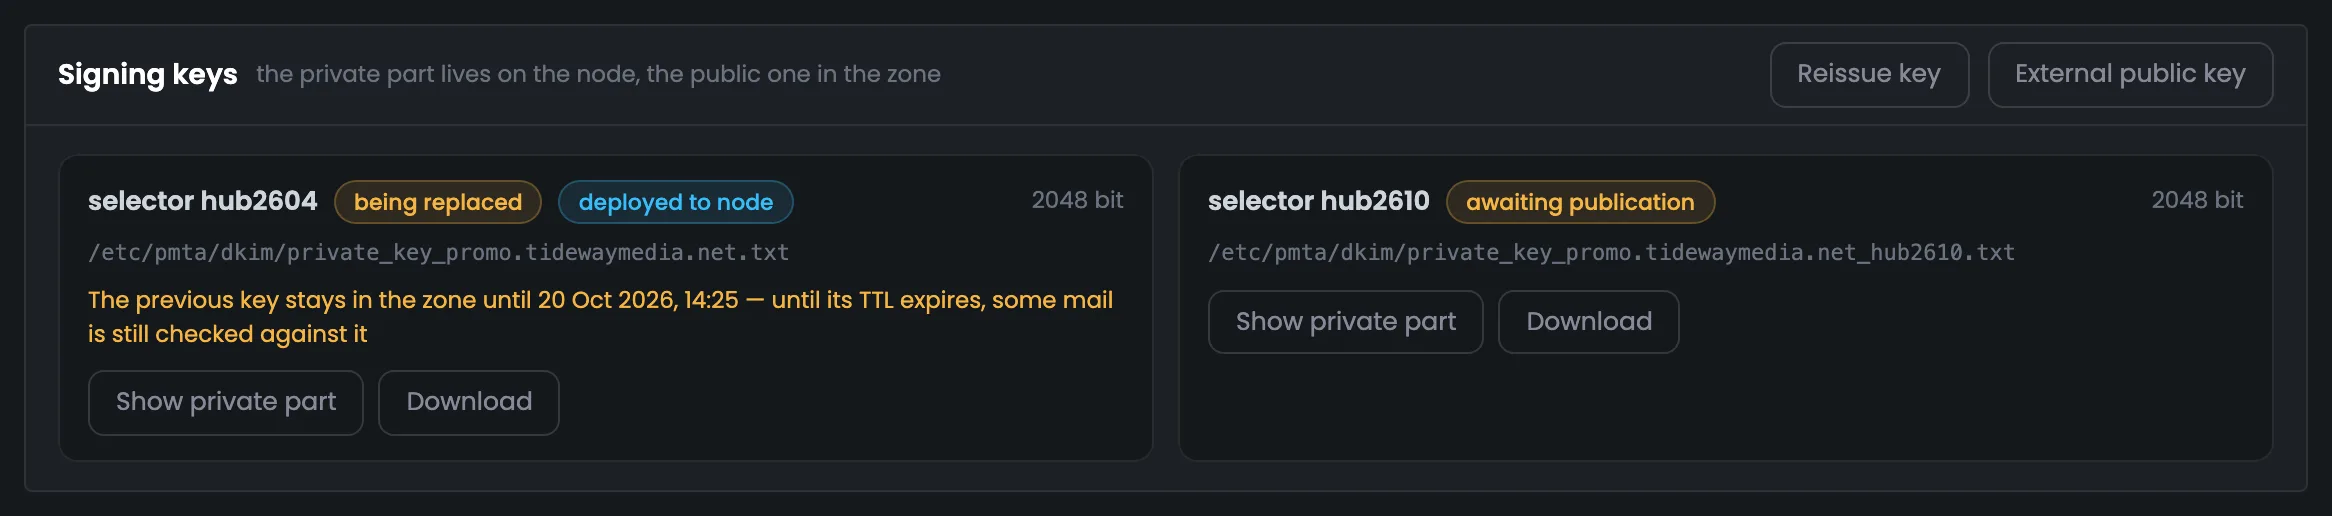
EnlargeAll of the domain's DKIM signing keys and their state on one screen. The previous key is being replaced but stays deployed on the server, and the Hub keeps its record in DNS until it expires from DNS servers' caches; the new key is awaiting publication. Here you can also reissue a key under a new name or add a public key from another MTA. For PowerMTA, the private part of the key is a file on the server — the path is shown, and the key can be displayed and downloaded; for MailerQ, it's stored in the cluster database. Usually there's nothing to do here: just wait until Cloudflare sees the new record too, and run the check again. Both keys and their state are also listed among the domain's signing keys.
 Enlarge
The previous DNS record is kept for a period tied to the TTL.
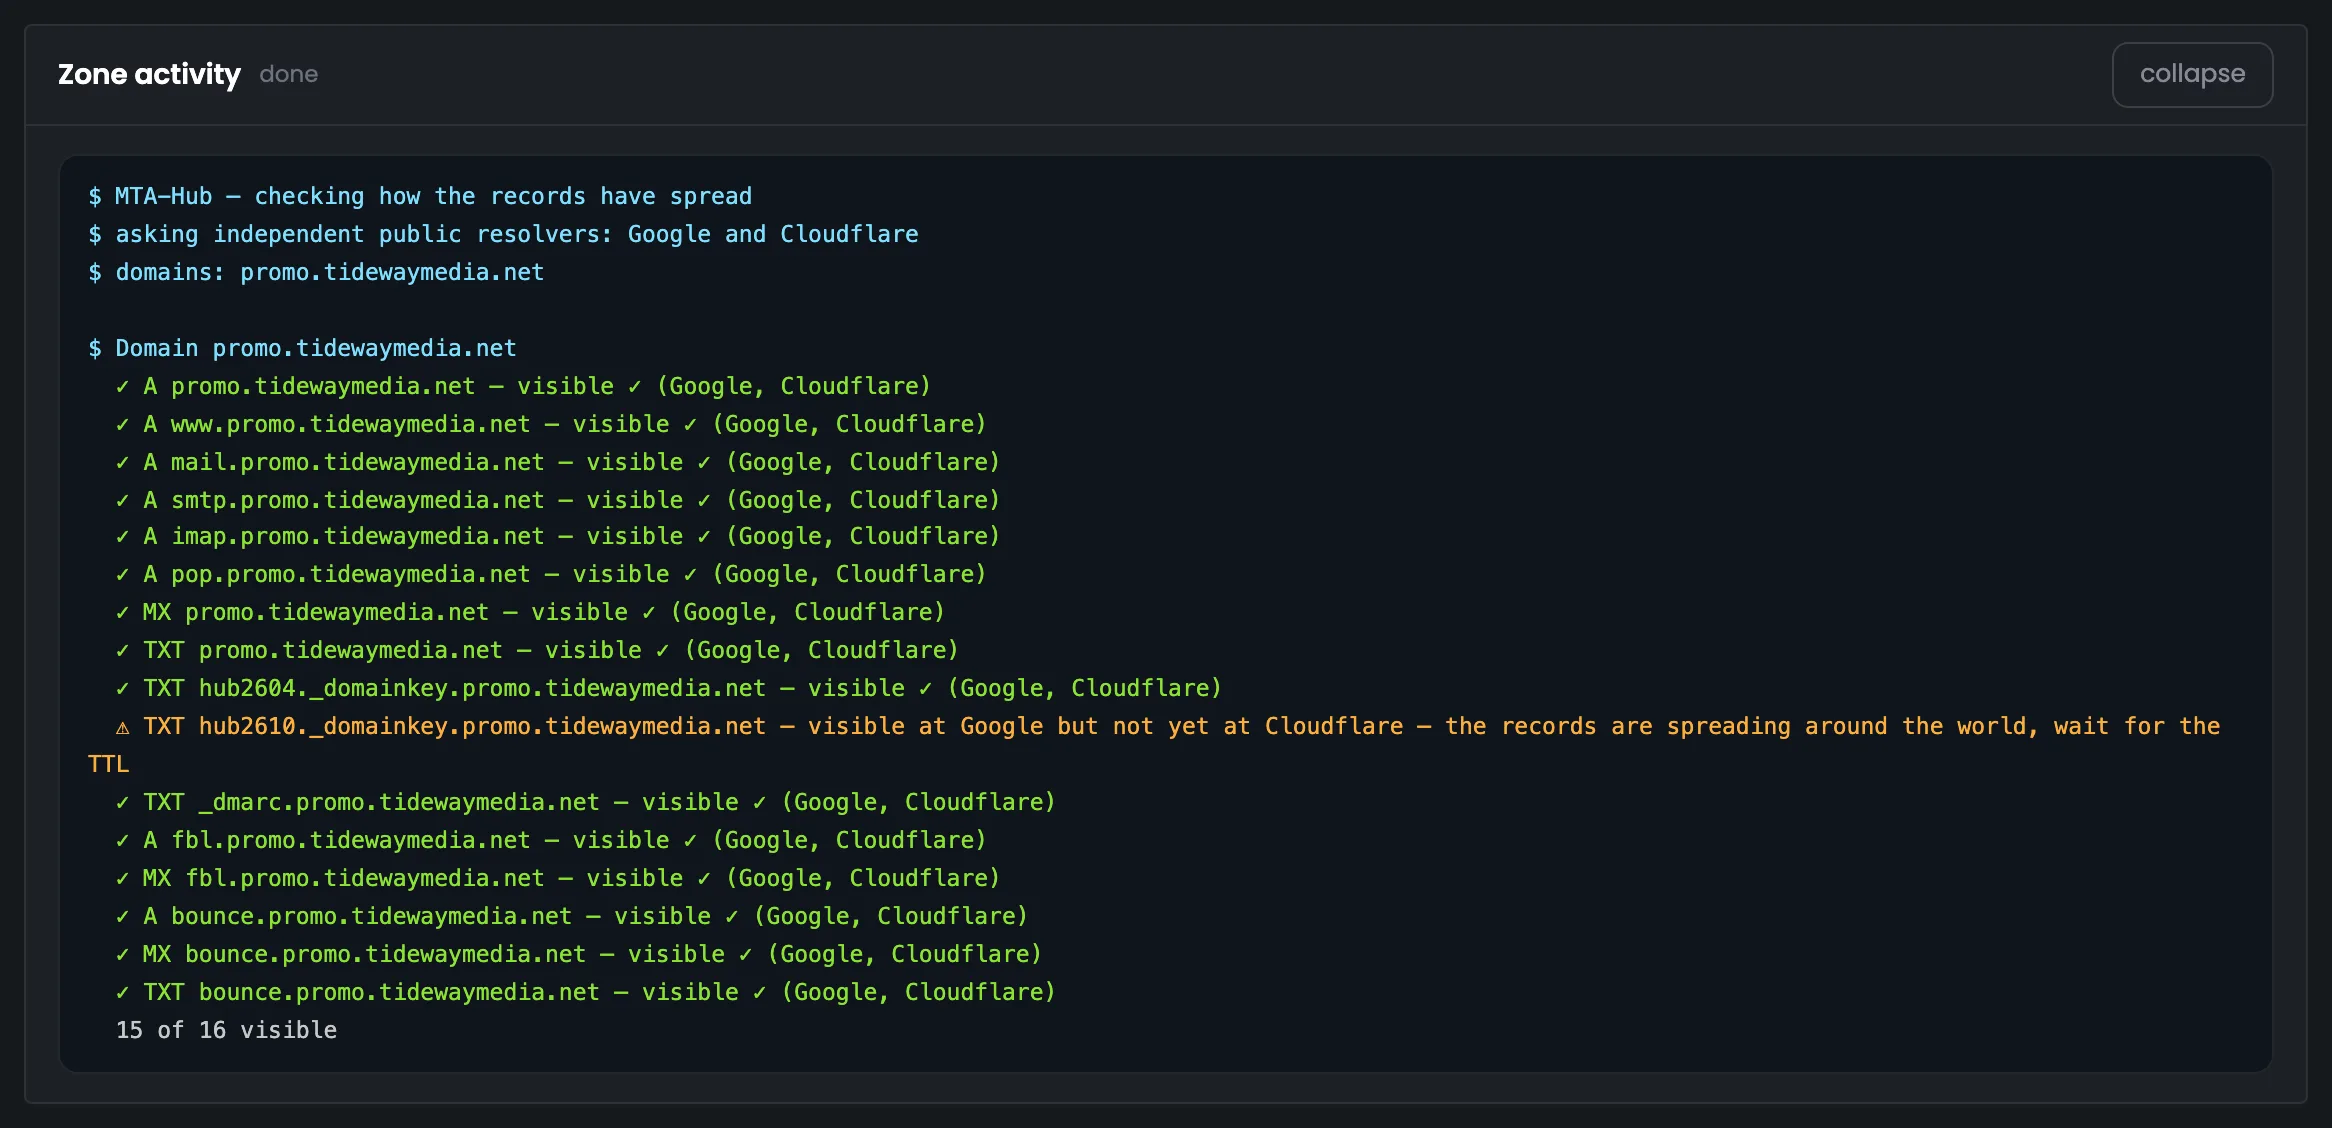
The log of the domain's last task shows exactly what the Hub did with the zone and how it ended. In the example it's the check after a key change: for each record you see what Google and Cloudflare answered, and the overall result “15 of 16 visible”. If the task covered several domains, the card shows the shared header and the part that belongs to this domain. The log shows which record still isn't visible everywhere, and you can run the check again. If a record isn't visible at either Google or Cloudflare, it's no longer a delay: export that record again from the domain card and check once more.
 Enlarge
A domain's zone can be kept on your own name servers or in a DNS provider's panel, and you can change the place. Here the Hub also shows records that are in the zone but that it didn't create — for example, a second SPF from a previous mailing service — and lets you remove them. And a special case: domains that send mail through proxies need their own subdomain for each proxy.
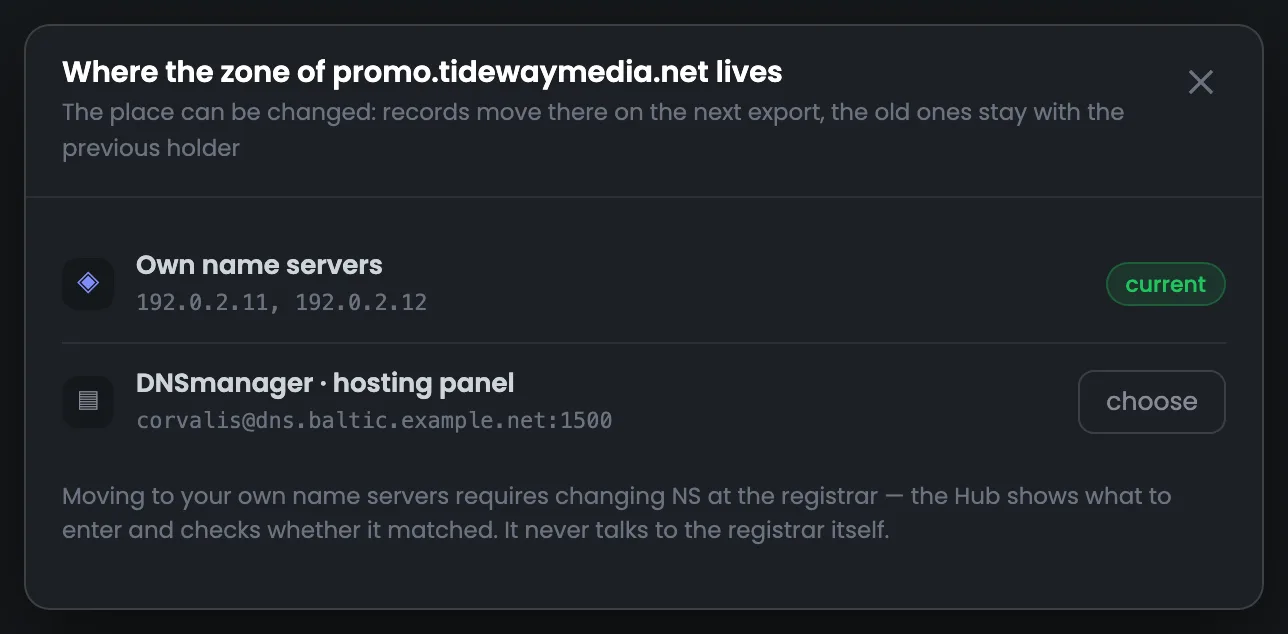
Here you choose where the domain's zone is kept: on your own name servers running PowerDNS, or in a DNS provider's panel through a connected DNS account. You can change the place — the records move there with the next export. To move to your own name servers, you need to change the NS at the registrar: the Hub shows you what to enter and checks whether the delegation matches. The Hub itself changes nothing at the registrar — the domain owner does that. You move a zone when transferring it from a provider's panel to your own name servers or back; more on this on the “Name servers” and “DNS accounts” pages.
 Enlarge
Every night the Hub compares the whole zone and finds records it didn't create — for example, leftovers from a previous mailing service. In the example, the provider's zone for id.corvalis-bank.org has a second SPF next to the Hub's record, and two SPF records on one domain break mail checks. Ticked records are deleted with one button; before deleting, the Hub compares the zone once more and restores its own records. A deletion in DNS can't be undone, so first make sure no other service needs the record. If the domain used to send through another service, look here first: old SPF records and signing keys often stay in the zone after you switch email platforms.
 Enlarge
Check what the records are for before deleting: this changes a live DNS zone.
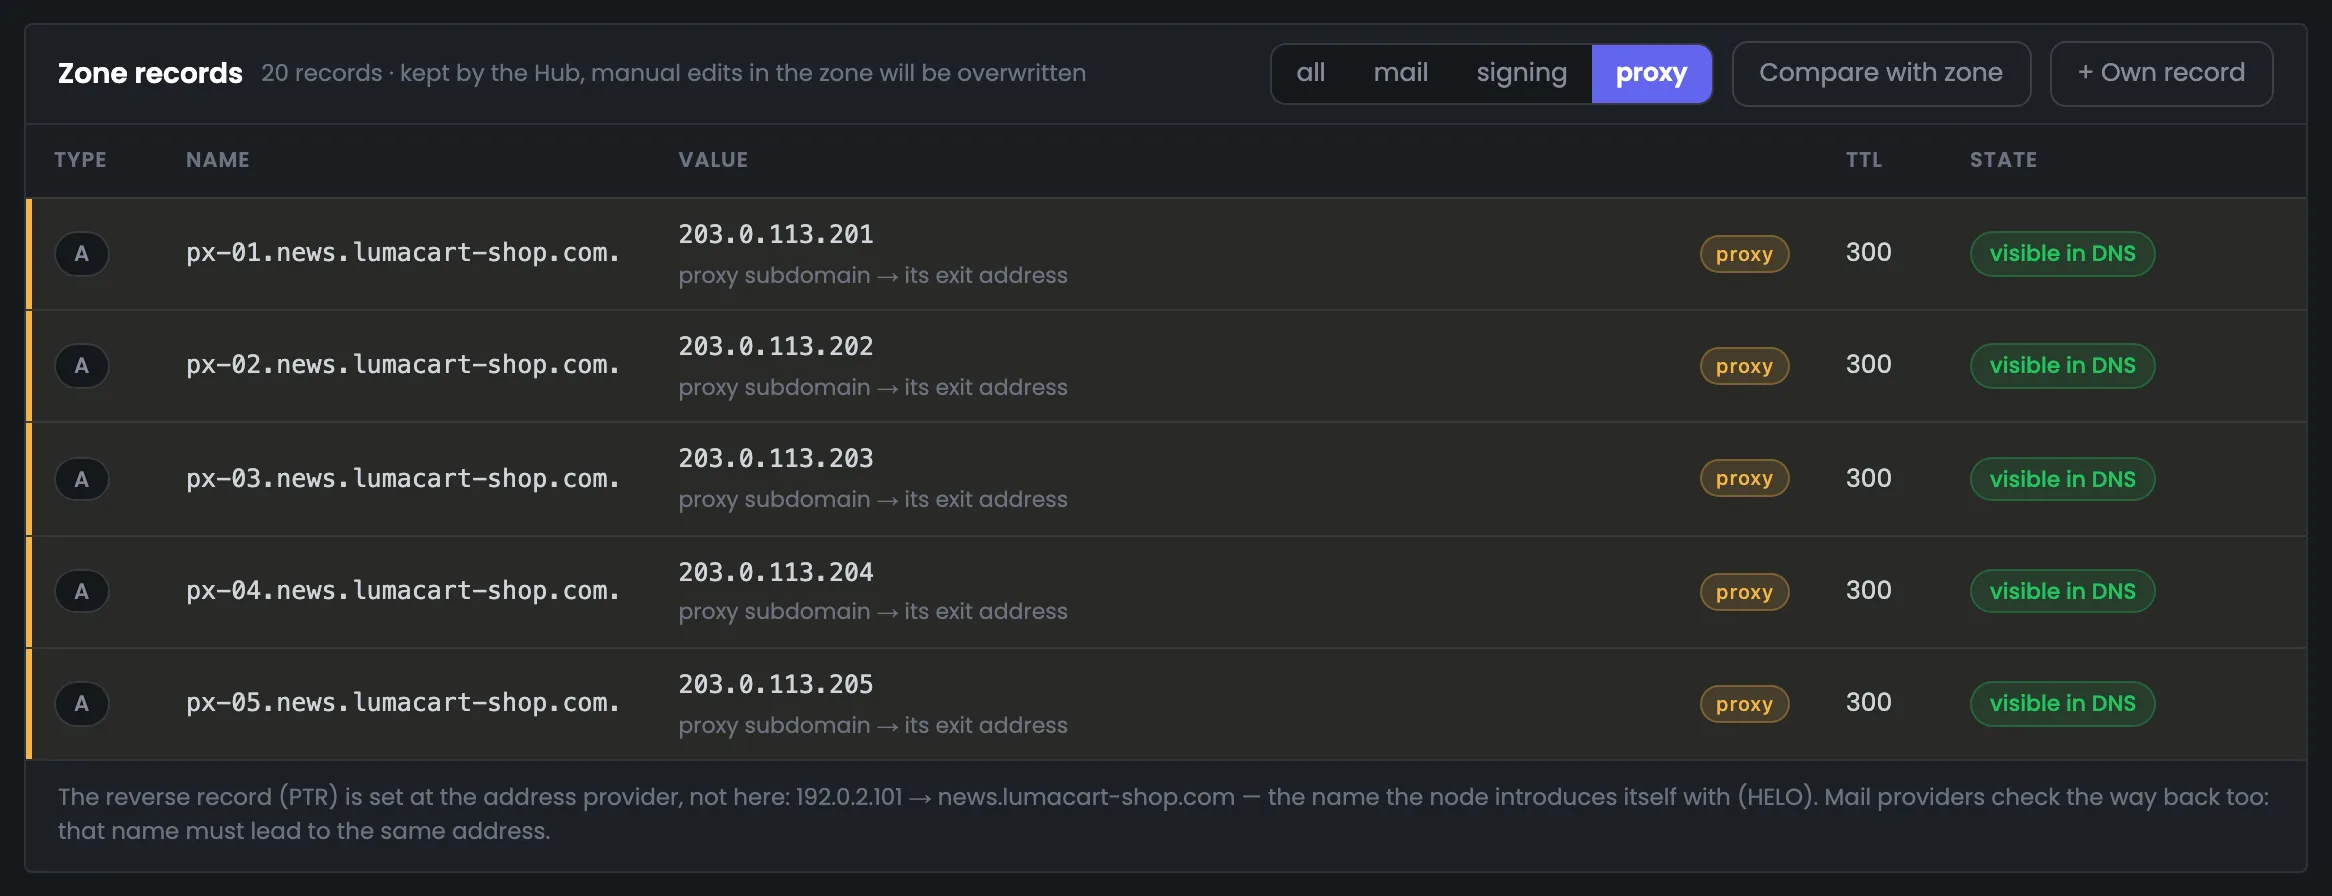
DNS for sending through proxies: if a domain sends mail through proxies, it needs separate records. For each proxy the Hub creates a subdomain pointing to the proxy's external address, and adds the proxy addresses to the domain's SPF. This is the name the server introduces itself with to the mailbox provider when sending through the proxy. In the example news.lumacart-shop.com has five proxies, and their records are highlighted in yellow: a domain can have more of them than all the other records combined. The short time to live — 300 seconds — lets you change a proxy address quickly: the new value spreads through DNS servers' caches in minutes, not hours.
 Enlarge
06 / Questions about DNS
About how often checks run, signing keys, reverse DNS records and moving a DNS zone.
The Hub builds A, MX, SPF, DKIM and DMARC, plus service subdomains for bounces, complaints and proxies. The set depends on the node, its addresses, connected proxies, signing keys and the settings of the specific domain.
No. When you add a domain, the Hub builds the record set and issues the key. Publishing is a separate action — for one domain or a selected group. Before it starts, you see where the records will be sent.
Record visibility through Google and Cloudflare is checked nightly at 05:40 in the panel's time zone, and when you click “Check in DNS”. Extra records in the zone are found by the nightly comparison. PTR and delegation to your own NS are checked every hour. The interface shows the time of each check.
During the check, the public DNS servers answered differently: for example, Google already returns the new record, while Cloudflare doesn't yet. You can run the check again. This status refers to the two DNS servers being checked; it doesn't mean every DNS server on the internet was queried.
The new key is issued under a new selector. Until its record is visible at Google and Cloudflare, messages are signed with the previous key. The old DNS record is kept for a transition period based on the TTL. The state of both keys is shown on the domain card.
The PTR is set by the hosting provider or another provider of the IP address. The Hub shows the expected value and checks that the forward and reverse records match. The PTR itself is changed at the address provider.
Yes. Records found beyond the Hub's plan can be selected and deleted. Before the operation the Hub compares the zone contents again. First check that no other service uses these records: deleting changes a live DNS zone.
Yes. Choose the new place on the domain card; the records will be sent there next time. When moving to your own name servers, you also need to change the NS at the registrar. The Hub shows the values needed and checks the delegation result.
07 / Next stage